This tutorial will explain how to use the NumPy tile function (AKA, np.tile or numpy tile).
Without getting into any of the details yet, let me explain what NumPy tile does.
NumPy tile creates a new array by repeating an input array
At a very high level, the NumPy tile function creates a new NumPy array by repeating the input array.
However, the exact details of how the function works and what it does are a little more complicated.
Having said that, this tutorial will cover several different topics to help you learn how to use np.tile properly. It will provide you with a quick review of NumPy arrays. It will explain the syntax of np.tile. After showing you the syntax, it will show you step-by-step examples.
Contents:
- A quick review of NumPy arrays
- Introduction to NumPy tile
- The syntax of np.tile
- NumPy tile examples
- NumPy tile FAQ
If you’re in a hurry, you can click on any of the links above and it will take you to the appropriate location in the tutorial.
Ok … let’s start the tutorial with a quick review of NumPy.
A quick review of NumPy arrays
NumPy is a very commonly used tool for doing data manipulation in Python.
More specifically, NumPy provides a toolkit for working with numbers in Python.
NumPy provides tools for organizing and manipulating numeric data
The NumPy package essentially provides tools for organizing and manipulating numbers.
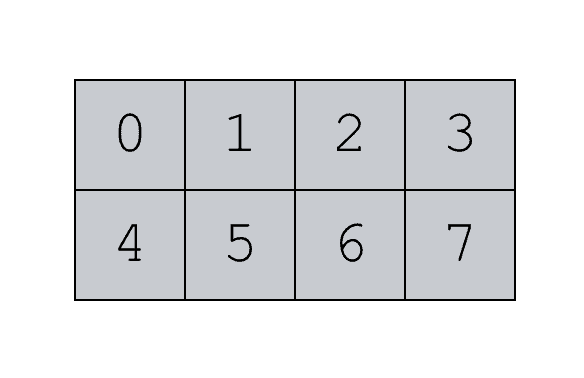
The heart of NumPy is what we call a NumPy array. A NumPy array is just a special Python object for storing numbers in a row-and-column format.
The best way to mentally visualize a NumPy array is thinking about a grid of numbers:
Again, NumPy provides a lot of tools for creating these arrays. There’s the NumPy zeros function, which creates NumPy arrays that contain all zeros. There’s the NumPy ones function, which creates NumPy arrays that contain all ones. And there’s the NumPy arange function which creates arrays that contain ranges of numbers. Those are just a few examples though.
Many NumPy functions are for manipulating existing NumPy arrays
Many of the other NumPy functions are used for manipulating NumPy arrays that already exist.
There are many examples of this, like NumPy reshape, which changes the shape of a NumPy array. In addition to Numpy reshape, NumPy concatenate, NumPy vstack, and NumPy hstack all combine NumPy arrays together, in one way or another.
And then there’s NumPy tile.
We can use the NumPy tile function to create a new NumPy array based on an existing NumPy array. It’s somewhat similar to NumPy repeat, but definitely different.
Let’s talk about exactly what NumPy tile is and why we use it.
A quick introduction to NumPy tile
Let’s take a closer look at NumPy tile and how it works.
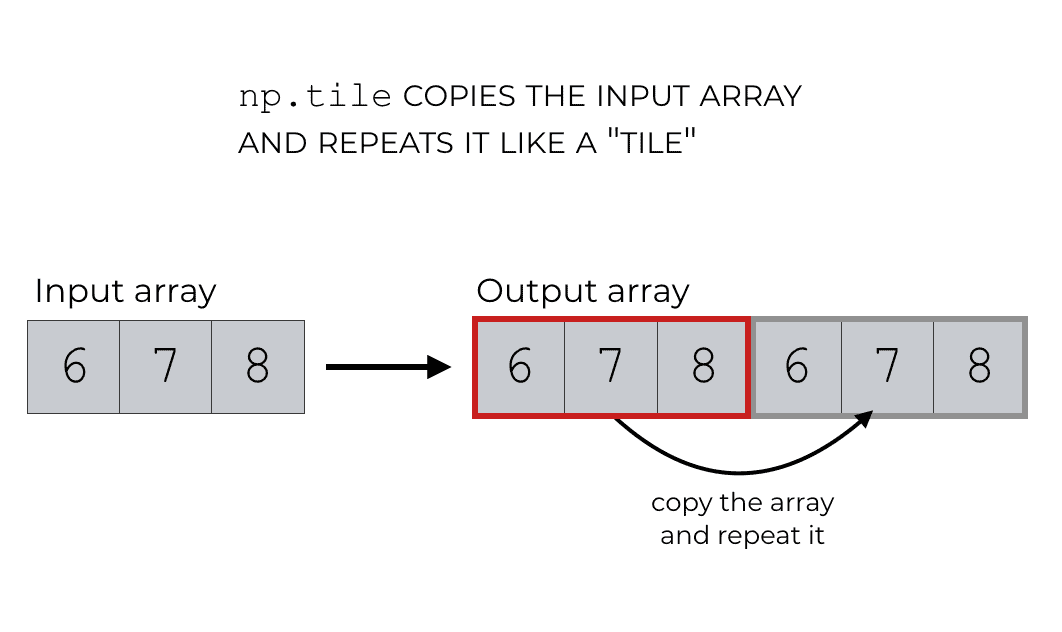
Put simply, the NumPy tile function creates new NumPy arrays that contain little copies of an input array.
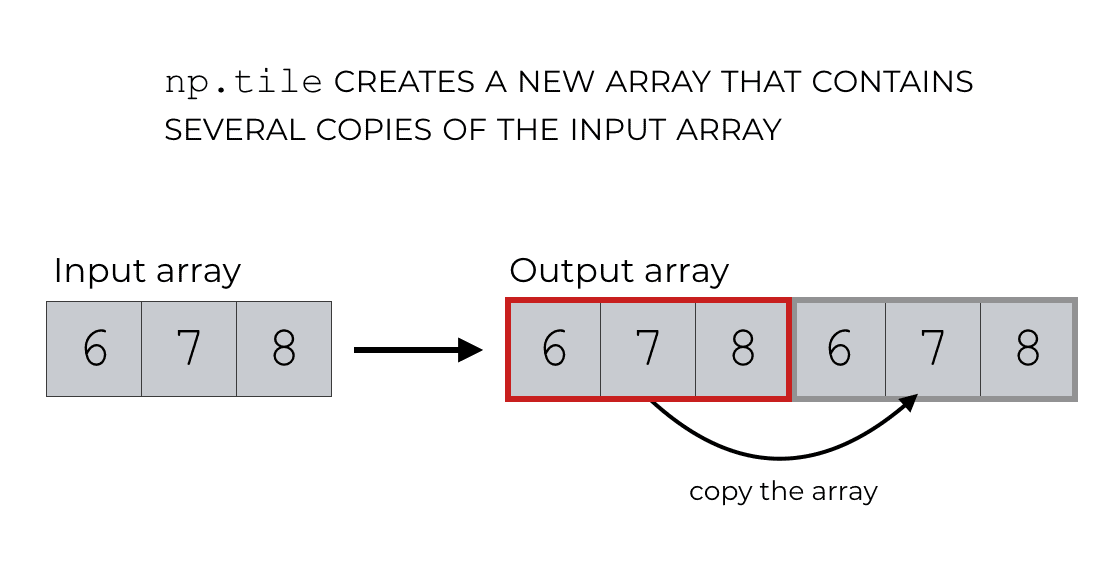
The input array is treated like a “tile” …. a little unit that can be copied and repeated into a grid format.
So when we use the NumPy tile function, it’s not repeating the individual elements in the way that NumPy repeat does.
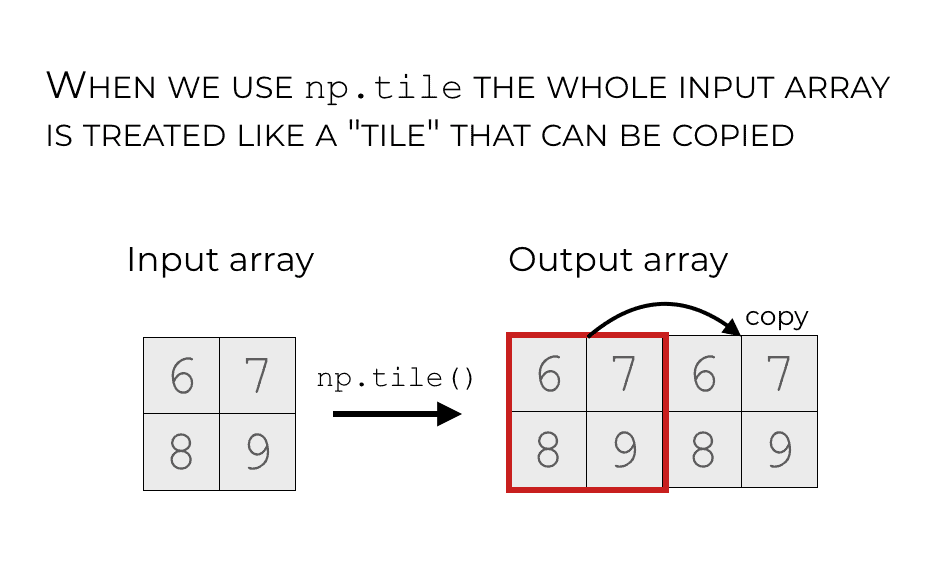
Again, Numpy tile takes the whole input array and copies everything (including the order of the elements) and repeats that whole structure within the output array.
This enables you to do things like copy an entire 2-dimensional NumPy array and repeat it in the output.
It’s possible to copy the input array once (like in the above image).
But you can also copy the array multiple times, like this:
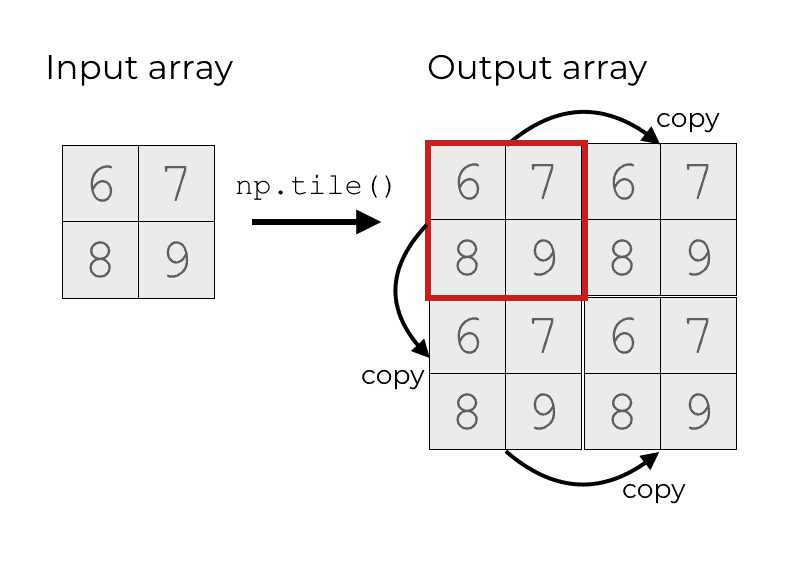
Exactly how we tile the array though is determined by how we use the syntax.
That being the case, let’s take a look at how the code for np.tile works.
The syntax of np.tile
The syntax of the NumPy tile function is fairly simple, but at the same time, it’s not immediately easy to understand.
Part of that is because you need to “wrap your mind” around how the function works ….
… and the other reason is that the parameter names are often not used.
In any case let’s take a close look at everything.
To call the NumPy tile function, you’ll commonly use the syntax np.tile().
Keep in mind that this assumes that you’ve imported NumPy with the code import numpy as np. If you instead import NumPy with the code import numpy, you’ll have to refer to the function as numpy.tile() instead. Just remember that how you call the function depends on how you’ve imported NumPy!
(Throughout this explanation of the syntax, I’ll mostly refer to the function as np.tile, but I might alternatively call it numpy.tile. They are both essentially the same.)
So we call the function with the function name np.tile().
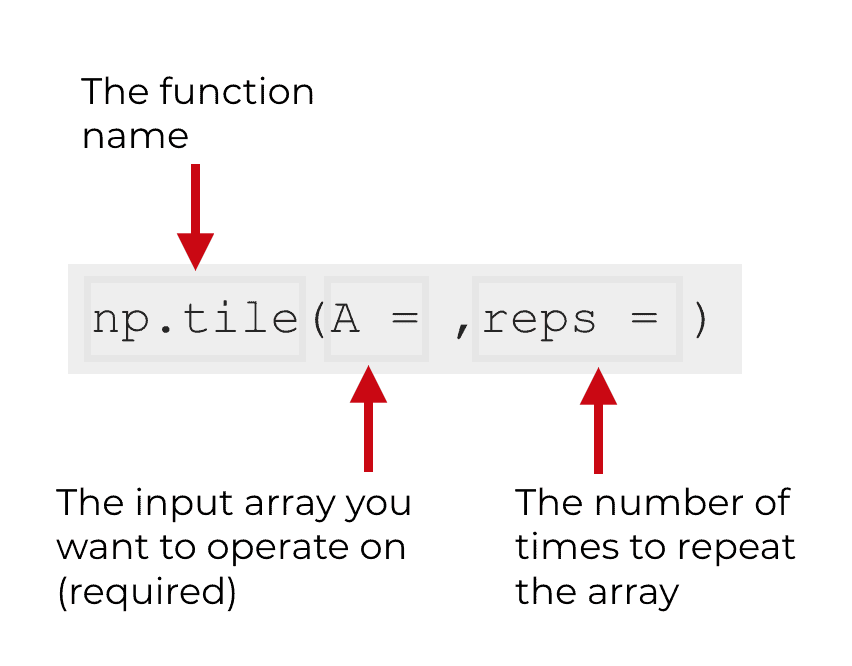
Then inside of the function are two parameters that enable you to control how the function works: A and reps.
Let’s talk about those parameters in more detail.
The parameters of np.tile
The np.tile function really only has two parameters:
Areps
Let’s talk about them individually.
A (required)
The A parameter enables you to specify the input array.
This array will essentially function as the “tile” that gets copied and repeated inside of the output array.
Technically, NumPy will allow you to provide any “array like input” to the A parameter.
In Python, “array like inputs” include:
- NumPy arrays
- Python lists
- Python tuples
No matter what, the output will still be a NumPy array, but np.tile is fairly flexible in terms of the types of inputs that it will operate on.
Note that NumPy requires you to pass something to this parameter. So you must provide an argument to the A parameter.
However, like many parameters in Python functions, you do not explicitly need to type the “A” parameter. This means that you can pass an argument to the A parameter by position. If you do this, the first argument to the function will be treated as the argument to the A parameter. (If this is confusing, look at the examples to see how this works.)
reps
The reps parameter enables you to indicate how to repeat the input array.
That includes how many times to repeat it, but also the structure of the tiled output.
To do this, you will pass an integer or an “array like” object to reps.
It will be easiest to understand by looking at examples, but let me quickly explain.
If you provide an integer n to reps, then it will simply copy the array n times, horizontally. So if you set reps = 2, it will produce an output with two instances of the input array, tiled horizontally.

But remember: you can also pass an “array like” object to reps.
That means that you can pass a list or a tuple to reps. When you do, the first number in the tuple is the number of repeats downwards and the second number in the tuple is the number of repeats across.

And if you have more than two numbers, it will actually repeat into a greater number of dimensions! So you can actually use np.tile to create 3-dimensional or multi dimensional NumPy arrays.
That’s a little more complicated, so we’re not going to cover that …. we’ll stick to 1D and 2D arrays here, for the sake of simplicity.
Ok. Now that you’ve seen how the syntax works, let’s take a look at some proper examples of NumPy tile.
Examples of how to use NumPy tile
NumPy tile isn’t terribly hard to understand, but it can be a little bit confusing in the beginning.
That’s why we’re going to start with very simple examples and then slowly increase the complexity. In the later examples, you’ll start to get more of a sense of how np.tile works.
Examples:
- Tile a list of numbers horizontally
- Tile a 1D NumPy array horizontally
- How to tile an array vertically
- Tile an 1-d input both vertically and horizontally
- Tile a 2-dimensional array vertically and horizontally
Run this code first
One quick note … make sure that you import NumPy properly.
In order for the following examples to work properly, you need to import NumPy with the following code:
import numpy as np
Ok … let’s start with a very simple example.
EXAMPLE 1: Tile a list of numbers horizontally
First, we’re going to repeat a simple Python list horizontally.
I’m going to use a list here because I think that it makes the syntax more intuitive if you can actually see the numbers in the input. It makes it easier to directly compare the input to the output.
The input list will contain three numbers: [6, 7, 8].
We’ll repeat this two times, horizontally. To do this, we’ll set reps = 2.
Ok. Let’s take a look at the code.
np.tile(A = [6,7,8], reps = 2)
This creates the following NumPy array as an output:
array([6, 7, 8, 6, 7, 8])
As you can see, the output array contains the original input numbers – 6, 7, and 8 – repeated two times.
But notice how they are repeated.
The elements of the input are not repeated individually, such that the first element is repeated two times and then the second element is repeated two times (i.e., [6, 6, 7, 7, 8, 8]). That’s how the NumPy repeat would repeat the input.
No. NumPy tile repeats the input as if it is copying the original input as a coherent unit, including the original order of the elements.
The input array (in this case, a list) is treated like a small ’tile’ that can be copied and repeated.
Here, because we’ve set reps = 2, it only copied the array one extra time … meaning the total number of repeated ’tiles’ is 2.
Note: NumPy tile copied the array horizontally
Notice one thing.
NumPy tile copied the array horizontally. This is the default behavior if you only provide an integer as the argument to the reps parameter. It just tiles the input horizontally.
That will change though when we look at more complex examples, with an array of numbers as the argument to reps. We’ll see that in future examples.
EXAMPLE 2: Tile a 1D NumPy array horizontally
Very quickly, I want to re-do example 1 with a proper NumPy array as an input instead of a list.
Recall that in example 1, we ran the code with a list as the input.
Also remember that NumPy tile will accept any array like input as the argument to the A = parameter. So it will accept a list, a tuple, or a NumPy array.
To reinforce this point, let’s redo the example with a NumPy array.
First, let’s just create a simple NumPy array:
simple_array = np.array([6,7,8])
If you print this out, with print(simple_array), you’ll see that it contains the same elements as the list in example 1: [6 7 8]. However, if you check the data type with the code type(simple_array), you’ll see that simple_array is an numpy.ndarray … i.e., a NumPy array.
Ok. We have our NumPy array. Let’s use np.tile.
np.tile(A = simple_array, reps = 2)
OUT:
array([6, 7, 8, 6, 7, 8])
As you can see, the array of input numbers – 6, 7, and 8 – have been tiled across.
This code is effectively the same as np.tile(A = [6,7,8], reps = 2). The only difference in this case is that we’re using a proper NumPy array as the input instead of a list.
Again, I’m showing you this to reinforce the point that the np.tile function will operate on a variety of array like inputs.
EXAMPLE 3: Tile an array vertically
In this example, we’re going to take a simple 1-dimensional input and tile it downwards.
Essentially, we’re going to treat the input like a row of data, and copy the row.
To keep things simple, we’re going to use a Python list here as the input, but remember that this could also be a NumPy array.
Ok … let’s take a look at the code.
np.tile(A = [6,7,8], reps = (2,1))
OUT:
array([[6, 7, 8],
       [6, 7, 8]])
So what happened here?
Effectively, np.tile just cloned the row. But why?

Look carefully at the code we used to execute this: np.tile(A = [6,7,8], reps = (2,1)).
Specifically, look at the reps parameter.
We used the code reps = (2,1)).
This tells NumPy how many times to “repeat” the input “tile” downwards and across.
So when we type reps = (2,1)), we’re indicating that in the output, we want 2 tiles going downward and 1 tile going across (including the original tile). This will essentially just duplicate the original input downward.
The argument to reps – the tuple of numbers – tells np.tile how many times to tile the input array.
EXAMPLE 4: Tile an 1-d input both vertically and horizontally
Ok … now we’re going to make things a little more complicated.
We’re going to tile a 1-dimensional input both vertically and horizontally.
To keep things simple, we’ll use a Python list as the input, but remember again that we could use use a NumPy array as an input.
Here, we’re going to use a very simple input. Only two numbers in a list: [6, 7].
And we’re going to tile this list of numbers three times downwards and two times across.
To do this, we’ll set reps = [3,2].
If we’re treating the input list [6,7] as a “tile”, then the output will be like a 3×2 grid of those tiles.
Let’s look at the full code:
np.tile(A = [6,7], reps = [3,2])
Which produces the following NumPy array as an output:
array([[6, 7, 6, 7],
       [6, 7, 6, 7],
       [6, 7, 6, 7]])
If you carefully read example 1, example 2, and example 3, then you should probably understand this, but let me explain.
We’re treating the input list [6,7] as a “tile” … as a unit that can be copied and repeated.
![An illustration of how NumPy tile tiles the input 3 times vertically and 2 times horizontally when we set reps = [3,2].](https://www.sharpsightlabs.com/wp-content/uploads/2019/10/np-tile-3x2-example.png)
The reps parameter indicates how many times to repeat it. By setting reps = [3,2], we’re indicating that we want to repeat the input “tile” three times vertically and two times horizontally.
EXAMPLE 5: Tile a 2-dimensional array vertically and horizontally
Ok. One more example.
Here, we’re going to use a 2-dimensional array as an input.
Create NumPy array
First, let’s just create our 2-dimensional NumPy array using the NumPy array function.
np_array_2d = np.array([[6,7],[8,9]])
And let’s print out the array:
print(np_array_2d)
OUT:
[[6 7]
 [8 9]]
Essentially, np_array_2d is a 2×2 NumPy array.
Tile the array with np.tile
Next, we’re going to tile the array with np.tile.
np.tile(np_array_2d, reps = [2,2])
OUT:
array([[6, 7, 6, 7],
       [8, 9, 8, 9],
       [6, 7, 6, 7],
       [8, 9, 8, 9]])
Explanation
The output here is a NumPy array with 4 rows and 4 columns.
But take a careful look at the contents of the output array. It essentially contains four little copies of the original input: two vertically and two horizontally.
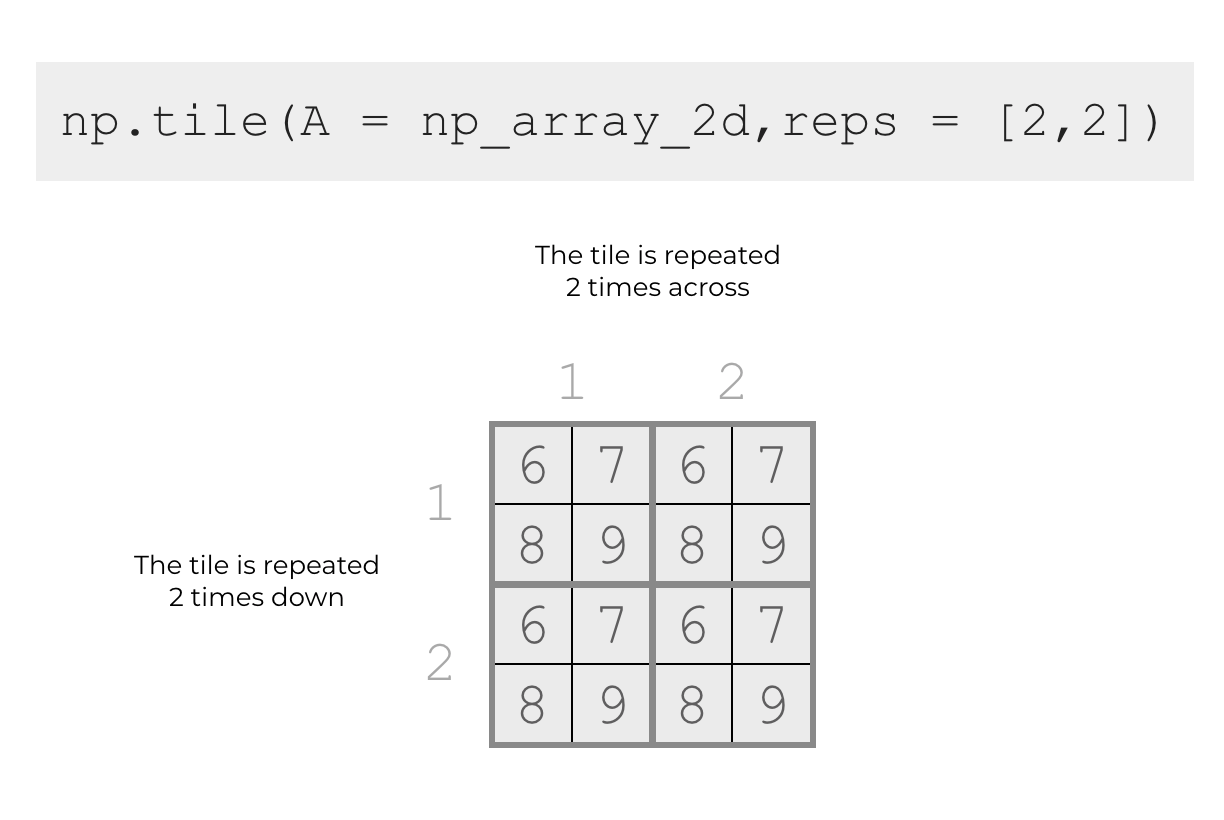
That’s really all np.tile does …. it takes an input array and uses that input as a “tile” that can be copied and repeated multiple times, in a grid format, inside of the output array.
NumPy tile FAQ
Let’s quickly address some frequently asked questions about NumPy tile.
Frequently asked questions:
How can I clone or duplicate a row using np.tile?
This is fairly straight forward.
We essentially covered this in example 3.
Let’s assume that you have a 1-dimensional input (a 1D NumPy array or a list).
To duplicate the row, you’ll use np.tile with reps = [2,1].
np_array_1d = np.array([6,7,8,9])
np.tile(A = np_array_1d, reps = [2,1])
OUT:
array([[6, 7, 8, 9],
       [6, 7, 8, 9]])
Obviously, you could copy the row more than twice …. to do that you’d just have to change the argument to the reps parameter.
Does np.tile work in more than 2 dimensions?
Yep.
In the examples section of this tutorial, we stuck to 1D inputs and 2D inputs, for the sake of simplicity.
Also, we only tiled those inputs into 1 or 2 dimensions.
However, you can actually use np.tile in higher dimensions.
For example:
np.tile(A = [6,7], reps = [2,2,2])
OUT:
array([[[6, 7, 6, 7],
        [6, 7, 6, 7]],

       [[6, 7, 6, 7],
        [6, 7, 6, 7]]])
To be honest, it’s a little more complicated to visualize and think about higher dimensions, so for the sake of simplicity, I’m not going to explain much about this.
Just understand that np.tile does work in more than 2 dimensions.
Learn more about NumPy
In this tutorial, I’ve explained how np.tile works in a fair amount of detail.
But np.tile is just one function in the larger NumPy system.
To really be able to use NumPy fluently, you’ll need to learn:
- How to use the NumPy array function
- What NumPy axes are, and how NumPy axes work
- How to summarize NumPy arrays
- How to reshape NumPy arrays
There’s quite a bit to learn!
Moreover, there’s a lot more to learn about other parts of the Python data science stack, like matplotlib, Pandas, and sci-kit learn.
For more Python data science tutorials, sign up for our email list
If you want to learn the Python data science stack, then sign up for our email list.
Here at Sharp Sight, we regularly publish tutorials about:
- NumPy
- Pandas
- Base Python
- Scikit learn
- Machine learning
- Deep learning
- … and more.
When you sign up for our email list, you’ll get our tutorials delivered directly to your inbox.
Ready to learn more data science?
Sign up now.
Excellent Thank you very much
You’re welcome.