In this tutorial, I’ll explain how to use the Numpy all function (AKA, np.all).
I’ll explain the what this function does, how the syntax works, and I’ll show you clear, step-by-step examples of how to use it.
If you need something specific, just click on any of the following links. The link will take you to that specific part of the tutorial.
Table of Contents:
Having said that, if you’re somewhat new to Numpy or want all of the details, you should probably read the tutorial start to finish.
A Quick Introduction to Numpy All
Ok. Let’s start off with a quick introduction to the Numpy all function and how it works.
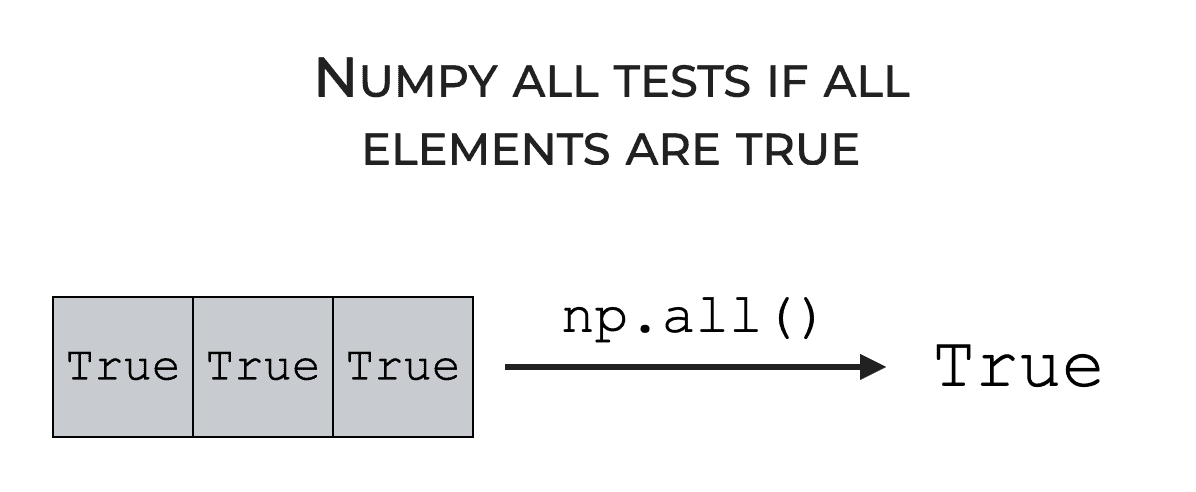
At a high level, the Numpy all function tests a Numpy array and evaluates if all of the elements evaluate as True.
This explanation might be a little confusing, so let’s quickly review a few things about Numpy to help you understand.
A Quick Review of Numpy Arrays
First, since np.all() works on Numpy arrays, let’s quickly review what Numpy arrays are.
You probably know that a Numpy array is a data structure that we use in Python.
More specifically, a Numpy array is a row-and-column data structure that we use to store numeric data.
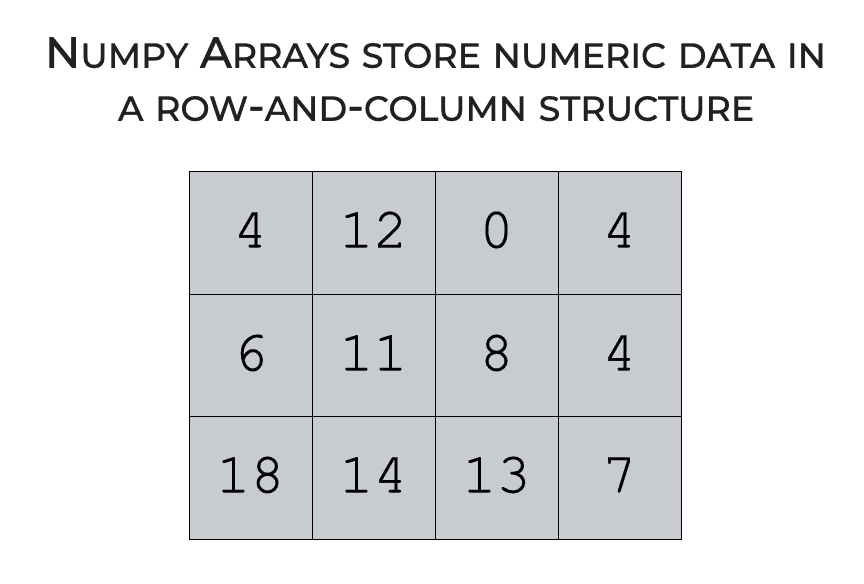
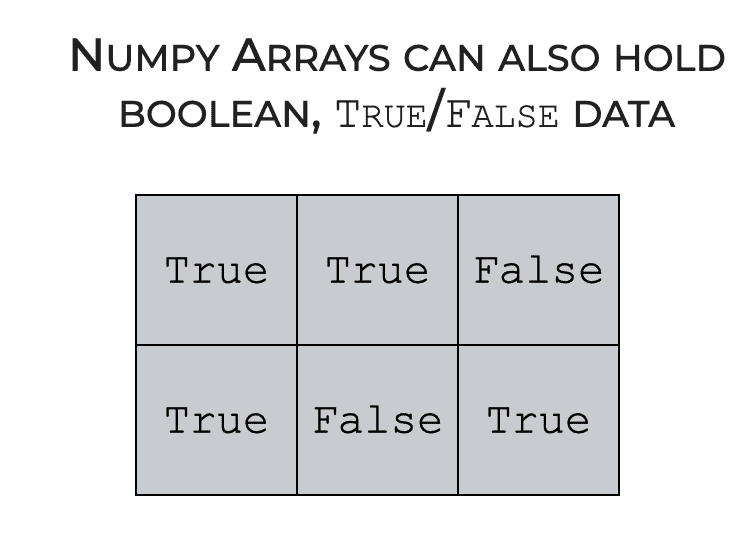
Typically Numpy arrays contain numeric data, like integers and floating point numbers. But technically, it’s possible for a Numpy array to hold other data types like boolean data.
This will be relevant later as we discuss what numpy.all does.
Numpy Arrays have Axes
Another important feature of Numpy arrays is that Numpy arrays have axes.
Axes often confuse beginners, but there’s sort of a simple way to think about them.
Numpy axes are like directions along edges of a Numpy array.
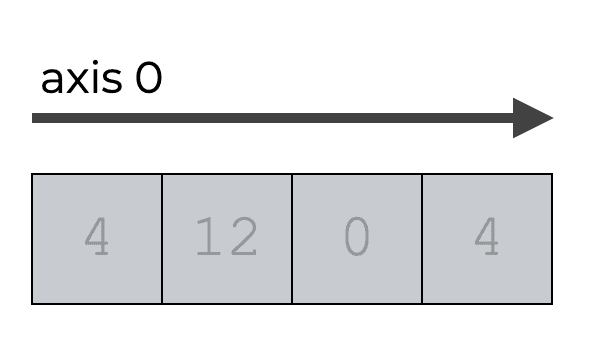
For 1-dimensional arrays, there is only one axis, axis-0. And for 1D arrays, axis-0 points horizontally.
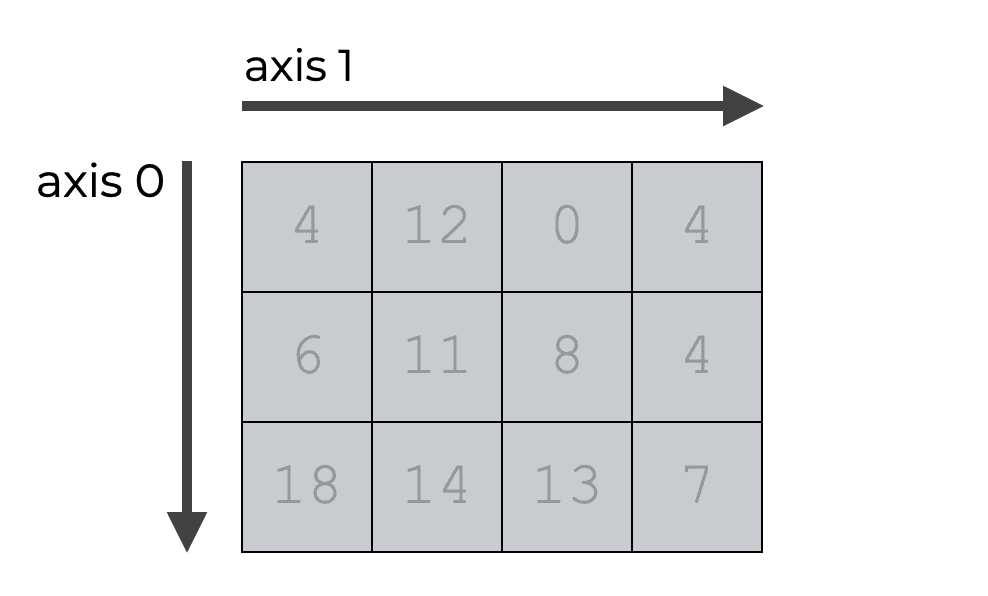
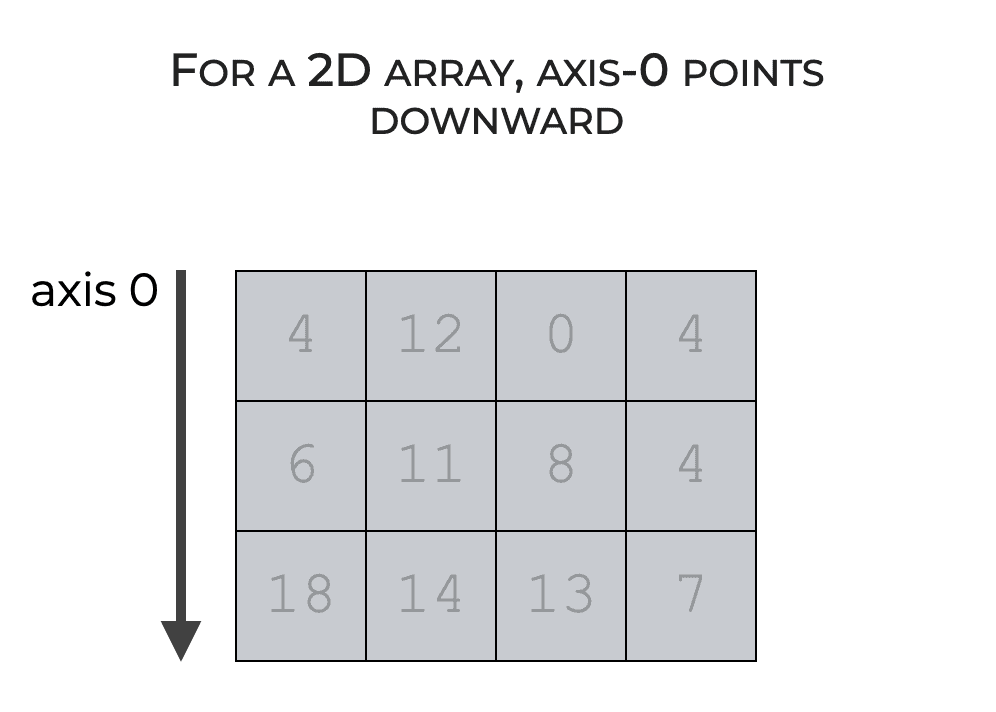
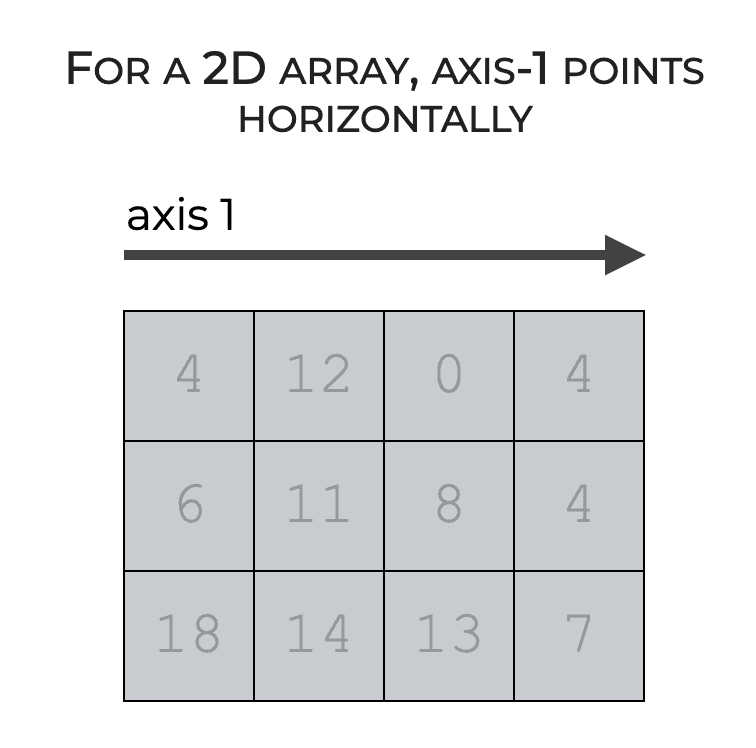
Things are a little different for 2-dimensional arrays. For 2D arrays, axis-0 points downward and axis-1 points horizontally.
This is relevant, because when we use np.all(), we can use the axis parameter, which will cause the function to operate in one direction or another. I’ll show you how this works in the syntax section and show you examples in the examples section.
The Numpy All Function Tests if All Elements Evaluate as True
Now, let’s return to the Numpy all function.
The np.all() function tests if all elements in an array are True. There are some more complicated applications of this, but the simplest way to see it is with a small Numpy array that contains boolean data. (Remember that I mentioned earlier that a Numpy array can contain boolean data.)
If we have a Numpy array with boolean, True or False data, we can use np.all() to check if all of the elements are True.
Or if we have a Numpy array with numeric data, we can test if all of the numbers meet certain conditions.
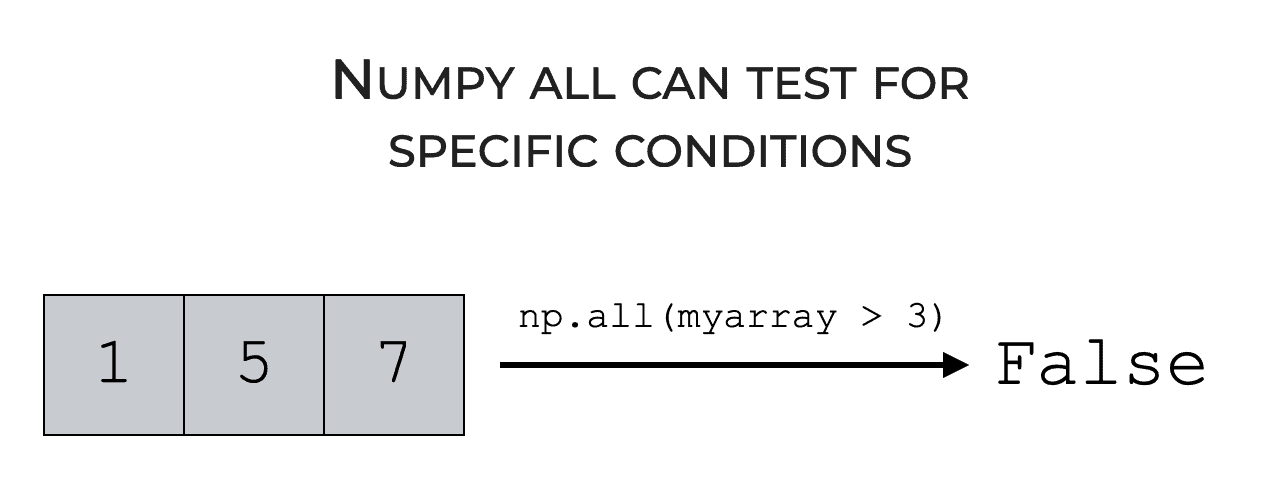
At a high level, this is what np.all does: it tests Numpy arrays to check if all elements meet some condition or evaluate as True.
Having said that, there are a few details about how it operates that can change depending on the syntax.
That being the case, lets look at the syntax.
The Syntax of Numpy All
Here, we’ll look at the syntax of the all() function, including some important parameters.
A quick note
One quick note before we dive in.
The exact form of the syntax will depend on how we import Numpy.
The common convention among Python programmers and data scientists is to import Numpy with the alias np. You can do that with the following code:
import numpy as np
After you import Numpy this way, you can call Numpy functions starting with the prefix np.
np.all syntax
Let’s start with a look at the basic syntax.
To call the function, you simply type the syntax np.all(). Again, this assumes that you’ve imported Numpy with the alias np.
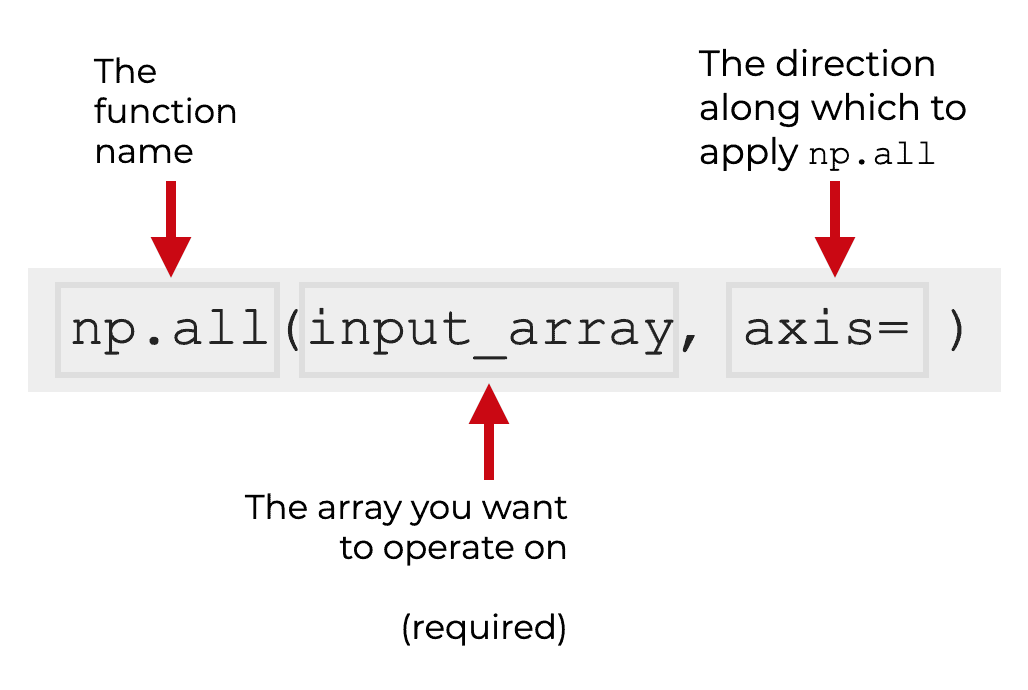
Then, inside the parenthesis, the first argument is the name of the Numpy array that you want to operate on. In the above picture, I’ve called that array input_array.
After the name of the input array, there are several parameters that enable you to slightly change how the function behaves.
The Parameters of np.all
The np.all function has a few parameters and arguments that control its behavior:
input_arrayaxisoutkeepdims
Let’s take a look at each of them individually.
input_array (required)
The first argument to the function is input_array. (Note that in the official documentation, this is called a.)
This parameter enables you to specify the input to the function.
Importantly, do don’t actually need to type this parameter name. Rather, you simply type the name of your array as the first argument to the function. I’ll show you an example of this in the examples section.
Additionally, this parameter will accept several types of inputs as valid inputs. Numpy arrays are obviously valid inputs, but this function will also accept array-like objects such as Python lists and tuples.
Also note that this is required. You must provide some kind of array-like input for this parameter.
axis (optional)
The axis parameter enables you to specify an axis along which to use np.all.
By default, this parameter is set to axis = None. In this case, the all() function will operate on all of the array elements collectively, without regard to any particular axis.
But you can also use this parameter such that np.all will operate along a particular axis.
If you set axis = 0, the function will operate in the axis-0 direction. This will not have an effect on a 1-dimensional array. But for a 2-dimensional array, this will cause np.all to operate downward. So effectively, setting axis = 0 causes the function to operate on the columns of a 2D array.
Similarly, if you set axis = 1, the function will operate in the axis-1 direction. For a 2D array or n-dimensional array, axis-1 points horizontally. So effectively, if you set axis = 1, np.all will test the rows for a particular condition.
I realize that this is confusing, so I’ll show you examples of this in the examples section.
If you’re confused about Numpy axes, you should read our tutorial that explains how axes work.
out (optional)
The out parameter enable you to specify a particular array in which to put the output.
keepdims (optional)
You can use the keepdims parameter to “keep” the original number of dimensions when you apply np.all.
Essentially, when you set keepdims = True, the output will have the same number of dimensions as the input.
The output of np.all
By default, the np.all returns a boolean value (i.e., True or False) that indicates whether all of the elements of the input are true, or meet a particular condition.
However, if you use np.all with the axis parameter on a multi-dimensional array, there are many instances where the function will output an array of boolean values instead. (I’ll show you an example of this in the examples section.)
Ok. Now that we’ve looked at the syntax of the function, let’s look at some examples.
Examples of How to Use Numpy All
Here, I’ll show you a few step-by-step examples of how to use Numpy all.
You can click on any of these links, and it will take you directly to the appropriate example.
Examples:
- Use np.all on a 1-dimensional array
- Test an array for a specific condition
- Use np.all on a 2-dimensional array
- Apply np.all along axis-0
- Apply np.all along axis-1
Run this code first
One quick thing before we get started.
As I mentioned in the syntax section, in order to use this function, you first need to import Numpy.
You can do that with this code:
import numpy as np
Once you import Numpy, you’ll be ready to run the examples.
EXAMPLE 1: Use np.all on a 1-dimensional array
First, let’s start with a simple example.
Here, we’ll apply the all() function to a 1-dimensional list of boolean values.
Note that we could use a proper Numpy array instead, but a Python list makes it easier to directly see what’s going on in the syntax.
Specifically, we’re going to apply np.all to the list [True, True, True].
Let’s take a look.
np.all([True, True, True])
OUT:
True
Explanation
This is really simple.
The Numpy all() function evaluates if all of the input elements are True.
In this case, we passed in the list [True, True, True].
Clearly, all of the values of the input are true.
As a result, np.all produced the output value True, indicating that all of the values in the input are true.
Note: if you want to try this with a proper Numpy array, you can run the following code:
my_true_array = np.array([True, True, True])
np.all(my_true_array)
EXAMPLE 2: Test an array for a specific condition
Next, let’s test an array for a specific condition.
To do this, we can actually input a boolean expression into np.all, and it will evaluate if that condition is value for all values of the Numpy array.
Let me show you what I mean.
Create array
First, let’s just create a Numpy array.
Here, instead of creating an array with boolean values, we’ll create a traditional array with numeric data.
my_1d_array = np.array([1,2,3])
And we can print it out to see the contents:
print(my_1d_array)
OUT:
[1 2 3]
As you can see, my_1d_array is a simple 1D array with three numeric values.
Run function
Next, we’re going to use Numpy’s all() function to check if a logical expression is valid for every element of the array.
np.all(my_1d_array > 2)
OUT:
False
Explanation
When we use the all() function like this, and input a boolean expression that’s operating on a Numpy array, the all() function will test if that condition is valid for every element of the array.
Here, the conditional expression my_1d_array > 2 is testing if each particular value is greater than 2.
In fact, the conditional expression inside the function actually produces a Numpy array with True/False values. I recommend that you run the following code, so you can see what’s going on:
my_1d_array > 2
OUT:
array([False, False, True])
When you run that conditional logic by itself, you can see that it outputs a Numpy array with True/False values. These True/False values show if the condition is valid for particular elements of my_1d_array.
Then np.all operates on this intermediate array, and checks if the logic is true for all of the values. In this case the values of my_1d_array are not all greater than 2, so the code np.all(my_1d_array > 2) returns False.
EXAMPLE 3: Use np.all on a 2-dimensional array
Now, we’ll use np.all on a 2-dimensional array.
This is really very similar to example 2, but here, we’ll use a 2D input instead of a 1D input.
Create array
First, let’s just create a 2D Numpy array. To do this, we’ll use Numpy arrange to generate a range of numbers, and then we’ll use the Numpy reshape method to reshape that array into a 2-dimensional shape.
my_2d_array = np.arange(start = 1, stop = 7).reshape((2,3))
And let’s print it out so you can see the contents.
print(my_2d_array)
OUT:
[[1 2 3]
 [4 5 6]]
As you can see, my_2d_array contains the values from 1 to 6, arranged into a 2×3 shape.
Use Function
Now, let’s use the all() function to test a condition for the whole 2D array.
np.all(my_2d_array > 2)
OUT:
False
Explanation
Here, the output is False, indicating that all of the elements are not greater than 2.
When we use Numpy all on a 2D array like this, it simply identifies if the condition applies to all of the elements.
Also, one other quick note. Behind the scenes, what’s actually going on is that the conditional logic itself, my_2d_array > 2, is creating a Numpy array filled with boolean values.
To see this, just type that code into Python by itself:
my_2d_array > 2
OUT:
array([[False, False,  True],
       [ True,  True,  True]])
So what’s happening, is that the conditional logic (i.e., the greater than operation) creates a Numpy array filled with boolean values. Then np.all operates on that to make a final True/False determination.
EXAMPLE 4: Apply np.all along axis-0
In this example, we’ll make things a little more complicated. Here, we’re going to use the axis parameter to apply the function along the axis-0 direction.
Create array
First, let’s just create a 2D Numpy array.
Here, we’ll create a 2-dimensional Numpy array that contains the values from 1 to 6, arranged into a 2×3 shape.
(This is the same array that we created in example 3, so if you created it there, you don’t need to create it again.)
my_2d_array = np.arange(start = 1, stop = 7).reshape((2,3))
And let’s print it out so you can see the contents.
print(my_2d_array)
OUT:
[[1 2 3]
 [4 5 6]]
So my_2d_array just has the values from 1 to 6 arranged into a 2D shape.
Use function
Now, we’re going to test some conditional logic in the axis-0 direction.
Here, we’re going to test if all of the values are greater than 2, in the axis-0 direction.
np.all(my_2d_array > 2, axis = 0)
OUT:
array([False, False, True])
Explanation
What’s going on here?
In this example, the np.all function tested the conditional logic in the axis-0 direction.
Remember that for a 2D array, axis-0 points downward.
When we use the function with the axis parameter set to axis = 0, the function will test if that condition is true for all of the elements, along that direction.
Effectively, when we set axis = 0, np.all tests if the logic is true for each column.
EXAMPLE 5: Apply np.all along axis-1
Finally, let’s apply the function along the axis-1 direction.
This will effectively apply the function along the rows.
Create array
First, let’s just create our 2D Numpy array.
(This is the same array that we created in example 3 and example 4, so if you created it already, you don’t need to create it again.)
my_2d_array = np.arange(start = 1, stop = 7).reshape((2,3))
And let’s print it out so you can see the contents.
print(my_2d_array)
OUT:
[[1 2 3]
 [4 5 6]]
my_2d_array has the values from 1 to 6 arranged into a 2D shape.
Use function
Next, we’ll apply some conditional logic in the axis-1 direction.
Here again, we’re going to test if the values are greater than 2, but now we’ll do it in the in the axis-1 direction.
np.all(my_2d_array > 2, axis = 1)
OUT:
array([False, True])
Explanation
What happened here?
In this example, the function tested the conditional logic in the axis-1 direction.
Remember that for a 2D array, axis-1 points horizontally.
When we use this function with the axis parameter set to axis = 1, the function tests if that condition is true for all of the elements along the axis-1 direction.
Effectively, when we set axis = 1, np.all tests if the logic is true for each row.
Leave your other questions in the comments below
Do you have other questions about Numpy all?
If so, leave your questions in the comments section near the bottom of the page.
Join our course to learn more about Numpy
Are you interested in learning more about Numpy?
This tutorial should have shown you how to use the Numpy all() function, but if you want to master Numpy, there’s a lot more to learn.
If you’re ready to master Numpy you should join our premium course, Numpy Mastery.
In this course, you’ll learn everything you need to know about Numpy.
- How to create Numpy arrays
- How to use the Numpy random functions
- What Numpy axes are, and how to use them
- What the “Numpy random seed” function does
- How to reshape, split, and combine your Numpy arrays
- and much more …
Additionally, you’ll discover our unique practice system that will enable you to memorize all of the syntax that you learn. Once you take this course and practice like we show you, you’ll be able to write Numpy code fluently, accurately, and 100% from memory.
Find out more here: