In this tutorial, I’ll show you how to use the Numpy cos function to compute the trigonometric cosine in Python.
I’ll explain the syntax of np.cos, how the function works, and how to use it.
If you need something specific, just click on any of the following links.
Table of Contents:
But everything might make more sense if you read the whole tutorial from start to finish. Let’s start with a quick overview of the cosine function.
A Quick Introduction to Numpy Cos
The Numpy cos function is very simple. It computes the trigonometric cosine in Python, using the Numpy package.

You can use the Numpy cos function to compute the trigonometric cosine of a single number, but you can also use it to compute the cosine for of arrays of numbers.
I’ll show you how to do both, but first, we’ll look at the syntax.
The syntax of np.cos
The syntax for the Numpy cosine function is simple:
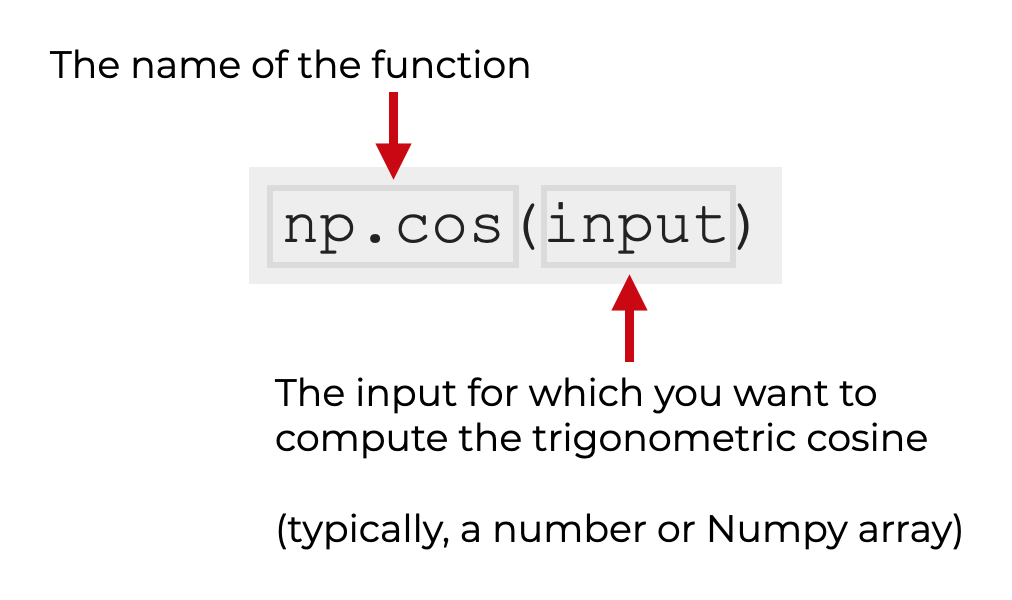
Remember that that this syntax assumes that you’ve imported Numpy with the alias np (this is the common convention).
Acceptable formats for the input
Let’s look at the acceptable input types for the np.cos function.
In the syntax explanation seen above, I’ve labeled the input value as “input“.
Importantly, this input value can take several possible forms:
- a number (integer or float)
- a Numpy array (filled with numbers)
- a Python list of numbers, or list-like object
So the np.cos function will operate on several different types of inputs.
The output of np.cos
Obviously, the Numpy cos function computes the cosine of the input.
Having said that, the exact structure of the output depends on the structure of the input.
- if the input is a single number, the output will be a single number (the cosine of the input)
- if the input is a Numpy array, the output will be a Numpy array of the cosines
- if the input is a Python list of numbers or a list-like object, the output will be a Numpy array of the cosines
Additional parameters
In addition to the input argument, np.cos some optional parameters:
- out
- where
These are somewhat rarely used, but so I won’t explain them here.
Examples of how to use the Numpy cos function
Now that we’ve looked at the syntax for np.cos, let’s look at some examples of computing cosines in Python, using Numpy.
Examples:
- Compute the cosine of 0
- Compute the cosine of π/2
- Use the Numpy cosine function on a Numpy array of values
- Plot the cosine function (using Plotly)
Preliminary code: Import Numpy and Set Up Plotly
Before you run the examples, you’re going to need to run a bit of setup code.
Specifically, you need to import Numpy so you can run the np.cos function.
You’ll also need to import Plotly (because we’ll plot the cosine function).
You also may need to set up your IDE to plot visualizations from Plotly.
Import Packages
First, we’ll import Numpy and Plotly.
You can do that with the following code:
import numpy as np
import plotly.express as px
Set Up Image Rendering
Next, you may need to set up your IDE to show Plotly visualizations (we’re going to use Plotly in example 4).
The reason that you may need to do this, is that by default, Plotly attempts to show its data visualization output in browser windows.
If you’re using an Integrated Development Environment (like Spyder, PyCharm, etc), that may be a problem. If you’re using an IDE, you may need to set it up so that Plotly visualizations display in the IDE.
Note: if you’re using Jupyter, you can skip this code!
To set up Plotly to render plots directly in your IDE as svg images, run the following code:
import plotly.io as pio
pio.renderers.default = 'svg'
After you’ve done that, you should be ready to go.
EXAMPLE 1: Compute the cosine of 0
Let’s begin with a simple example.
Here, we’re going to compute the cosine of 0:
np.cos(0)
OUT:
1.0
Explanation
This is very simple.
In this example, we’re using np.cos to compute the cosine of 0, which is 1.
(Note that the output is a floating point number, so technically, the output is 1.0)
EXAMPLE 2: Compute the cosine of π/2
Now, we’ll compute the cosine of π/2.
np.cos(np.pi/2)
OUT:
6.123233995736766e-17
Explanation
Ok. The output looks strange.
But if you look carefully, you’ll see that this number is in scientific notation, with an exponent  .
.
This is an extremely small number. Effectively, zero. Which makes sense, since the cosine of π/2 is 0.
EXAMPLE 3: Use the Numpy cosine function on a Numpy array of values
Next, we’ll compute the cosine of an array of numeric values.
Remember what I mentioned in the syntax section: Numpy cosine can operate on a single numeric value, but it can also operate on lists, list-like objects, and Numpy arrays.
Create Numpy Array
Here, we’re going to use Numpy linspace to create an array of 300 evenly spaced numbers.
x_values = np.linspace(start = -np.pi*(3/2), stop = np.pi*(3/2), num = 300)
After you run the code, x_values will contain 300 evenly spaced numbers from  to
to  .
.
Compute Cosine using Numpy
Next, we’ll use this array of x values as the input to Numpy cosine; we’ll use np.cos to compute the cosines of the inputs.
cosine_values = np.cos(x_values)
And we can take a look at the first 10 values:
cosine_values[1:10]
OUT:
array([-0.99977921, -0.99911695, -0.99801351, -0.99646937, -0.99448523,
       -0.99206194, -0.98920059, -0.98590243, -0.98216893])
Explanation
This is pretty simple.
Here, the input to np.cos is an array of numbers.
The output is the element-wise cosine of each value of that input array.
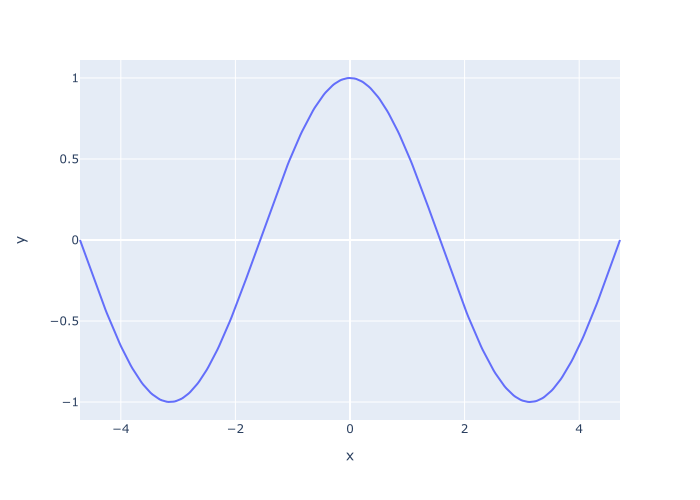
EXAMPLE 4: Plot the cosine values using Plotly
Finally, let’s plot the cosine values that we just computed in example 3.
Here, we’ll use the Plotly line function, px.line, to create a line chart of the cosine values.
px.line(x = x_values, y = cosine_values)
OUT:
Explanation
Here, we’ve plotted the cosine values that we computed with np.cos in example 3.
We used the values contained in x_values as the x-axis input to px.line.
And on the y-axis, we’ve plotted the cosine values in the array called cosine_values , which we computed with np.cos.
Leave your other questions in the comments below
Do you have other questions about how to use np.cos to compute cosine values in Python?
If so, leave your questions in the comments section below.
Join our course to learn more about Numpy
In this tutorial, I’ve explained how to compute the trigonometric cosine in Python using Numpy cos.
This should help you with computing cosines and doing trigonometric operations, but if you really want to learn Numpy, there’s a lot more to learn.
If you’re serious about mastering Numpy, and serious about data science in Python, you should consider joining our premium course called Numpy Mastery.
Numpy Mastery will teach you everything you need to know about Numpy, including:
- How to create Numpy arrays
- How to reshape, split, and combine your Numpy arrays
- What the “Numpy random seed” function does
- How to use the Numpy random functions
- How to perform mathematical operations on Numpy arrays
- and more …
Moreover, this course will show you a practice system that will help you master the syntax within a few weeks. We’ll show you a practice system that will enable you to memorize all of the Numpy syntax you learn. If you have trouble remembering Numpy syntax, this is the course you’ve been looking for.
Find out more here: