This tutorial will show you how to use the Numpy flatten method. It will explain the syntax of the method and show you how to flatten an array in Numpy.
The following is a table of contents. If you’re looking for something specific, you can click on any of the links to jump to the appropriate section.
Table of Contents:
- A quick review of Numpy
- How to Flatten Numpy Arrays
- The syntax of Numpy flatten
- Numpy flatten examples
Having said that, if you’re new to Numpy, I recommend reading the whole tutorial.
A quick introduction to Numpy Flatten
So what does Numpy flatten do?
Very simply: Numpy flatten “flattens” out a Numpy array.
To understand this though, it helps to know a few things about Numpy.
A quick review of Numpy
Let’s do a quick review of Numpy and Numpy arrays.
You probably know that Numpy arrays are a type of object that hold numeric data. Numpy arrays contain numbers in a row and column form.
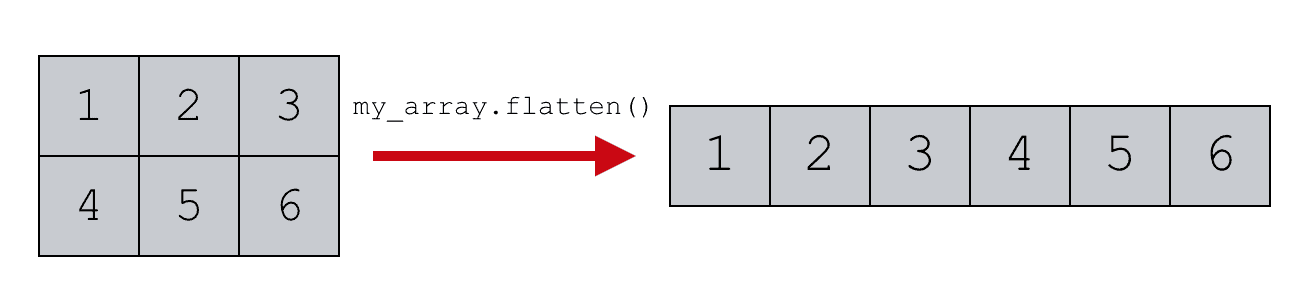
Here’s a visual example of a 2-dimentional numpy array.
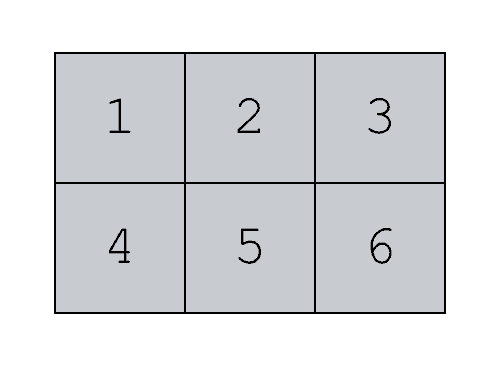
Numpy arrays can be 2-dimentional like the array above, but also 1-dimentional or n-dimentional.
We use can Numpy functions to create Numpy arrays (i.e., arrays of numeric data). And we can also use Numpy functions and methods to manipulate Numpy arrays.
Creating Numpy arrays
There are a variety of Numpy functions for creating Numpy arrays. For example, we can create arrays that contain all zeros using the np.zeros function. We can create Numpy arrays within a numeric range using np.arange. And we can create Numpy arrays out of Python lists using np.array.
Those are just a few methods (there are quite a few others).
Numpy arrays have a “shape”
It’s important to understand that Numpy arrays have a “shape.”
The shape of an array is essentially the number of rows and columns.
For example, an array with a shape of (2,3) has 2 rows and 3 columns.
Reshaping Numpy arrays
Often, when working with Numpy arrays, we need to reshape the array. That is, we need to re-organize the elements of the array into a new “shape” with a different number of rows and columns.
One common way is by using the Numpy reshape method, which enables us to specify the exact number of rows and columns of the output array. The reshape method gives us a lot of control over the output.
But there’s actually another simple way to reshape your array.
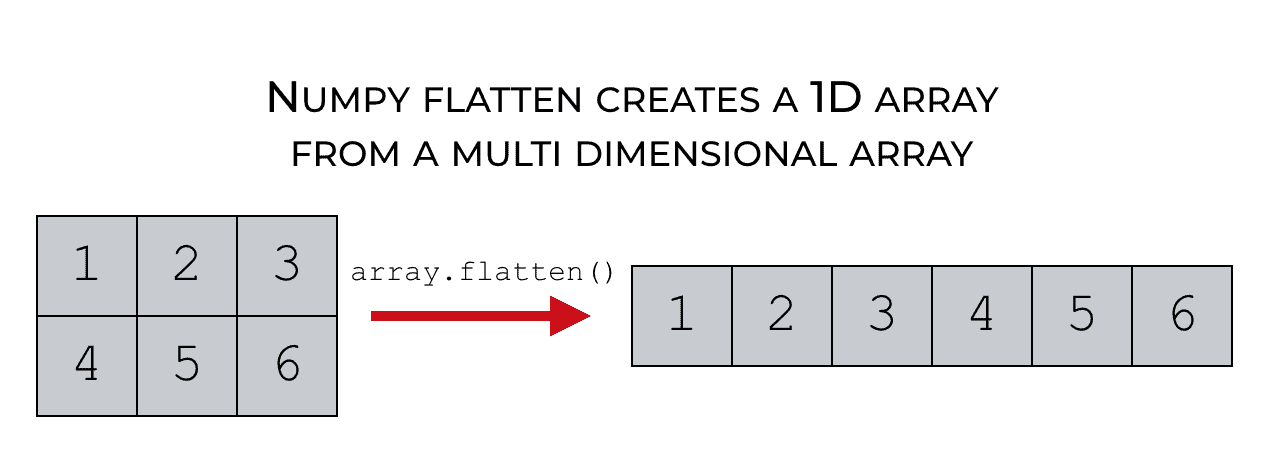
Let’s say you want to reshape your array from a 2-dimensional array (with multiple rows and columns) into a 1-dimensional array, with only one row.
There’s an easy way to do that. You can use the Numpy flatten method.
How to Flatten Numpy Arrays
So again, what does flatten do?
It just “flattens” out a Numpy array.
Numpy flatten changes the shape of a Numpy array from a multi-dimensional array, to a 1-dimensional array.
It’s a very simple tool. It really only does one thing, and the syntax is very straightforward.
Let’s take a look.
The syntax of Numpy flatten
The syntax is very simple, but before we get into it, I need to remind you of one thing.
A quick note about importing Numpy
We’re going to need to use a couple of Numpy functions going forward.
Exactly how we call those functions depends on how we import Numpy.
In the rest of this tutorial, we’re going to assume that you’ve imported Numpy with the following code:
import numpy as np
This is the common convention among almost all Python programmers who use Numpy.
When we import Numpy with the code import numpy as np, we can use the prefix np when we call our Numpy functions.
Again, that’s the convention we’ll be using in the rest of this tutorial.
Numpy Flatten syntax
When we call the Numpy flatten method, we need to call it as a method based of of an existing Numpy array.
So let’s say that you have a Numpy array called my_array.
You can type the name of the array, then use dot notation to call the method.
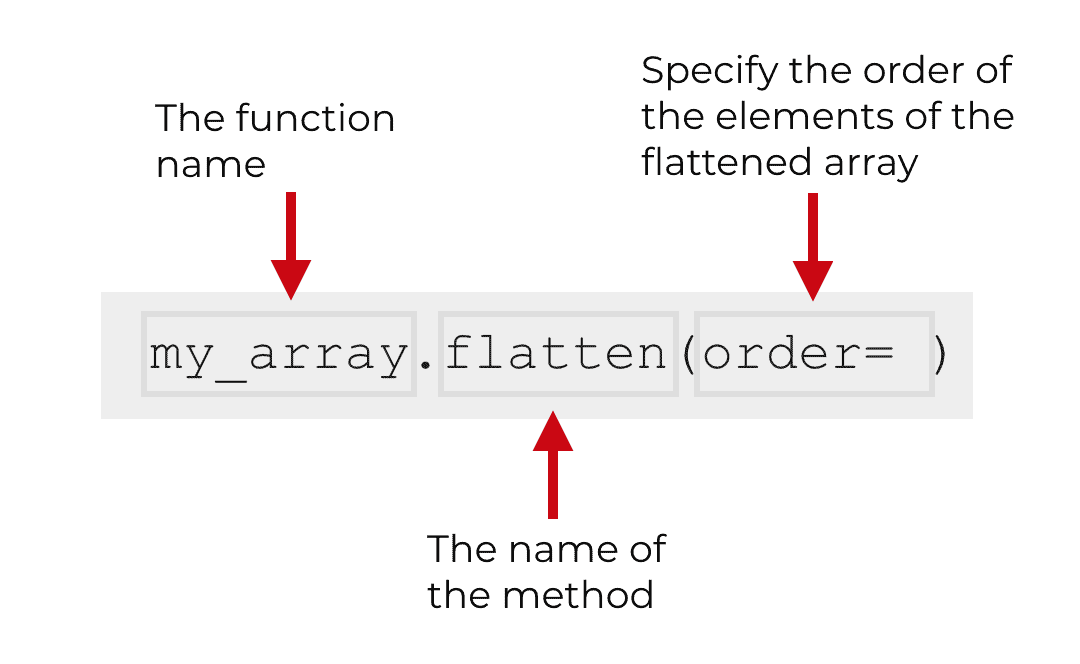
So if you have a Numpy array called my_array, you can call the method with the code my_array.flatten().
That’s basically it, with the exception of one parameter.
Let’s quickly talk about that.
The parameters of Numpy flatten
The flatten method only has one parameter: the order parameter.
Let’s talk about it.
order (optional)
The order parameter enables you to specify the order of the observations in the flattened output array.
Keep in mind that the order parameter is optional. If you don’t use it in your syntax, it will default to order = 'C'.
However, you have a few options for the order parameter. Let’s talk about two of them.
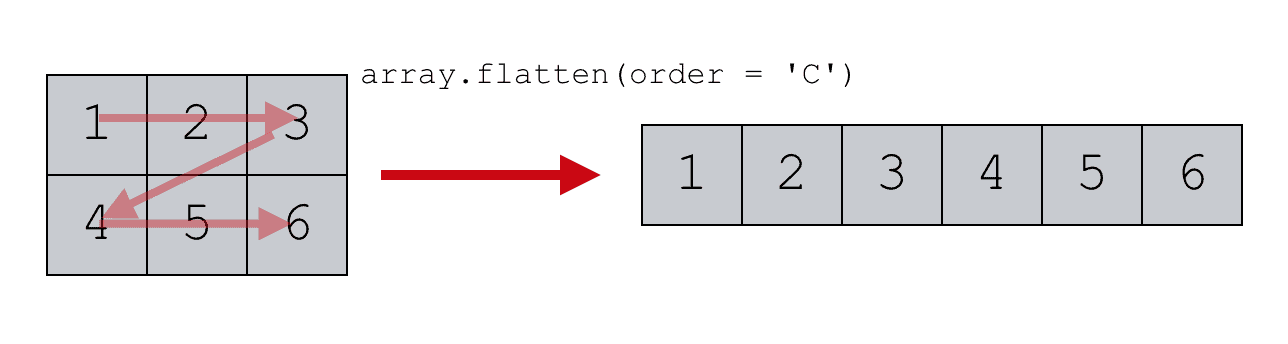
order = ‘C’
If you set order = 'C', the flatten method will flatten the elements out in a row first fashion.
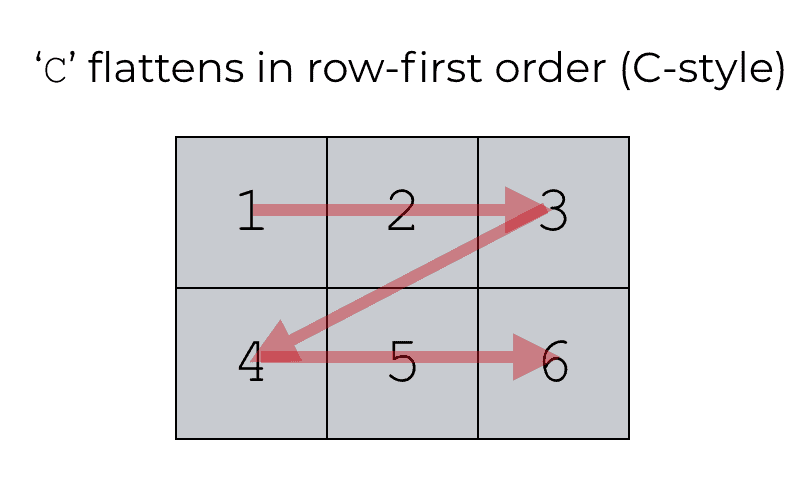
(Note that it’s called the 'C' method because this is how data are stored and retrieved in the C programming language.)
This is the default behavior, so if you do not use the order parameter in your syntax, Numpy flatten will automatically flatten your array by row.
order = ‘F’
If you set order = 'F', the flatten method will flatten the elements out in a column first fashion.
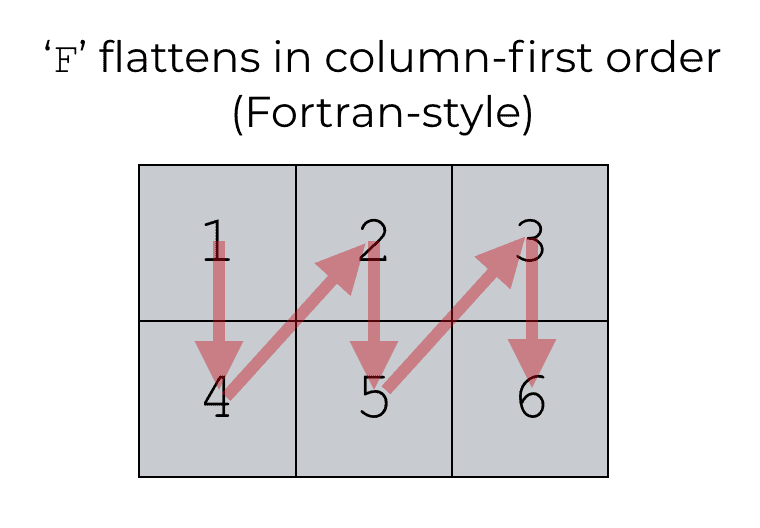
(Note that it’s called the 'F' method because this is how data are stored and retrieved in the Fortran programming language. I know. It’s old school.)
The output of Numpy flatten
The flatten method returns a new array with the elements collapsed into one dimension.
So remember: the flatten method will not directly reshape your original array. It produces a new array.
Examples of how to use Numpy Flatten
Ok. Now that we’ve taken a look at the syntax, let’s look at some examples.
Examples:
Run this code first to import Numpy
Before we run the examples, we need to import Numpy.
To import Numpy, run this code:
import numpy as np
By importing this code, we will be able to use the alias ‘np‘ in our syntax. We can use that ‘np‘ as a prefix before our Numpy functions.
(Note, this is a common convention among Numpy users.)
Run this code to create a 2D array
Before we run our example, we also need to create a Numpy array.
To do this, we’ll use the Numpy arange function to create an array of integers, and we’ll use the Numpy reshape method to reshape it into 2-dimensions.
my_array = np.arange(start = 1, stop = 7).reshape([2,3])
And let’s take a look.
print(my_array)
OUT:
[[1 2 3]
 [4 5 6]]
This is a simple, 2D array that contains the values 1 to 6.
Ok. Now let’s look at some examples.
EXAMPLE 1: Use numpy flatten to flatten a 2-d array
First, we’ll just do a simple example.
Here, we’re going to flatten a our 2D numpy array, my_array.
my_array.flatten()
OUT:
array([1, 2, 3, 4, 5, 6])
Explanation
So what happened here?
Our input array, my_array, is a 2-dimensional array with 2 rows and 3 columns.
When we use the flatten function, it just flattens it out.
Keep in mind that it does this row-wise by default.
Ultimately, the flatten method produces a new output array that has been “flattened” into 1 dimension.
EXAMPLE 2: Flatten an array by row
Next, let’s use the “order” parameter.
Here, we’ll set order = 'C' to explicitly flatten the input array by row. (Remember from the syntax explanation above that when we set order = 'C', it flattens the array row-wise).
Let’s take a look.
my_array.flatten(order = 'C')
OUT:
array([1, 2, 3, 4, 5, 6])
Explanation
When we set order = 'C', the flatten method flattens the array row-wise.
So the output is just a 1D array, with the elements reordered row-wise based on the input array.
(Note that the output here is the same as the output for example 1. That’s because if we don’t use the order parameter, Numpy flatten defaults to order = 'C'.)
EXAMPLE 3: Flatten an array by column
Finally, let’s use Numpy flatten with order = 'F'.
This will flatten the elements of the array column-wise.
my_array.flatten(order = 'F')
OUT:
array([1, 4, 2, 5, 3, 6])
Explanation
By setting order = 'F', we’re instructing the flatten method to flatten out the elements column wise.
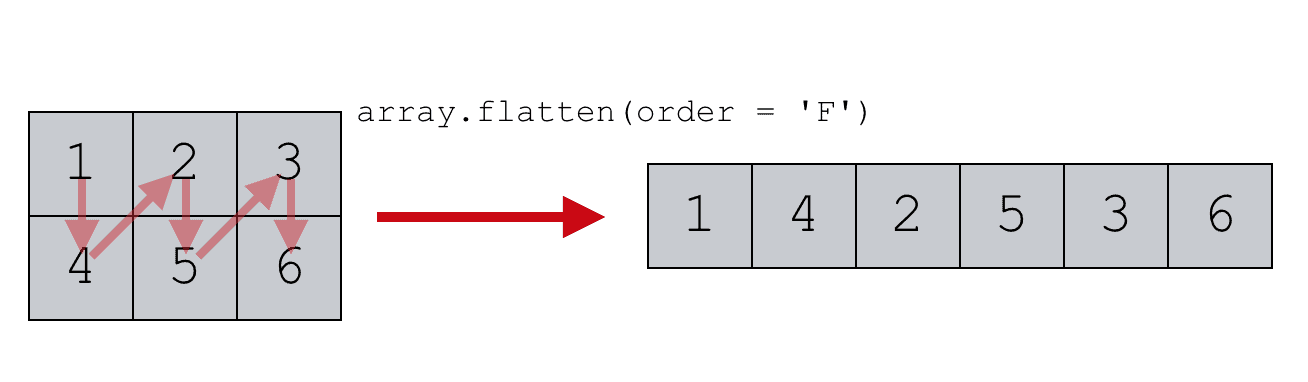
Notice that in the output array, the elements are arranged differently from the output in example 2.
In example 2, the elements were re-arranged row-wise.
However here, when we set order = 'F', the elements have been re-arranged and flattened column-wise.
Leave your questions in the comments below
Do you still have questions about the Numpy flatten method?
Leave your questions in the comments section below.
Join our course to learn more about Numpy
The examples you’ve seen in this tutorial should be enough to get you started, but if you’re serious about learning Numpy, you should enroll in our premium course called Numpy Mastery.
There’s a lot more to learn about Numpy, and Numpy Mastery will teach you everything, including:
- How to create Numpy arrays
- How to use the Numpy random functions
- What the “Numpy random seed” function does
- How to reshape, split, and combine your Numpy arrays
- and more …
Moreover, it will help you completely master the syntax within a few weeks. You’ll discover how to become “fluent” in writing Numpy code.
Find out more here:
In my case the code my_array.flatten(order = ‘F’) does not change my_array structure. But while I run the code New_array = my_array.flatten(order = ‘F’), the New_array structure changes as desired.
It indicats that, my_array.flatten() code requires some variable to hold/display, the changed shape.
Moreover, while writing the code my_array.flatten, I have to write it manually the full syntax, No normal auto pop up appears after . [dot] mark affixing my_array.
Remember, as I noted in the article, the
flatten()method does not change the original array. It produces a new output array and leaves the original array unchanged.That’s why you’re seeing this in your array called
new_array. When you use the codenew_array = my_array.flatten(order = ‘F’), you’re storing the output with the new namenew_array.Hi, great tutorial!
Just to confirm, the output for Example 3 should be {1,4,2,5,3,6} instead of {1,2,3,4,5,6}, right?
Yeah … the array elements in that image were ordered incorrectly.
Thanks for pointing that out.
Fixed.
Sharp sights keep it up.
I just found this blog not long ago when I wanted to search up the explanation of np.random.seed().
I really loved the way you broke it down… and I really understood it.
I’ve been going through your tutorials ever since and I must confess that you’re truly amazing.
Your tutorials are a good breakdown of topics that I struggle to understand when studying other books.
I’m a beginner and every bit of your tutorial makes a lot of sense… They are details that I miss out in books… You really take your time to explain them.
I was almost giving up until I stumbled across your blog post… They give me serious hope (from the ones you’ve been posting since 2016, 2017 and so on)… Thank you so much.
Please, give us more insight….
This is great to hear, Emmanuel.
Here at Sharp Sight, our goal is to help data science students master data science as fast as possible.
We have special training methods to do this in our premium courses …
But one of the other ways that we do it is with clear, careful explanation.
Here in our free tutorials, we try to explain everything so a beginner can quickly “get it”
… but we also try to avoid overly complicated details that aren’t necessary for most people.
Clear explanation is how we do things.
PS – If you like these free tutorials, share them with your friends and on social media.
Currently, we’re producing about 1 free tutorial per week.
I’d like to do 2 or 3 tutorials per week, and the best way to get there is to grow the blog audience.
So if you like these tutorials and want to see more, share them.