The NumPy linspace function (sometimes called np.linspace) is a tool in Python for creating numeric sequences.
It’s somewhat similar to the NumPy arange function, in that it creates sequences of evenly spaced numbers structured as a NumPy array.
There are some differences though. Moreover, some people find the linspace function to be a little tricky to use.
It’s not that hard to understand, but you really need to learn how it works.
That being said, this tutorial will explain how the NumPy linspace function works. It will explain the syntax, and it will also show you concrete examples of the function so you can see it in action.
Near the bottom of the post, this will also explain a little more about how np.linspace differs from np.arange.
Ok, first things first. Let’s look a little more closely at what the np.linspace function does and how it works.
Numpy linspace creates sequences of evenly spaced values within an interval
The NumPy linspace function creates sequences of evenly spaced values within a defined interval.
Essentally, you specify a starting point and an ending point of an interval, and then specify the total number of breakpoints you want within that interval (including the start and end points). The np.linspace function will return a sequence of evenly spaced values on that interval.
To illustrate this, here’s a quick example. (We’ll look at more examples later, but this is a quick one just to show you what np.linspace does.)
np.linspace(start = 0, stop = 100, num = 5)
This code produces a NumPy array (an ndarray object) that looks like the following:
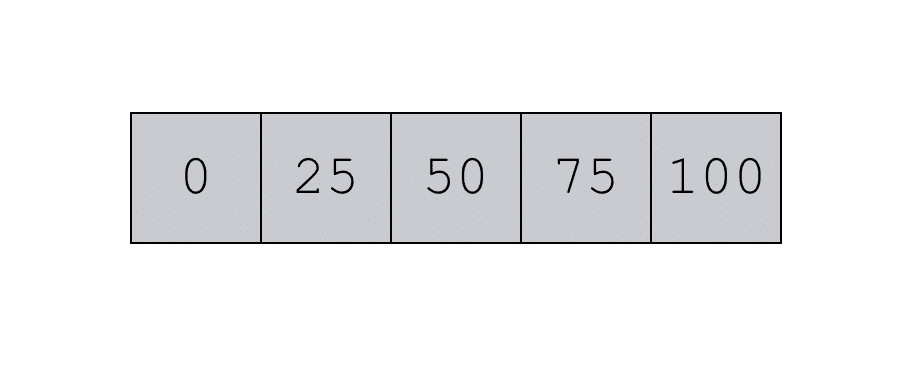
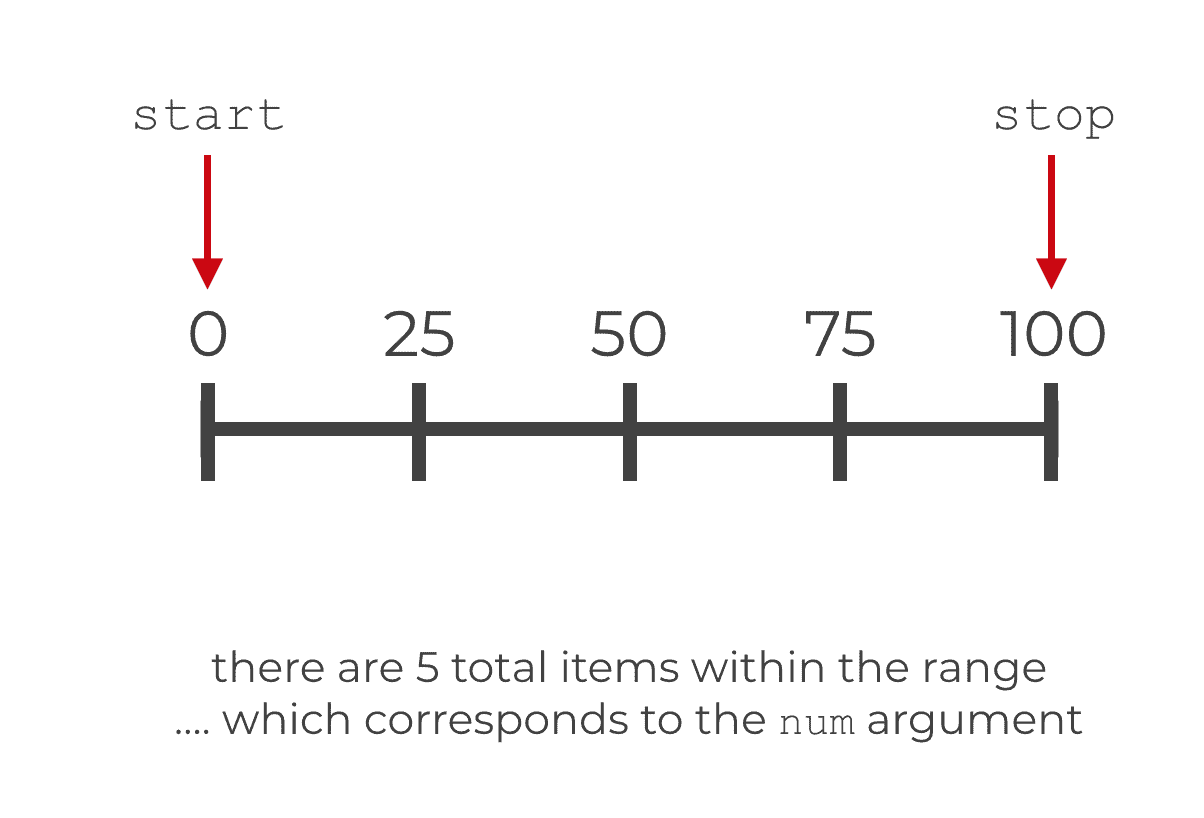
That’s the ndarray that the code produces, but we can also visualize the output like this:
So what’s going on here?
Remember: the NumPy linspace function produces a evenly spaced observations within a defined interval.
We specified that interval with the start and stop parameters. In particular, this interval starts at 0 and ends at 100.
We also specified that we wanted 5 observations within that range. So, the linspace function returned an ndarray with 5 evenly spaced elements. The first element is 0. The last element is 100. The remaining 3 elements are evenly spaced between 0 and 100.
As should be expected, the output array is consistent with the arguments we’ve used in the syntax.
Having said that, let’s look a little more closely at the syntax of the np.linspace function so you can understand how it works a little more clearly.
The syntax of NumPy linspace
The syntax of the NumPy linspace is very straightforward.
Obviously, when using the function, the first thing you need to do is call the function name itself:
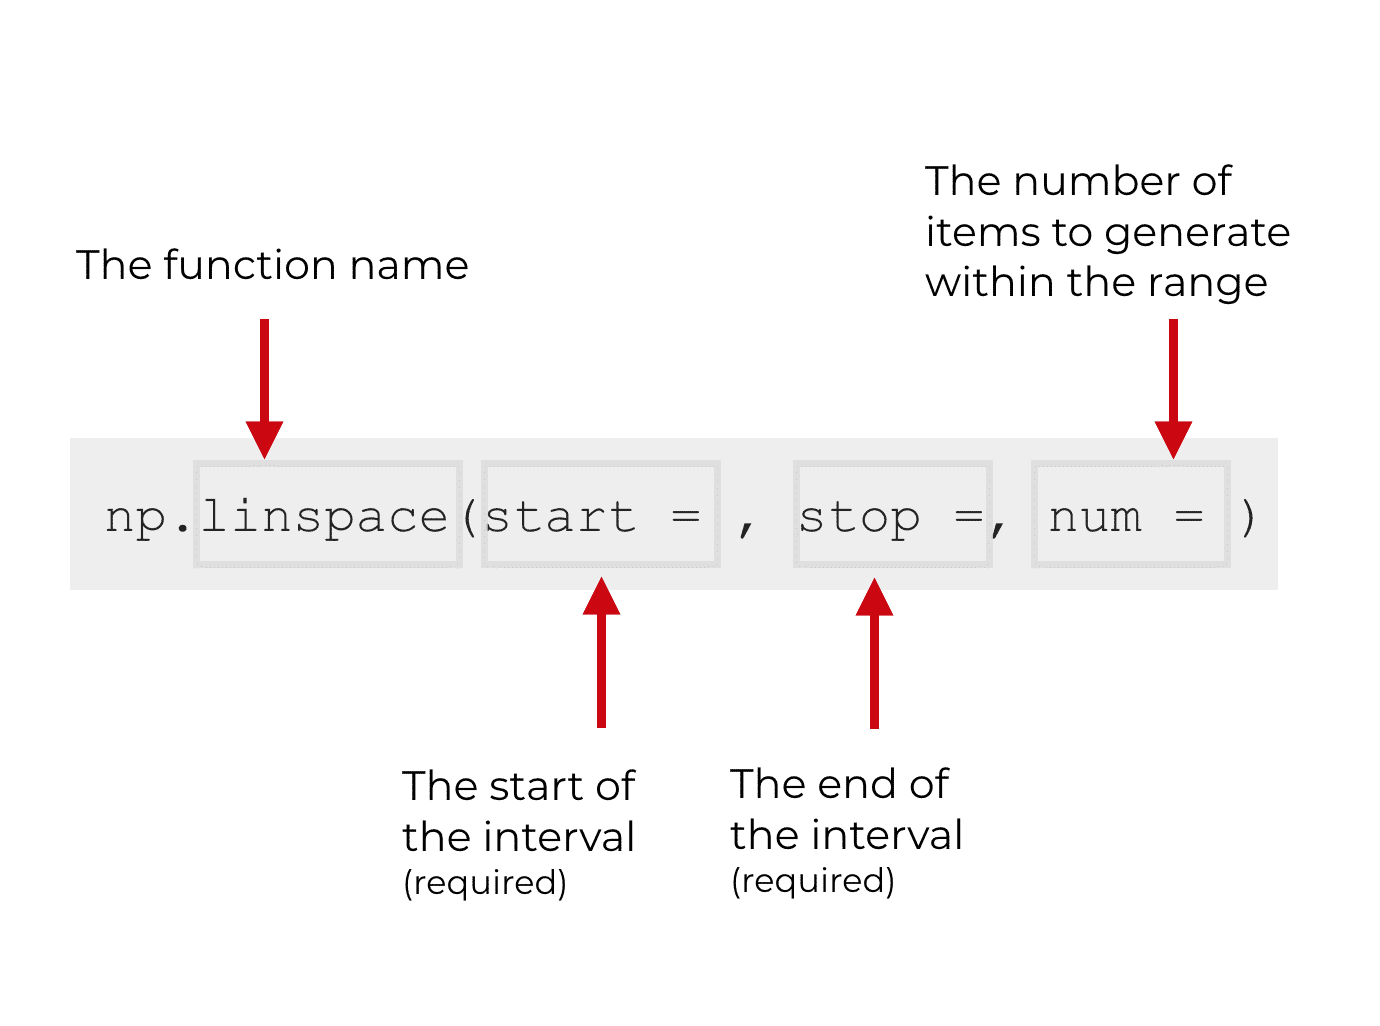
To do this, you use the code np.linspace (assuming that you’ve imported NumPy as np).
Inside of the np.linspace code above, you’ll notice 3 parameters: start, stop, and num. These are 3 parameters that you’ll use most frequently with the linspace function. There are also a few other optional parameters that you can use.
Let’s talk about the parameters of np.linspace:
The parameters of NumPy linspace
There are several parameters that help you control the linspace function: start, stop, num, endpoint, and dtype.
To understand these parameters, let’s take a look again at the following visual:
start
The start parameter is the beginning of the range of numbers.
So if you set start = 0, the first number in the new nd.array will be 0.
Keep in mind that this parameter is required.
stop
The stop parameter is the stopping point of the range of numbers.
In most cases, this will be the last value in the range of numbers. Having said that, if you modify the parameter and set endpoint = False, this value will not be included in the output array. (See the examples below to understand how this works.)
num (optional)
The num parameter controls how many total items will appear in the output array.
For example, if num = 5, then there will be 5 total items in the output array. If, num = 10, then there will be 10 total items in the output array, and so on.
This parameter is optional. If you don’t provide a value for num, then np.linspace will use num = 50 as a default.
endpoint (optional)
The endpoint parameter controls whether or not the stop value is included in the output array.
If endpoint = True, then the value of the stop parameter will be included as the last item in the nd.array.
If endpoint = False, then the value of the stop parameter will not be included.
By default, endpoint evaluates as True.
dtype (optional)
Just like in many other NumPy functions, with np.linspace, the dtype parameter controls the data type of the items in the output array.
If you don’t specify a data type, Python will infer the data type based on the values of the other parameters.
If you do explicitly use this parameter, however, you can use any of the available data types from NumPy and base Python.
You don’t need to use all of the parameters every time
Keep in mind that you won’t use all of these parameters every time that you use the np.linspace function. Several of these parameters are optional.
Moreover, start, stop, and num are much more commonly used than endpoint and dtype.
Using the syntax without parameter values
Also keep in mind that you don’t need to explicitly use the parameter names. You can write code without the parameter names themselves; you can add the arguments as “positional arguments” to the function.
Here’s an example:
np.linspace(0, 100, 5)
This code is functionally identical to the code we used in our previous examples: np.linspace(start = 0, stop = 100, num = 5).
The main difference is that we did not explicitly use the start, stop, and num parameters. Instead, we provided arguments to those parameters by position. When you don’t use the parameter names explicitly, Python knows that the first number (0) is supposed to be the start of the interval. It know that 100 is supposed to be the stop. And it knows that the third number (5) corresponds to the num parameter. Again, when you don’t explicitly use the parameter names, Python assigns the argument values to parameters strictly by position; which value appears first, second, third, etc.
You’ll see people do this frequently in their code. People will commonly exclude the parameter names in their code and use positional arguments instead. Although I realize that it’s a little faster to write code with positional arguments, I think that it’s clearer to actually use the parameter names. As a best practice, you should probably use them.
Examples: how to use numpy linspace
Now that you’ve learned how the syntax works, and you’ve learned about each of the parameters, let’s work through a few concrete examples.
Create interval between 0 and 1, in breaks of .1
A quick example
np.linspace(start = 0, stop = 1, num = 11)
Which produces the output array:
array([ 0. , 0.1, 0.2, 0.3, 0.4, 0.5, 0.6, 0.7, 0.8, 0.9, 1. ])
An example like this would be useful if you’re working with percents in some way. For example, if you were plotting percentages or plotting accuracy metrics for a machine learning classifier, you might use this code to construct part of your plot. Explaining how to do that is beyond the scope of this post, so I’ll leave a deeper explanation of that for a future blog post.
Create interval between 0 and 100, in breaks of 10
A very similar example is creating a range of values from 0 to 100, in breaks of 10.
np.linspace(start = 0, stop = 100, num = 11)
The code for this is almost identical to the prior example, except we’re creating values from 0 to 100.
Since it’s somewhat common to work with data with a range from 0 to 100, a code snippet like this might be useful.
How to use the endpoint parameter
As mentioned earlier in this blog post, the endpoint parameter controls whether or not the stop value is included in the output array.
By default (if you don’t set any value for endpoint), this parameter will have the default value of True. That means that the value of the stop parameter will be included in the output array (as the final value).
However, if you set endpoint = False, then the value of the stop parameter will not be included.
Here’s an example.
In the following code, stop is set to 5.
np.linspace(start = 1, stop = 5, num = 4, endpoint = False)
But because we’re also setting endpoint = False, 5 will not be included as the final value.
On the contrary, the output nd.array contains 4 evenly spaced values (i.e., num = 4), starting at 1, up to but excluding 5:
array([ 1., 2., 3., 4.])
Personally, I find that it’s a little un-intuitive to use endpoint = False, so I don’t use it often. But if you have a reason to use it, this is how to do it.
Manually specify the data type
As mentioned earlier, the NumPy linspace function is supposed to “infer” the data type from the other input arguments. You’ll notice that in many cases, the output is an array of floats.
If you want to manually specify the data type, you can use the dtype parameter.
This is very straightforward. Using the dtype parameter with np.linspace is identical to how you specify the data type with np.array, specify the data type with np.arange, etc.
Essentially, you use the dtype parameter and indicate the exact Python or NumPy data type that you want for the output array:
np.linspace(start = 0, stop = 100, num = 5, dtype = int)
In this case, when we set dtype = int, the linspace function produces an nd.array object with integers instead of floats.
Again, Python and NumPy have a variety of available data types, and you can specify any of these with the dtype parameter.
How np.linspace is different from np.arange
If you’re familiar with NumPy, you might have noticed that np.linspace is rather similar to the np.arange function.
The essential difference between NumPy linspace and NumPy arange is that linspace enables you to control the precise end value, whereas arange gives you more direct control over the increments between values in the sequence.
To be clear, if you use them carefully, both linspace and arange can be used to create evenly spaced sequences. To a large extent, these are two similar different tools for creating sequences, and which you use will be a matter of preference. I personally find np.arange to be more intuitive, so I tend to prefer arange over linspace. Again though, this will mostly be a matter of preference, so try them both and see which you prefer.
For more Python data science tutorials, sign up for our email list
Here at Sharp Sight, we teach data science. We want to help you master data science as fast as possible.
If you sign up for our email list, you’ll receive Python data science tutorials delivered to your inbox.
You’ll get free tutorials on:
- NumPy
- Pandas
- Base Python
- Scikit learn
- Machine learning
- Deep learning
- … and more
… delivered to your inbox every week.
Want to learn data science in Python? Sign up now.
Thank you. It is really helpful.
thanks. Very informative.
Thank you for such a detailed explanation and comparison. Very helpful!
You’re welcome.
I wanna know if we have to find the no between given numbers mannualy, how can we do it???
I don’t understand what you’re asking.
If you have a serious question, you need to ask your question in a clear way.
It is really helpful. thanks
Excellent
Awesome article, thanks!
Shukran
Nice Explanation. Thank you
very simply explained that even a dummy will understand. i hope other topics will be explained like this one
E
We have tutorials for almost every major Numpy function, many Pandas functions, and most of the important Seaborn functions.
Good explanation. I noticed that when creating a unit circle np.arange() did not close the circle while linspace() did. So probably in plotting linspace() is the way to go.
Which one you use depends on the application
Excellent,very helpful for us.
Thank you for the explicit explanation
You’re welcome.
U have clear my all doubts. Thanks… Great explanation
????????????
thanks u dude that’s very clear
You’re welcome dude.
Excellent …
I give me clear concept about use linspace function
Thnks a lot, thanks for sharing
You’re welcome.