This tutorial will show you how to use Numpy loadtxt to load numeric data stored in a text file into a Numpy array.
The tutorial explains what the function does, explains the syntax, and shows step-by-step examples of how to use np.loadtxt.
If you need something specific, you can click on any of the following links.
Table of Contents:
A Quick Introduction to Numpy Loadtxt
Numpy loadtxt is a function for the Numpy package.
As you’re probably aware, Numpy is a package for the Python programming language that enables a programmer to work with Numeric data.
This package has a variety of tools for creating, aggregating, reshaping, and manipulating numeric data. It’s one of the primary toolkits for doing data science and machine learning in Python.
And although it’s primarily used to wrangle and manipulate numeric data, before we do that data wrangling, we often need to get our numeric data from some source.
That’s where Numpy loadtxt comes in.
Load data stored in a text file with Numpy Loadtxt
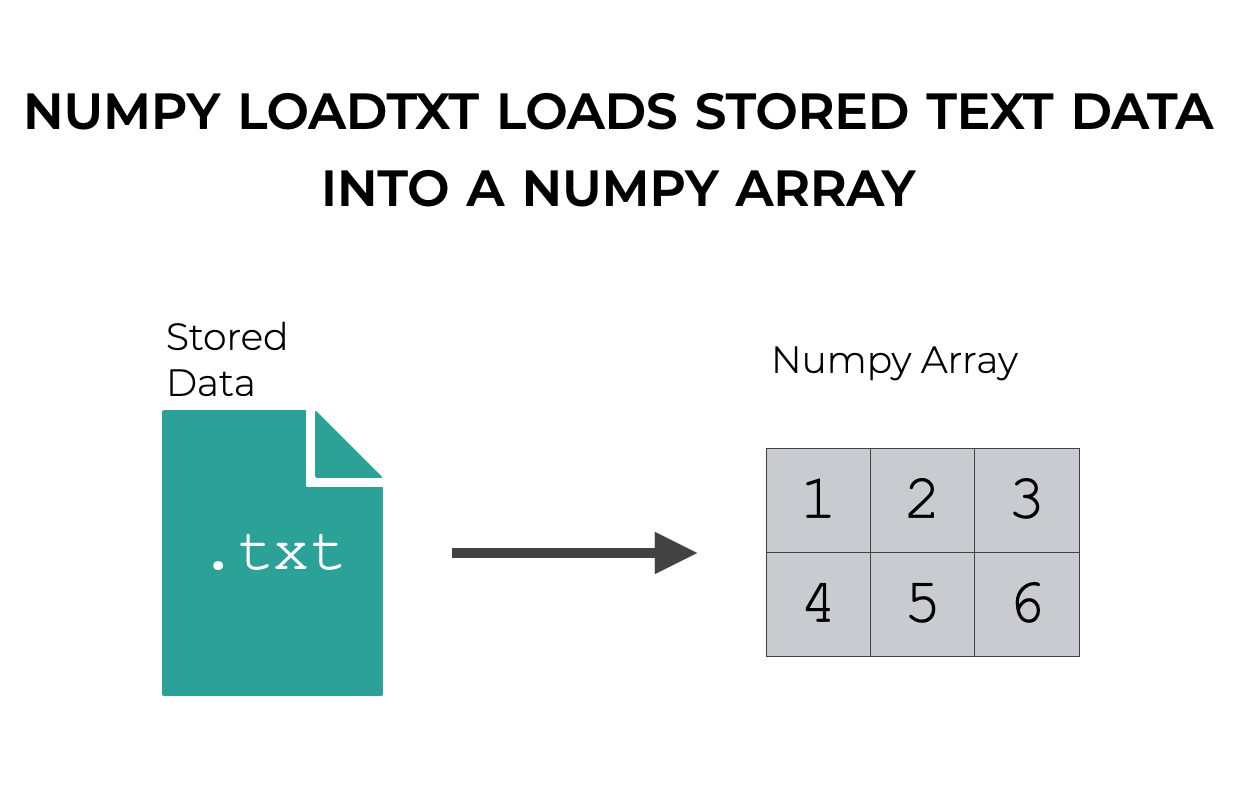
Numpy loadtxt enables you to load numeric data that’s stored in a text file.
So, for example, if you have row-and-column data that’s stored in a text file, where the numbers are separated by commas (a so-called csv file), you can use Numpy loadtxt to load the data into your Python environment.
But this is a fairly flexible tool that gives you a lot of fine-grained control over how you import your text data.
And how exactly you use it depends on the syntax.
That being the case, let’s take a look at the syntax of the function.
The syntax of Numpy Loadtxt
In this section of the tutorial, we’ll look at the syntax of Numpy loadtxt.
We’ll look at the high-level syntax, and we’ll also look at some optional parameters that change how the function works.
A quick note about the syntax
One quick reminder about the syntax.
When we use Numpy (or any other Python package), we need to import that package first.
And how we import a package will impact the exact syntax that we use.
For example, when we import Numpy, we almost always do it with this code:
import numpy as np
This is the standard convention among Python users.
When we import Numpy like this, it enables us to call Numpy functions with the prefix np.
I’m reminding you of this, because (as I noted) this changes the syntax slightly.
Going forward, I’m going to assume that you’ve imported Numpy like this, with the alias np.
np.loadtxt syntax
Let’s start with the high-level syntax.
In the simplest case, we can call Numpy loadtxt with the code np.loadtxt().
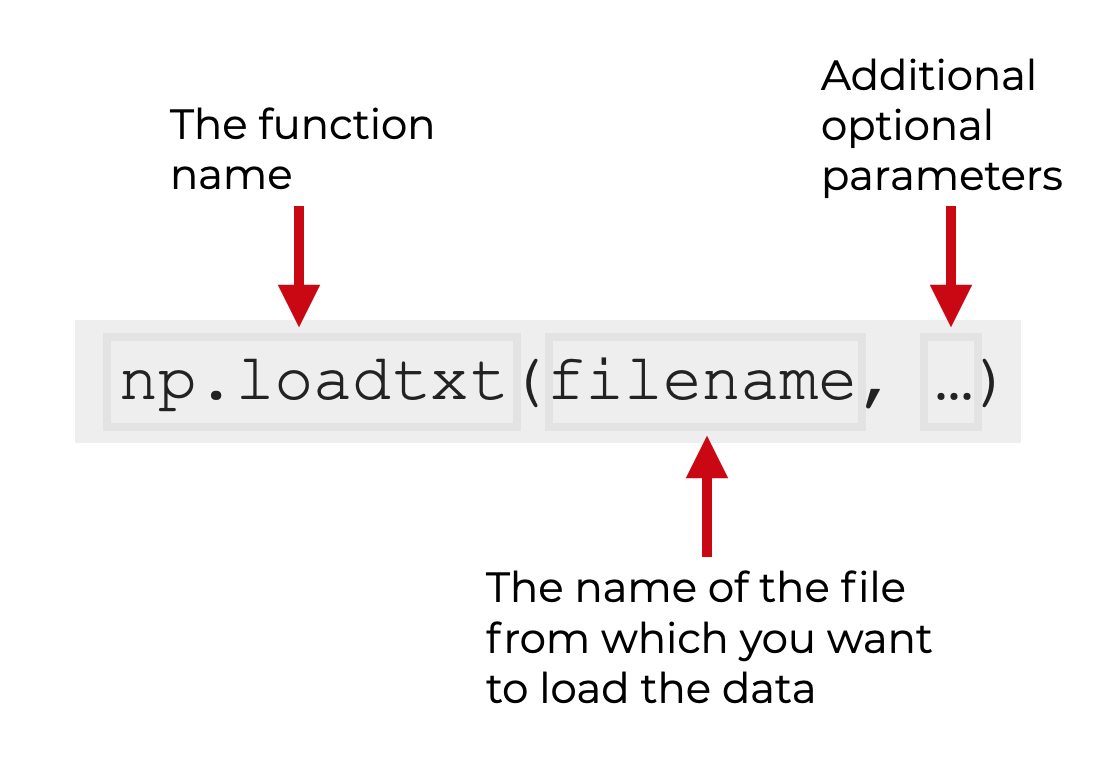
In this simple case, the first (and only required) input to the function is the name of the text file from which you want to load your data.
However, np.loadtxt has several optional parameters that enable you to fine-tune how the function works.
The Parameters and Inputs of Numpy Loadtxt
Here, let’s take a look at the inputs and optional parameters of Numpy loadtxt.
filenamedtypecommentsdelimiterconvertersskiprowsusecolsunpacknadminencodingmax_rowsquotecharlike
Let’s look at each of these, one at a time.
filename (required)
The filename argument is the first input to the Numpy loadtxt.
As mentioned above, this is the name of the input text file.
It’s important to point out that this argument is positional. Numpy automatically assumes that the first input to the function is the name of the input text file.
dtype
The dtype parameter specifies the data type of the output Numpy array.
By default, this is set to dtype = 'float'
comments
The comments parameter enables you to indicate a character or string of characters that designate a comment in the input file.
By default, this is set to comments = '#'.
delimiter
The delimiter specifies the delimiter character that separates the columns in the input text file.
By default, this is set to delimiter = None. With this default, np.loadtxt assumes that whitespace separates the columns.
If you have a comma separated file, you would use delimiter = ','.
(I’ll show you an example of this in the examples section.)
converters
The converters parameter enables you to specify a function that will “convert” the strings by operating on them in some way.
Alternatively, instead of providing a single function to operate on all columns, you can indicate a specific converter function for any column of the input.
skiprows
The skiprows parameter specifies the number of rows in the input file to “skip” as it parses the text data.
By default, this is set to skiprows = 0.
usecols
The usecols parameter specifies which columns to retrieve from the input file.
By default, this is set to usecols = None, which reads all of the columns.
If you want to specify specific columns, you can provide the numeric index inside of a list or tuple. For example, to extract columns 1 and 3, you would use usecols = [1,3]. (Remember: Python indexing starts at 0).
unpack
The unpack parameter allows you to “unpack” the text file into multiple Numpy arrays (as opposed to one array).
By default, this is set to unpack = False.
If you set this to unpack = True, you will be able to unpack the output into multiple arrays. For example:
myarray_1, myarray_2 = np.loadtxt(...)
ndmin
The ndmin parameter specifies the minimum number of dimensions of the output array.
By default, this is set to ndmin = 0.
Alternatively, the other valid arguments are 1 or 2.
encoding
The encoding parameter enables you to specify the encoding of the text file.
By default, this is set to encoding = 'bytes'.
If you override this, then the strings will be treated as unicode, and the strings will be processed by any specified converters.
max_rows
The max_rows parameter specifies the maximum number of rows to read from the text file (after any rows that are skipped by skiprows).
By default, this is set to max_rows = None, which reads all of the rows.
quotechar
The quotechar parameter enables you to specify a character that designates a quoted item.
By default, this is set to quotechar = None, which disables quoting for the load process.
like
The like parameter enables you to specify an object type besides a Numpy array, so that the output is an array-like object, instead of a proper Numpy array.
Examples of How to Use Numpy Loadtxt
Now that we’ve looked at the syntax and parameters of Numpy loadtxt, let’s look at some examples.
Examples:
- Load a Numpy array from a text file
- Load an array from a text file using a specific delimiter
- Use a specific data type for the loaded data
- Use a specific character to identify comments in the text file being loaded
Setup Code (run this first)
Before you run the examples, you’ll need to run some setup code.
Specifically, you need to import Numpy and create a Numpy array that we can work with.
Import Numpy
First, you can import Numpy with this code:
import numpy as np
Remember what I wrote earlier in this tutorial: importing Numpy like this enables us to call Numpy functions with the prefix np.
Create Numpy Array
Second, we’ll create a Numpy array that we can use in our examples.
Here, we’ll create a 2D array with the numbers from 1 to 6, using the Numpy array function:
my_array = np.array([[1,2,3],[4,5,6]])
And let’s print it out to take a look:
print(my_array)
OUT:
[[1 2 3]
 [4 5 6]]
As you can see, this is a simple 2-dimensional array with six values.
In all of the examples, we’re actually going to use Numpy savetxt first to save this array to a text file. Then, we’ll load it back into Python with Numpy loadtxt.
EXAMPLE 1: Load a Numpy array from a text file
First, we’ll start with a simple example.
We’ll load a Numpy array from a simple text file.
As in all of our examples, for the purposes of illustration, this will have two steps:
- save a Numpy array to a text file
- load the array back into our environment, with Numpy loadtxt
Save Numpy array to Text File
First, we’re going to save our Numpy array to a text file:
np.savetxt('my_numpy_data.txt', my_array)
If you want to understand how this works, I recommend reading our tutorial about Numpy savetxt.
(Note: you should be able to find this file on your computer, and open it with a text editor.)
Load Numpy array from Text File
Now, we’re going to load the file back into our Python environment with Numpy loadtxt.
np.loadtxt('my_numpy_data.txt')
OUT:
array([[1., 2., 3.],
       [4., 5., 6.]])
As you can see, Numpy loadtxt has loaded the data back into our environment as a Numpy array.
Notice as well, that the numbers are all formatted as floats, which is the default.
We’ll change the number format in one of the future examples.
EXAMPLE 2: Load an array from a text file using a specific delimiter
Next, we’re going to load a file that has a specific delimiter between the columns.
By default, Numpy loadtxt assumes that the columns are separated by whitespace.
But in this example, we’ll load a file where the columns are separated by commas.
You’ll notice that in the previous example, the columns were separated by spaces by default.
Here, we’ll change that so that the columns are separated by commas.
Save Numpy array to Text File
First, we’re going to save our Numpy array to a text file, with commas separating the columns:
np.savetxt('my_numpy_data.txt', my_array, delimiter = ',')
If you find this file on your computer, you’ll see that the columns are separated by commas.
(Again, if you want to understand how this works, I recommend reading our tutorial about Numpy savetxt.)
Load Numpy array from Text File
Next, we’ll load the file with Numpy loadtxt using the delimiter parameter to specify that the columns are separated by commas:
np.loadtxt('my_numpy_data.txt', delimiter = ',')
OUT:
array([[1., 2., 3.],
       [4., 5., 6.]])
Here, np.loadtxt has parsed the comma-separated data, and loaded the data into a Numpy array.
EXAMPLE 3: Use a specific data type for the loaded data
Now, we’re going to use the dtype parameter to load the numbers as integers.
Save Numpy array to Text File
First, we’ll save our Numpy array, my_array, to a text file with Numpy save.
np.savetxt('my_numpy_data.txt', my_array, fmt = '%i')
Here, we’ve used the fmt parameter to save the data as integers.
However, if you try to load the data with Numpy loadtxt, it will import the data as floats by default.
To fix this, we’ll need to use the dtype parameter.
Load Numpy array from Text File
Here, we’ll set dtype = int, which will cause Numpy loadtxt to load the data as integers.
np.loadtxt('my_numpy_data.txt', dtype = int)
OUT:
array([[1, 2, 3],
       [4, 5, 6]])
Notice that the values in the array are loaded as integers (i.e, ints).
And remember: there are a variety of data types that you can select. We’ve just used integers for this particular example.
EXAMPLE 4: Use a specific character to identify comments in the text file being loaded
Finally, let’s do an example where we strip out the comments in a file.
Here, we’ll use the comments parameter to identify (and remove) comment lines in the text file.
Save Numpy array to Text File
First, we need to create a text file that has comment lines in it.
To do this, we’ll use Numpy savetxt and add a header and footer with the header and footer parameters.
Additionally, we’ll set the comments parameter to comments = '** ' to specify a that '** ' designates a comment line (i.e., the header and footer lines).
np.savetxt('my_numpy_data.txt'
           ,my_array
           ,header = 'This is header text'
           ,footer = 'This is footer text'
           ,comments = '** '
           )
If you check my_numpy_data.txt, you’ll see the header and footer prefixed with the comment string:
** This is header text
1.000000000000000000e+00 2.000000000000000000e+00 3.000000000000000000e+00
4.000000000000000000e+00 5.000000000000000000e+00 6.000000000000000000e+00
** This is footer text
(Again, if you want to understand how this works, I recommend reading our tutorial about Numpy savetxt.)
Load Numpy array from Text File
Now, we’ll load the file using Numpy loadtxt.
When we do this, we’ll set comments = '**' to specify that the header and footer lines, which begin with '**', are comments that need to be stripped out.
np.loadtxt('my_numpy_data.txt', comments = '**')
OUT:
array([[1., 2., 3.],
       [4., 5., 6.]])
As you can see, when we run this code, it strips out the header and footer comment lines, and loads the numeric data into a Numpy array.
Frequently asked questions about Numpy Load Text
Now that you’ve learned about Numpy loadtxt and seen some examples, let’s review some frequently asked questions about the function.
Frequently asked questions:
Question 1: How do you load a binary file instead of a text file?
If you want to load your Numpy data from a binary file instead of a text file, you should use Numpy load.
You can read about Numpy Load in this tutorial.
Question 2: How do I save Numpy array to a text file?
If you want to save Numpy data to a text file (instead of loading data from a text file), you should use Numpy savetxt.
You can read about Numpy savetxt in this tutorial.
Leave your other questions in the comments below
Do you have other questions about Numpy loadtxt?
If so, leave your questions in the comments section below.
Join our course to learn more about Numpy
In this tutorial, I’ve shown you how to use Numpy loadtxt.
Numpy loadtxt is useful if you need to load Numpy array from a text file, but if you really want to master numeric data manipulation in Python, you’ll need to learn a lot more Numpy.
That said, if you’re serious about learning Numpy, you should consider joining our premium course called Numpy Mastery.
Numpy Mastery will teach you everything you need to know about Numpy, including:
- How to create Numpy arrays
- How to Numpy axes work
- What the “Numpy random seed” function does
- How to use the Numpy random functions
- How to reshape, split, and combine your Numpy arrays
- Applying mathematical operations on Numpy arrays
- and more …
The course will also provide you with our unique practice system. This practice system will enable you to memorize all of the Numpy syntax that you learn.
If you’re struggled to remember Numpy syntax, this is the course you’ve been looking for.
If you practice like we show you, you’ll memorize all of the critical Numpy syntax in only a few weeks.
Find out more here: