This tutorial will show you how to use the Numpy min function (AKA, np.min).
It explains what the function does at a high level, explains the syntax, and shows clear, step-by-step examples of how to use np.min.
If you need anything specific, you can click any of the links below?
Table of Contents:
Let’s get jump in.
A quick introduction to the Numpy min function
If you’re reading this, you’re probably aware that Numpy min is a function for the Numpy package for Python.
At a high level, Numpy is a toolkit for doing data manipulation with numeric data. More specifically, we use numpy to create and manipulate data structures called Numpy arrays. These arrays are row-and-column data structures that typically contain numbers, much like an Excel spreadsheet.
In particular, when we use Numpy, we often use it to perform computations on Numpy arrays.
We can use Numpy functions to add, multiply and subtract array values.
And we can also use Numpy to perform statistical computations, like finding the maximum or minimum values of an array.
That’s where Numpy min comes in.
Numpy Min computes minimum values on Numpy arrays
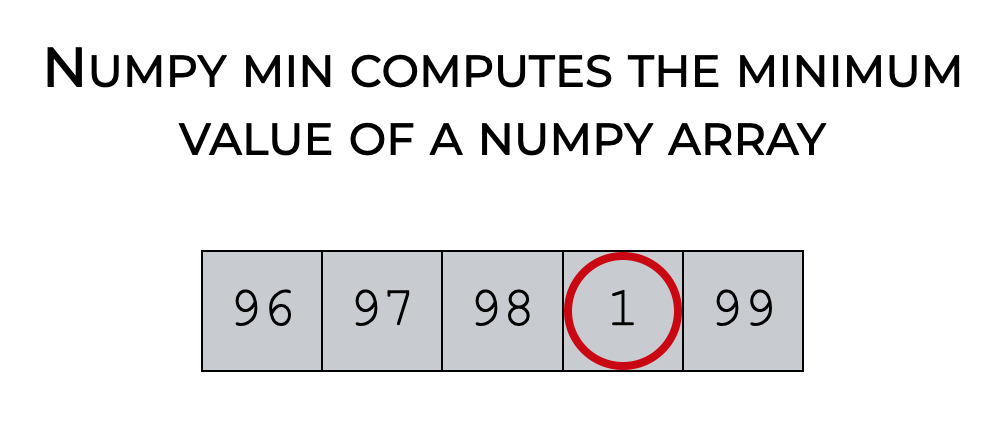
We use Numpy min to compute minimum values on Numpy arrays.
We can use Numpy min to compute the minimum of the entire array.
But we can also use Numpy min to compute the minima of rows and columns.
It’s a very useful function, and one that’s commonly used in Python data science and machine learning.
But how exactly we use it depends on exactly how we write the syntax.
That being said, let’s look at the syntax of np.min.
The Syntax of Numpy Min
Here, we’ll look at the syntax of Numpy min.
At a high level, it’s fairly easy to use.
But there are a few optional parameters that can make this function more complicated.
So I’ll show you the high-level syntax, as well as a few optional parameters.
A quick note
One quick note before we look at the syntax.
Syntactically, the name of the function is technically numpy.min().
Having said that, you’ll almost always see the function in code as np.min().
Why?
Remember that whenever we use a Python package, we need to import that package first.
And when we import a package, we can import it with an alias.
For Numpy, that’s exactly what we normally do. Typically, we import Numpy with the alias np, like this:
import numpy as np
When we do this, we can use np. as a prefix at the beginning of the function call, (instead of using numpy. as the prefix).
I want to point this out, because that’s the common convention among Python data scientists, and its the convention that I’ll be using in the rest of the syntax explanation and tutorial.
An explanation of the syntax
In the simplest case, the syntax of np.min() is fairly simple.
You simply call the function, and inside the function, you provide the name of the Numpy array that you want to operate on (i.e., the array where you want to find the minimum value).
Having said that, there are a few parameters that you can use to modify how the function works.
Let’s take a look.
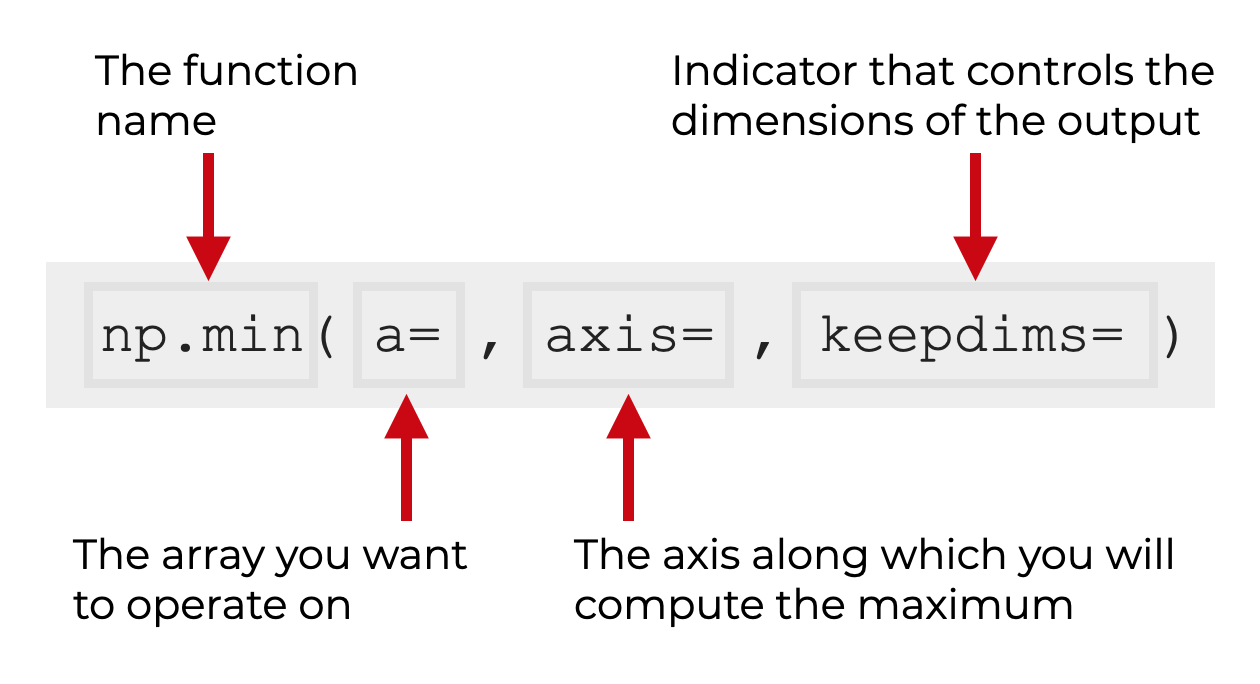
The parameters of np.min
The numpy.min function has four primary parameters:
aaxisoutkeepdims
Let’s talk about each of these parameters, one at a time.
a (required)
The a parameter enables you to specify the array that the np.min function will operate on.
In terms of allowed inputs, this will accept Numpy arrays, but technically, it also accepts array-like objects. So you can provide Python lists and tuples.
Keep in mind also, that you can explicitly use the parameter, like this:
np.min(a = my_array)
But you can also remove the explicit parameter, and simply provide the name of the array:
np.min(my_array)
Having said that, an input to this parameter of one kind or another is required.
axis (optional)
The axis parameter allows you to specify the axis on which to compute the minimum values.
Put simply, the axis parameter enables you to compute the row minima and column minima.
I’ll show examples of how to compute minima for rows and columns in the examples section, but let me quickly explain how the axis parameter works.
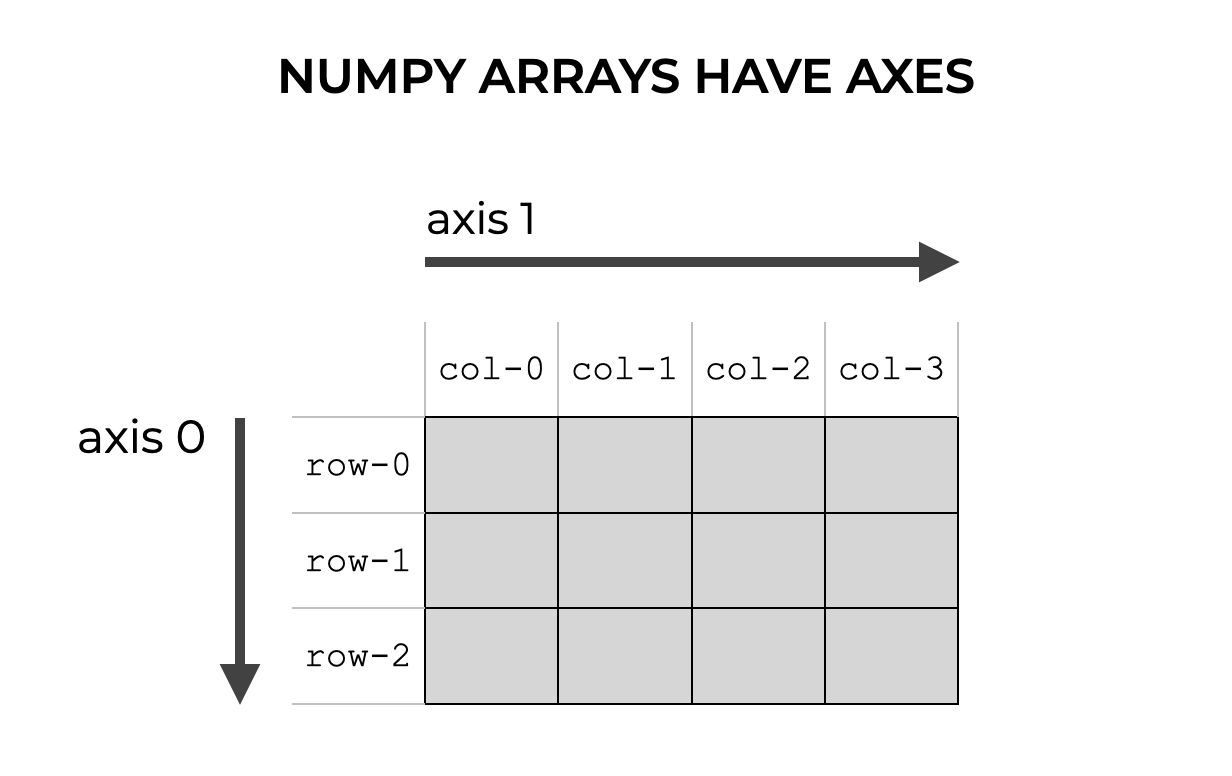
A quick review of array axes
To understand the axis parameter, you need to understand how axes work in Numpy arrays.
In a Numpy array, axes are like directions.
In a 2-dimensional Numpy array, axis-0 points downwards against the rows. And axis-1 points horizontally against the columns.
The array parameter specifies the axis to compute the maxima
Now, let’s return to the axis parameter of Numpy min.
When we use the axis parameter of the numpy.min function, we’re specifying the axis along which to identify the minimum values. We use axis to tell the function to compute the minima in the axis-0 direction, axis-1 direction, etc.
Effectively then, the axis parameter allows us to compute the minima along the rows or columns.
Let me show you.
Remember that for a 2D array, axis-0 points downwards, against the rows.
So when we use the code np.min(axis = 0) on an array, we’re telling Numpy min to compute the minimum values in that direction … the axis-0 direction.
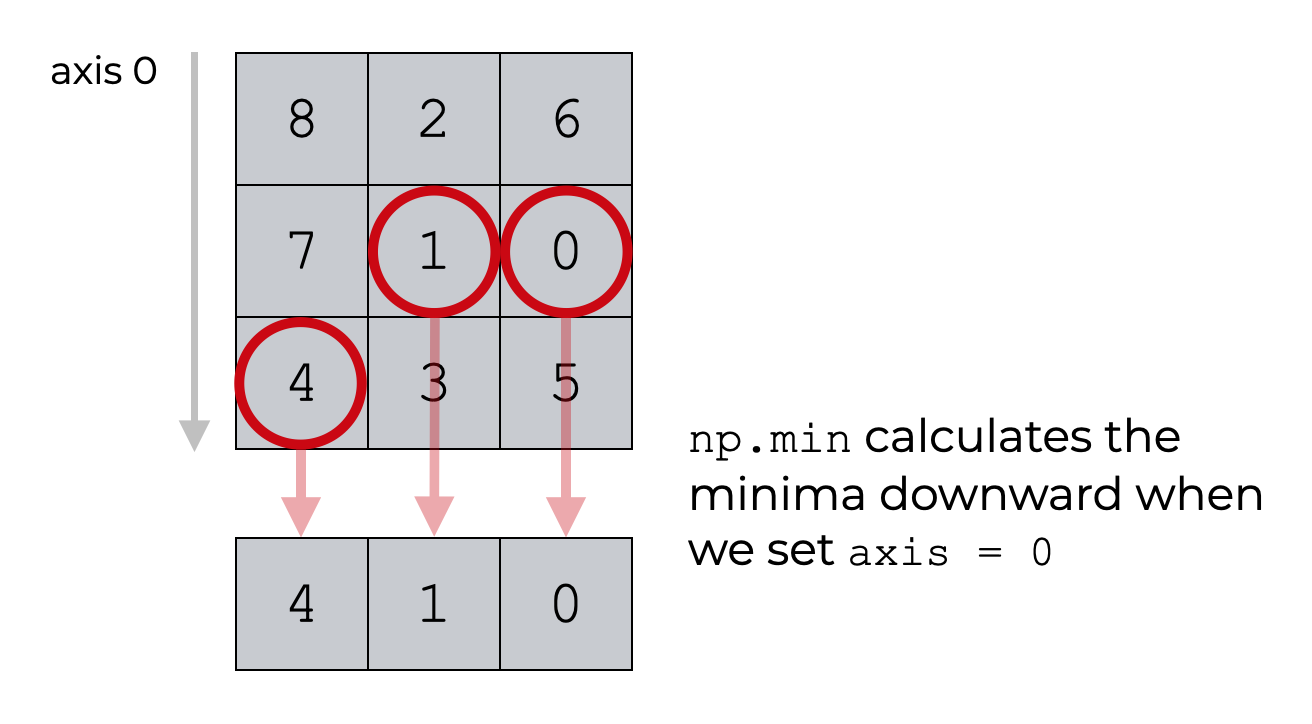
Effectively, when we set axis = 0, we’re specifying that we want to compute the minimum values of the columns.
Similarly, remember that in a 2-dimensional array, axis-1 points horizontally against the columns. So if we use Numpy min with axis = 1, we’re telling the function to identify the minima horizontally, in the axis-1 direction.
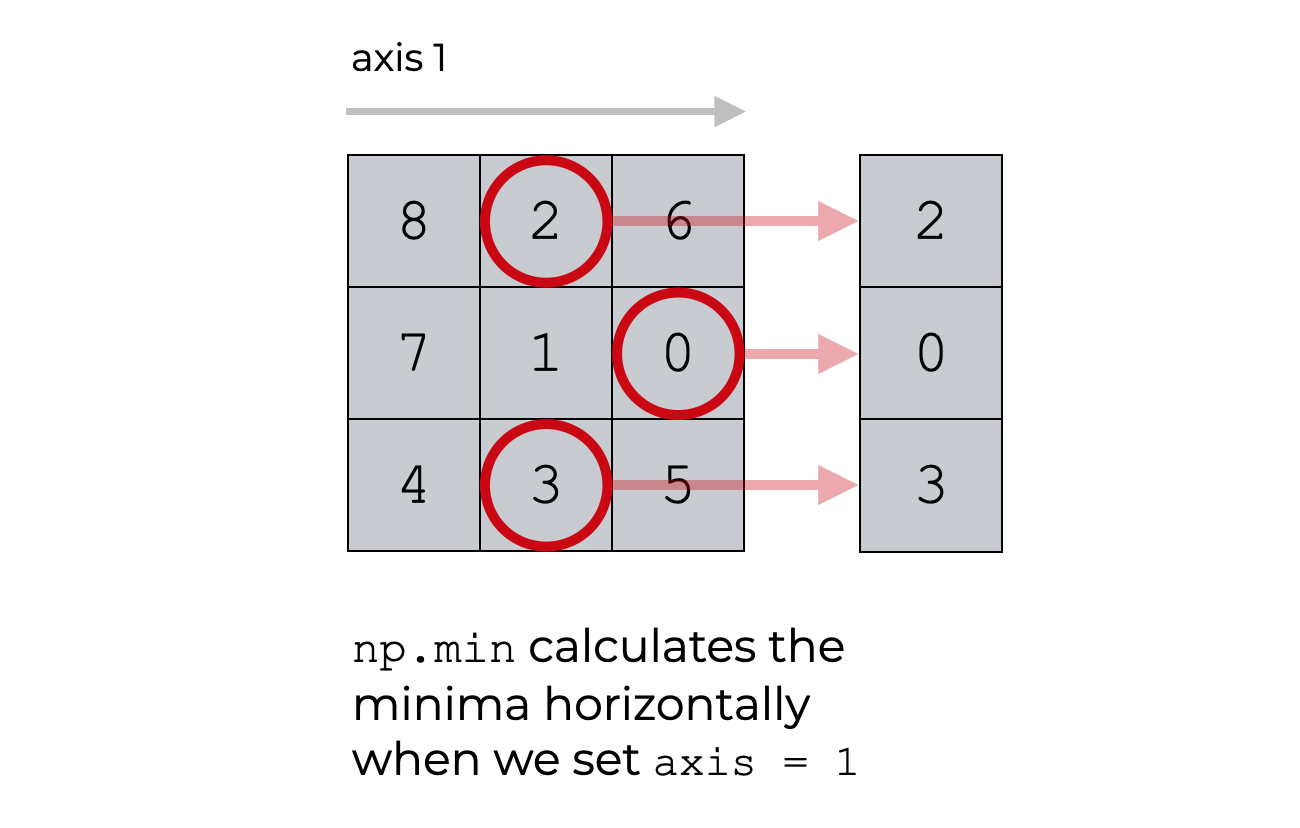
Effectively, this computes the minimum values along the rows.
I’m going to show you some examples of how to do this in the examples section.
Also, remember that that the axis parameter is optional. If you don’t specify an axis, np.min will find the minimum value of the whole array.
out (optional)
The out parameter enables you to specify an output array that will store the output of np.min.
This parameter is somewhat rarely used, so we aren’t going to discuss it in this tutorial.
Note that out is optional.
keepdims (optional)
The keepdims parameter enables you to keep the dimensions of the output the same as the dimensions of the input, if you set keepdims = True.
This often confuses Numpy users, so let me explain.
When you typically use Numpy min on an array, the function summarizes the data. It takes a large number of values, performs a summary operation that outputs one value (or a small number of values if you use the axis parameter).
Another way of thinking about this is that Numpy min reduces the number of dimensions.
For example, let’s say we have a 1-dimensional array and we use Numpy min:
If you use Numpy min on a 1D array, the output will be a single number. The function returns a scalar value:
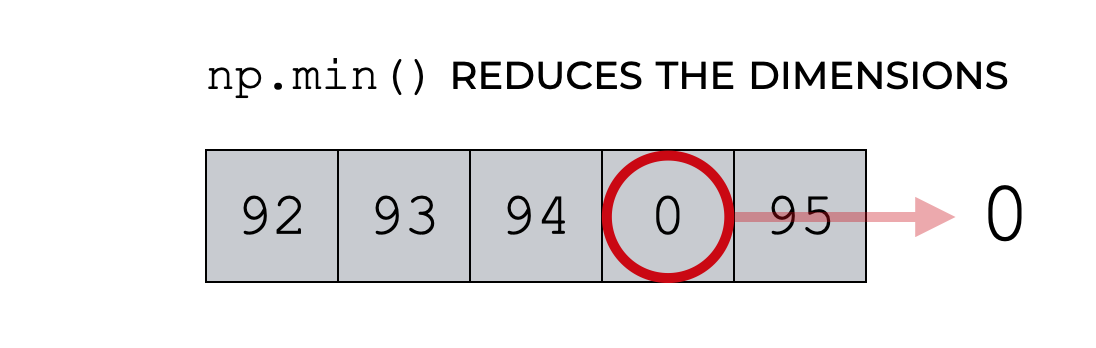
So Numpy min is summarizing the data, and in doing so, it reduces the number of dimensions.
But what if you want the output to keep the same number of dimensions in the output as the input?
You can do this the keepdims parameter.
By default, the keepdims parameter is set to keepdims = False. With this setting, Numpy min will reduce the number of dimensions in the output.
But if you set keepdims = True, the function will force the output to have the same dimensions as the input array.
Still a little confused?
I’m going to show you an example of how to use keepdims in the examples section.
Examples of how to use the Numpy min function
Now that we’ve looked at the syntax of Numpy min, let’s look at some examples of how to use it.
Examples:
- Compute the minimum of a 1-dimensional array
- Compute the minimum of a 2-dimensional array
- Compute the minimum values of the columns of a 2D array
- Compute the minimum values of the rows of a 2D array
- How to use the keepdims parameter with np.min
Run this code first
Before we look at the examples themselves, you’ll need to run some code to get set up.
Specifically, you need to import Numpy and you need to create the Numpy arrays that we’ll work with.
Import numpy
You can import Numpy with this code:
import numpy as np
Remember: when we import Numpy this way, we can use np as a prefix to our Numpy function calls.
That means that we can call our function as np.min().
Create Numpy Arrays
Here, we’re going to create a 1D array and a 2D array.
Create 1D array
First, we can create the 1D array with Numpy random randint:
np.random.seed(22)
myarray_1d = np.random.randint(size = 5, low = 0, high = 99)
Create 2D array
And second, we can create our 2D array with Numpy random choice along with Numpy reshape:
np.random.seed(1)
np_array_2d = np.random.choice(9, 9, replace = False).reshape((3,3))
Notice that we’re using Numpy random seed in both cases to set the seed for the pseudorandom number generator.
Now that we have our Numpy arrays, let’s get started with the examples.
Example 1: Compute the minimum of a 1-dimensional array
First, we’ll compute the minimum value of a 1D array
Here, we’ll be operating on the 1D array that we created above, myarray_1d.
Let’s quickly print the contents of the array:
print(np_array_1d)
And here’s the output:
[ 4 44 64 84 8]
Visually, we can identify the minimum value, which is 4.
But let’s identify the minimum value with some code.
Here, we’ll calculate the minimum value using Numpy min:
np.min(myarray_1d)
OUT:
4
This is very simple, but it clearly shows what the technique does. It just finds the minimum value.
This is very simplistic with an array with five values, but you could imagine an array with thousands of values.
EXAMPLE 2: Compute the minimum of a 2-dimensional array
Now, let’s compute the minimum value of a 2-dimensional array.
This will be very similar to example 1, but instead of operating on a 1D array, we’ll operate on a 2D array.
Specifically, we’re going to operate on the 2D array that we created above, called myarray_2d.
Let’s quickly print out the array:
print(myarray_2d)
OUT:
[[8 2 6]
 [7 1 0]
 [4 3 5]]
Again, it’s somewhat easy to see visually that the minimum value is 0.
But we can identify this value programatically with np.min.
np.min(myarray_2d)
OUT:
0
Again, this is very simple, but this should show you how the technique works on a 2D array.
I recommend trying it out on a much larger array.
Example 3: Compute the minimum values of the columns of a 2D array
Next, we’ll compute the minimum values of the columns of a 2D array.
To do this, we’re going to use the axis parameter. Specifically, we’re going to set axis = 0 inside of np.min.
Once again, we’ll be operating on our 2D array, myarray_2d.
Let’s print out the values
print(myarray_2d)
OUT:
[[8 2 6]
 [7 1 0]
 [4 3 5]]
As you can see here, this is a 2D array with 3 rows and 3 columns. It contains the integers from 0 to 8, arranged randomly.
Now, let’s compute the column minima.
# CALCULATE COLUMN MINIMA
np.min(myarray_2d, axis = 0)
OUT:
array([4, 1, 0])
What happened here?
Because we set axis = 0, we specified that we want Numpy min to identify the minimum values downward along axis-0.
This is somewhat easy to understand, as long as you understand how Numpy axes work.
Example 4: Compute the row minima with axis = 1
In a similar way, we can identify the row minima by setting axis = 1.
Once again, in this example, we’ll operate on the 2D array that we created above called myarray_2d.
Let’s print out the values:
print(myarray_2d)
OUT:
[[8 2 6]
 [7 1 0]
 [4 3 5]]
And now let’s calculate the row minima:
np.max(myarray_2d, axis = 1)
OUT:
array([2, 0, 3])
If you understood the previous example, this should make sense.
But, let’ me explain.
If we set axis = 1, we’re telling Numpy min to identify the minimum values in the axis-1 direction.
Because axis-1 points horizontally for a 2D array, this has the effect of computing the row minima.
Again, this is somewhat easy to understand, but in order to do so, you need to understand how Numpy axes work.
Example 5: How to use the keepdims parameter with np.min
In this last example, let’s look at the keepdims parameter.
As I mentioned earlier in the tutorial, the keepdims parameter enables us to control the dimensions of the output array.
Remember: when we use Numpy min, the function summarizes the data. This has the effect of reducing the number of dimensions.
But if you set keepdims = True, numpy will force the output to have the same number of dimensions as the input.
Let’s take a look at how this works.
Create 2D Array
For this example, we’re going to use the Numpy array function to create a new 2D array.
new_array_2d = np.array([[73,74,75]
                         ,[83,84,11]
                         ,[93,94,95]])
I’ve called this array new_array_2d.
If you look closely, you should be able to spot the minimum value, which is 11.
Examine the Number of Dimensions of the Input Array
Next, let’s look at the number of dimensions of our new array:
new_array_2d.ndim
OUT:
2
As you can see new_array_2d is a 2-dimensional array.
Compute Minimum Value
Next, let’s use np.min to compute the minimum value.
np.min(new_array_2d)
The minimum value is 11.
Compute Number of Dimensions of the Output
But how many dimensions does the output have? We can check the number of dimensions by calling the ndim attribute at the end of the np.min() function:
np.min(myarray_2d).ndim
OUT:
0
The number of dimensions is 0. That’s because the output value is a scalar. A scalar has zero dimensions.
Re-run np.min with keepdims = True
Next, let’s redo the code with keepdims = True.
np.min(new_array_2d, keepdims = True)
Which produces the following output:
array([[11]])
Notice that the output looks different. The output appear to be a Numpy array, instead of a scalar.
And let’s check the dimensions:
np.min(new_array_2d, keepdims = True).ndim
OUT:
2
So if we use np.min on myarray_2d with keepdims = True, the output has 2 dimensions.
Keep in mind that the minimum value is still 11. It’s the smallest value in the array.
But if we set keepdims = True, we’re changing the number of dimensions of the output. Instead of outputting a scalar value, it’s actually outputting a 2-dimensional Numpy array with a single value, 0.
Leave your other questions in the comments below
Do you still have questions about Numpy min?
If so, leave your questions in the comments section below.
If you want to learn data science in Python, learn NumPy
If you’ve read other tutorials here at the Sharp Sight data science blog, you know just how important data manipulation is.
If you’re serious about learning data science, you really need to master the basics of data manipulation. A huge part of the data science workflow is just cleaning and manipulating input data.
If you’re working with numeric data in Python, then you need to know Numpy. Numpy is critical for cleaning, manipulating, and exploring numeric data.
If you want to learn data science in Python, learn Numpy and learn it well.
For more Python data science tutorials, sign up for our email list
Having said that, if you want to learn NumPy and data science in Python, then sign up for our email list.
Here at the Sharp Sight blog, we regularly publish data science tutorials.
When you sign up, you’ll get free tutorials on:
- NumPy
- Pandas
- Base Python
- Scikit learn
- Machine learning
- Deep learning
- … and more.
When we publish tutorials, we’ll send them directly to your inbox.
Want to learn data science in Python? Sign up now.
Really excellent and clear explaination !
Thanks!
This definitely needs a link to the official numpy.min docs, because even if it takes four arguments today, that might not be true tomorrow.