This tutorial will explain the NumPy random choice function which is sometimes called np.random.choice or numpy.random.choice.
I recommend that you read the whole blog post, but if you want, you can skip ahead. Here are the contents of the tutorial …
Contents:
- a quick review of NumPy
- why we use np.random.choice
- the syntax of NumPy random choice
- examples of np.random.choice
Again, if you have the time, I strongly recommend that you read the whole tutorial. Everything will make more sense if you read everything carefully and follow the examples.
Ok … let’s get into it.
A quick introduction to the NumPy random choice function
First of all, what is np.random.choice?
NumPy random choice is a function from the NumPy package in Python.
You might know a little bit about NumPy already, but I want to quickly explain what it is, just to make sure that we’re all on the same page.
Numpy is a data manipulation module for Python
NumPy is a data manipulation module for Python.
Specifically, the tools from NumPy operate on arrays of numbers … i.e., numeric data.
Numpy is important for data science, statistics, and machine learning
Because NumPy functions operate on numbers, they are especially useful for data science, statistics, and machine learning.
For example, if you want to do some data analysis, you’ll often be working with tables of numbers. Frequently, when you work with data, you’ll need to organize it, reshape it, clean it and transform it. We call these data cleaning and reshaping tasks “data manipulation.”
In recent years, NumPy has become particularly important for “machine learning” and “deep learning,” since these often involve large datasets of numeric data. When you’re doing machine learning and deep learning, numeric data manipulation is a very big part of the workflow.
In any case, whether you’re doing statistics or analysis or deep learning, NumPy provides an excellent toolkit to help you clean up your data.
NumPy random choice helps you create random samples
One common task in data analysis, statistics, and related fields is taking random samples of data.
You’ll see random samples in probability, Bayesian statistics, machine learning, and other subjects. Random samples are very common in data-related fields.
NumPy random choice provides a way of creating random samples with the NumPy system.
NumPy random choice generates random samples
If you’re working in Python and doing any sort of data work, chances are (heh, heh), you’ll have to create a random sample at some point.
NumPy random choice can help you do just that.
To explain it though, let’s take a look at an example.
Think of a die … the kind of die that you would see in a game:

A typical die has six sides. Each side has some dots on it, corresponding to a number 1 through 6. Essentially, a die has the numbers 1 to 6 on its six different faces.
If you roll the die, when the die lands, one face will emerge pointing upwards, so rolling the die is exactly like selecting a number between 1 and 6. The numbers 1 to 6 on the die are the possible outcomes that can appear, and rolling a die is like randomly choosing a number between 1 and 6.
So essentially, in the example of rolling a die, we have possible outcomes (i.e., the faces), and a random process that chooses one of them.
The NumPy random choice function is a lot like this. Given an input array of numbers, numpy.random.choice will choose one of those numbers randomly.
So let’s say that we have a NumPy array of 6 integers … the numbers 1 to 6.
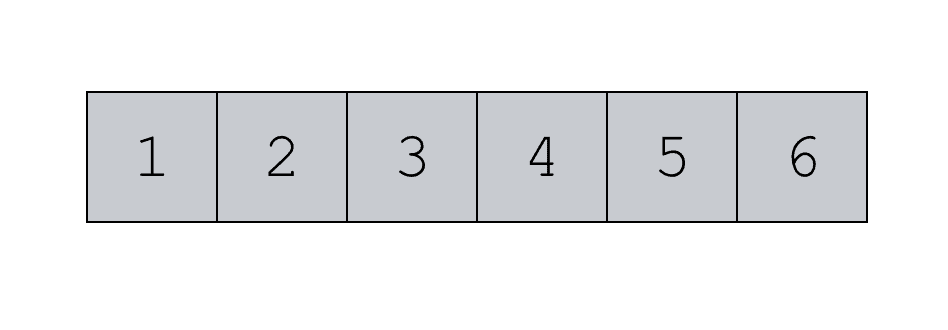
If we apply np.random.choice to this array, it will select one. It will choose one randomly…. it’s essentially the same as rolling a die.
That’s how np.random.choice works. You input some items, and the function will randomly choose one or more of them as the output.
The syntax of numpy random choice
Conceptually, this function is easy to understand, but using it properly can be a little tricky.
Ultimately, to use NumPy random choice properly, you need to know the syntax and how the syntax works.
That being the case, let’s look at the syntax of np.random.choice.
A quick note
One quick note …
In this tutorial, you’ll see me refer to the function as np.random.choice.
The term “np” refers to NumPy. But, to get the syntax to work properly, you need to tell your Python system that you’re referring to NumPy as “np”. You need to run the code import numpy as np. This code essentially tells Python that we’re giving the NumPy package the nickname “np“.
I’ll show you exactly how to do that again in the examples section of this tutorial, but I want to briefly explain it before we look at the syntax.
An explanation of the syntax
Ok, let’s take a look at the syntax.
The np.random.choice() function is fairly simple. When you use it, there is the name of the function, and then some parameters that will be enclosed inside of parenthesis.
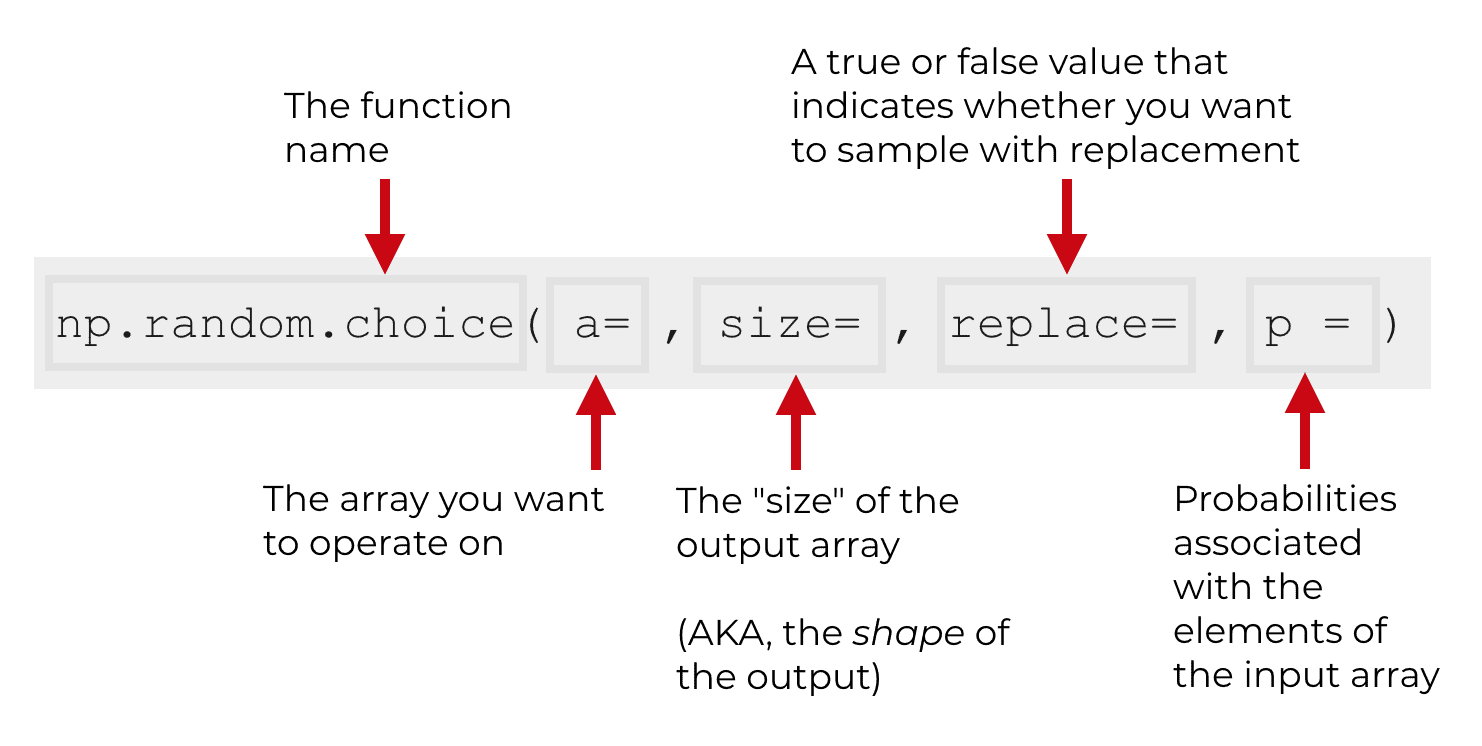
Because the parameters of the function are important to how it works, let’s take a closer look at the parameters of NumPy random choice.
The parameters of numpy random choice
There are four parameters for the NumPy random choice function:
asizereplacep
Let’s discuss each of these individually.
a (required)
The a parameter enables us to specify the array of input values … typically a NumPy array.
This is essentially the set of input elements from which we will generate the random sample.
Note that the a parameter is required … you need to provide some array-like structure that contains the inputs to the random selection process.
Also note that the a parameter is flexible in terms of the inputs that it will accept. Typically, we’ll supply a NumPy array of numbers to the a parameter. However, because it is flexible, it will also accept things like Python lists, tuples, and other Python sequences.
Moreover, instead of supplying a sequence like a NumPy array, you can also just provide a number (i.e., an integer). If you provide an integer n, it will create a NumPy array of integers up to but excluding n by using the NumPy arange function. In this case, it’s as if you supplied a NumPy array with the code np.arange(n). I’ll show you an example of this in the examples section of this tutorial.
size
The size parameter describes (…. wait for it ….)
… the size of the output.
Remember that the NumPy random choice function accepts an input of elements, chooses randomly from those elements, and outputs the random selections as a NumPy array.
Because the output of numpy.random.choice is a NumPy array, the array will have a size. If you know about NumPy arrays, this will make sense, but if you’re new to NumPy this may be confusing.
Therefore, if you don’t know what the size attribute is, I suggest that you read our tutorial about NumPy arrays. Specifically, you should read the section about the attributes of NumPy arrays.
replace
The replace parameter specifies whether or not you want to sample with replacement.
If you’ve taken a statistics class, you’ll probably be familiar with this.
… but if you haven’t taken a stats class, the idea of sampling with and without replacement might be foreign.
That being the case, let me quickly explain.
Let’s say that you have 4 simple cards on a table: a diamond, a spade, a heart, and a club. (This is an extremely simple example, so we’re working with simplified playing cards.)

I turn them over and mix them up on the table. Then I ask you to close your eyes.
You make your selection … it’s the heart card.

Next, I ask you to select another card.
… now, this is the critical point.
Do you put your first card back or not? Do you “replace” your initial selection?
If you do put your card back, then it will be possible to re-select the heart card, or any of the other three cards. But if you do not replace your initial card, then it will only be possible to select a spade, diamond, or club.
Essentially, replacement makes a difference when you choose multiple times.
And this is what the replace parameter controls. It will control whether or not an element that is chosen by numpy.random.choice gets replaced back into the pool of possible choices.
I’ll explain this again in the examples section, so you can see it in action.
p
Finally, the p parameter controls the probability of selecting a given item.
By default, each item in the input array has an equal probability of being selected.
It’s like rolling a fair die.
A fair die has 6 sides, and each side is equally likely to come up. So the probability of rolling a 1 is .1667 (i.e., 1/6th). The probability of rolling a 2 is also .1667, etc.
Similarly, if we set up NumPy random choice with the input values 1 through 6, then each of those values will have an equal probability of being selected, by default.
But we can change that. We can manually specify the probabilities of the different outcomes. For example, we could make selecting ‘1‘ a probability of .5, and give the other outcomes a probability of .1. (This is akin to rolling an unfair, weighted die.)
Essentially, this is what the p parameter controls: the probabilities of selecting the different input elements.
Note that the p parameter is optional, and if we don’t provide anything, NumPy just treats each outcome as equally likely.
If we do provide something to the p parameter, then we need to provide it in the form of an “array like” object, such as a NumPy array, list, or tuple.
Examples: how to use the numpy random choice function
Now that we’ve looked at the syntax of numpy.random.choice, and we’ve taken a closer look at the parameters, let’s look at some examples.
Examples:
- select a random number from a numpy array
- generate a random sample from a numpy array
- perform random sampling with replacement
- change the probabilities of different outcomes
- select a sample from a list of items
Run this code first
Before you run any of these examples, you’ll need to run some code as a preliminary setup step.
Import numpy
Specifically, you’ll need to properly import the NumPy module.
Keep in mind, that to import the NumPy module into your code environment, you’ll need to have NumPy installed on your computer first. Installing NumPy is complicated, and beyond the scope of this blog post. Having said that, I recommend that you just use Anaconda to get the modules properly installed.
But assuming that you have NumPy installed on your computer, you can import it into your working environment with the following code:
import numpy as np
This will import NumPy with the nickname np. Going forward, we will syntactically refer to NumPy as np in our code.
Example 1: select a random number with np.random.choice
In this first example, we’re going to select a single integer from a range of possible integers.
More specifically, we’re going to select a single integer between 0 and 9.
First, before we use np random choice to randomly select an integer from an array, we actually need to create the NumPy array.
Let’s do that now.
Create a NumPy array with np.arange
Here, we’re going to create a simple NumPy array with the numpy.arange function.
array_0_to_9 = np.arange(start = 0, stop = 10)
This is fairly straightforward, as long as you understand how to use np.arange. If you don’t, make sure to read our numpy.arange tutorial.
Using NumPy arange this way has created a new array, called array_0_to_9. This array contains the integers from 0 to 9.
You can print it out with the print function:
print(array_0_to_9)
OUTPUT:
[0 1 2 3 4 5 6 7 8 9]
Visually, we can represent the array as follows:

This is really straight forward … this array contains the integers from 0 to 9.
Next, we’re going to randomly select one of those integers from the array.
Select a random number from the NumPy array
To select a random number from array_0_to_9 we’re now going to use numpy.random.choice.
np.random.seed(0)
np.random.choice(a = array_0_to_9)
OUTPUT:
5
If you read and understood the syntax section of this tutorial, this is somewhat easy to understand. But there are a few potentially confusing points, so let me explain it.
Essentially, we’re using np.random.choice with the ‘a‘ parameter. You’ll remember from the syntax section earlier in this tutorial that the a parameter enables us to set the input array (i.e., the NumPy array that contains our input values). In other words, the code a = array_0_to_9 indicates that the input values are contained in the array array_0_to_9.
Remember, the input array array_0_to_9 simply contains the numbers from 0 to 9.
When we use np.random.choice to operate on that array, it simply randomly selects one of those numbers.
In this case, it randomly selects the number 5.
Visually, we can represent the operation like this:
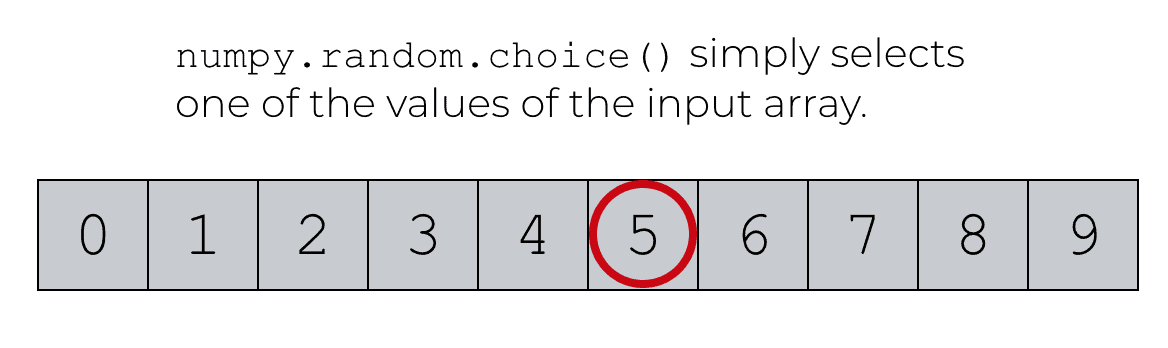
The input array has 10 values, and NumPy random choice randomly chooses one of them.
Why do we need to use np.random.seed?
There’s one part of this code that confuses many beginners, so I want to address it.
Before we ran the line of code np.random.choice(a = array_0_to_9), we ran the code np.random.seed(0).
We need np.random.seed because it “seeds” the random number generator for numpy.random.choice.
But WTF is a “seed” anyway?
This is a little complicated, but I’ll briefly explain here.
The NumPy random choice function operates on the principle of pseudorandom number generation.
When we use a pseudorandom number generator, the numbers in the output approximate random numbers, but are not exactly “random.” In fact, when we use pseudorandom numbers, the output is actually deterministic; the output is actually determined by an initializing value called a “seed.”
Let me say that again: when we set a seed for a pseudorandom number generator, the output is completely determined by the seed.
What that means is that if we use the same seed, a pseudorandom number generator will produce the same output.
Let me show you:
np.random.seed(0)
np.random.choice(a = np.arange(10))
This produces the output 5.
Now run it again with the same seed.
np.random.seed(0)
np.random.choice(a = np.arange(10))
It produces the output 5 again.
You can run this code as many times as you like. If you use the same seed, it will produce the exact same output.
np.random.choice is only pseudo random
What this means is that np.random.choice is random-ish. It’s sort of random, in the sense that there will be no discernible relationship between the seed and the output. But you have to remember that using the same seed will produce the same output.
This is actually good, because it makes the results of a pseudorandom function reproducible. If I share my code with you, and you run it with the same seed, you will get the exact same result. This is good for code testing, among other things.
If this is still confusing, you should read our tutorial about numpy.random.seed, which explains random number generation with NumPy.
Select a single integer (shorthand syntax)
Ok.
Now that I’ve shown you how to select a single random number from a specific NumPy array, let’s take a look at another way to select a number from a sequence of values.
Here, we’re going to select a number from the numbers 0 to 9. It’s essentially just like the prior example.
The one major difference is that we’re not going to supply a specific input array. Instead, we’re just going to provide a number inside of the parenthesis when we call np.random.choice. Here, we’re going to run the code np.random.choice(10).
np.random.seed(0)
np.random.choice(10)
Which produces the exact same output as in the previous example.
OUTPUT:
5
What’s going on here?
In this example, we ran the code np.random.choice(10). We did not provide a specific NumPy array as an input. Instead, we just provided the number 10.
When we provide a number to np random choice this way, it will automatically create a NumPy array using NumPy arange. Effectively, the code np.random.choice(10) is identical to the code np.random.choice(a = np.arange(10)). So by running np.random.choice this way, it will create a new numpy array of values from 0 to 9 and pass that as the input to numpy.random.choice.
This is essentially a shorthand way to both create an array of input values and then select from those values using the NumPy random choice function.
Example 2: select a random sample from a numpy array
Now that you’ve learned how to select a single number from a NumPy array, let’s take a look at how to create a random sample with NumPy random choice. That is, we’re going to select multiple elements from an input range.
Create a numpy array
First, let’s just create a NumPy array.
Here, we’ll create a NumPy array of values from 0 to 99.
array_0_to_99 = np.arange(100)
Select a random sample from the numpy array
Now that we have our input array, let’s select a sample of 5 numbers from it:
To do this, we’ll use the size parameter.
np.random.seed(1)
np.random.choice(array_0_to_99, size = 5)
OUTPUT:
array([37, 12, 72, 9, 75])
What happened here?
The NumPy random choice function randomly selected 5 numbers from the input array, which contains the numbers from 0 to 99.
The output is basically a random sample of the numbers from 0 to 99.
Example 3: perform random sampling with replacement
Next, let’s create a random sample with replacement using NumPy random choice.
Here, we’re going to create a random sample with replacement from the numbers 1 to 6.
Create a numpy array
First, we’ll just create a NumPy array of the values from 1 to 6.
array_1_to_6 = np.arange(start = 1, stop =7)
If we print it out, we can see the contents.
print(array_1_to_6)
OUT:
[1 2 3 4 5 6]
This is really straight forward. It’s just the numbers from 1 to 6.
Create a random sample from the input
Now, we’ll generate a random sample from those inputs.
Specifically, we’re going to create a sample of 3 values.
Additionally, we will set the replace parameter to replace = True. This will cause np.random.choice to perform random sampling with replacement. That is, even if a value is selected once, it will be “replaced” back into the possible input values, and it will be possible that the input could be selected again.
Let’s run the code.
np.random.seed(77)
np.random.choice(a = array_1_to_6, size = 3, replace = True)
OUTPUT:
array([5, 5, 4])
Notice what’s in the output. We have an output of 3 values. This is because we set the size parameter to size = 3. That means that the output must have 3 values.
Also, notice the values that are in the output. The value 5 is repeated twice.
Why?
This is possible because we set the replace parameter to replace = True.
When we do this, it means that an item in the input can be selected (i.e., included in the sample) and will then be “replaced” back into the pool of possible input values. Setting replace = True essentially means that a given input value can be selected multiple times!
Note: this is like rolling a die multiple times
Remember earlier in this tutorial that I explained NumPy random choice in terms of rolling a die?
That’s essentially what we’ve done in this example. The code np.random.choice(a = array_1_to_6, size = 3, replace = True) is essentially like rolling a die multiple times!
That’s what’s great about Python and NumPy … if you know how to use the tools right, you can begin to create little models of real-world processes.
Example 4: change the probabilities associated with outcomes
Next, we’re going to work with the p parameter to change the probabilities associated with the different possible outcomes.
So for example, let’s reuse our array array_1_to_6.
Here’s the code to create the array again:
array_1_to_6 = np.arange(start = 1, stop =7)
Essentially, the array array_1_to_6 has the values from 1 to 6.
Now, we’re going to randomly select from those values (1 to 6) but the probability of each value will not be the same.
Remember that by default, np.random.choice gives each input value an equal probability of being selected.
… but if we use the p parameter, we can change this.
np.random.choice(a = array_1_to_6, p = [.5,.1,.1,.1,.1,.1])
What are we doing here?
We’re using the p parameter to give the input values (1 to 6) different probabilities.
We can visualize the new setup like this:
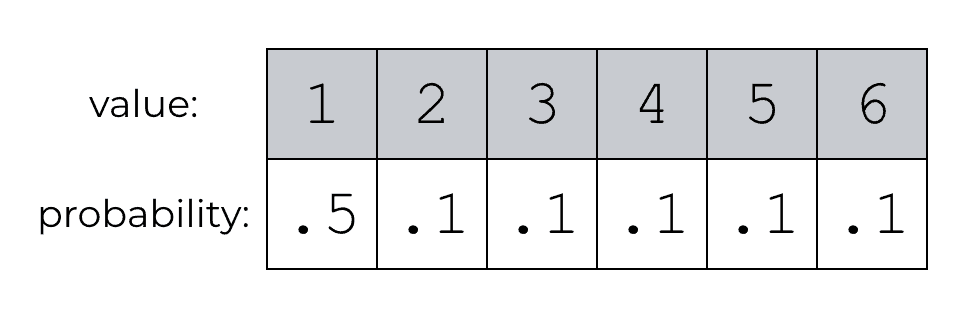
So essentially, the value “1” will have a probability of being selected of .5 (a 50% chance). And the other values from 2 to 6 will each have a probability of .1.
Now let’s run the code:
np.random.seed(42)
np.random.choice(a = array_1_to_6, p = [.5,.1,.1,.1,.1,.1])
OUT:
1
Generate a random sample from weighted inputs
Now let’s run the code again, but instead of generating a single value, we’ll generate a random sample of 20 values.
np.random.seed(42)
np.random.choice(a = array_1_to_6, p = [.5,.1,.1,.1,.1,.1], size = 20)
OUT:
array([1, 6, 4, 2, 1, 1, 1, 5, 3, 4, 1, 6, 5, 1, 1, 1, 1, 2, 1, 1])
Look closely at the numbers in the output array. LOOK AT ALL THOSE 1‘s.
Just by glancing at the output, you can see that 1 is coming up a lot more than the other values. That’s exactly how we designed it! There’s a 50% chance of generating a 1.
Example 5: select a random sample from list of items
Next, let’s move on from using numbers as possible outcomes.
…. let’s start using non-numeric inputs in the input array.
Here, we’re going to use a simple example.
For our input array, we’re going to create a Python array of 4 simplified playing cards: a ‘Diamond’ card, a ‘Spade’ card, a ‘Heart’, and a ‘Club’.
simple_cards = ['Diamond','Spade','Heart','Club']
You can think of the list simple_cards like this:
simple_cards represents a simplified set of 4 cards.
This is obviously not like a real set of 52 playing cards. As always, I really want to simplify this as much as possible just so you can see how this works.
Technically though, what is simple_cards? It’s a Python list that contains 4 strings.
Randomly select one item from the Python list
Now that we have our Python list, we’re first just going select a single item randomly from that list.
This is really easy. It’s almost exactly the same as some of the previous examples above where we were selecting a single item from a NumPy array of numbers. The only difference is that we’re supplying a list of strings to the numpy.random.choice instead of a NumPy array.
Let’s take a look.
np.random.seed(0)
np.random.choice(simple_cards)
OUTPUT:
'Diamond'
You can think of this code like selecting a single card from our simplified deck of four cards. There are four possible cards, and we selected the diamond.

From a technical perspective, if you read the earlier examples in this blog post, this should make sense.
All we did is randomly select a single item from our Python list.
Keep in mind though that the code is a little simplified syntactically, because I did not explicitly reference the parameters. If we were a little more explicit in how we wrote this, we could write the code as np.random.choice(a = simple_cards, replace = True). That’s effectively the same thing.
Now, let’s move on to a slightly more complicated example. We’re going to generate a random sample from our Python list.
Select a random sample from the Python list
Random sampling from a Python list is easy with NumPy random choice.
Once again, it’s almost exactly the same as some of the previous examples in this blog post.
Here, we’re going to select two cards from the list.
Essentially, we’re just going to pass the Python list to NumPy random choice and set the size parameter to 2. We’ll also set replace = False to make it so we can’t select the same card twice. I really want this to be like selecting two different cards from a deck of cards.
Let’s take a look at the code.
np.random.seed(55)
np.random.choice(a = simple_cards, size = 2, replace = False)
OUT:
array(['Diamond', 'Club'], dtype='U7')
So in this example, we randomly selected two cards from the ‘deck’ (i.e., we randomly selected 2 items from the list).
We selected the ‘Diamond’ and the ‘Club.’

Again, this example is pretty straight forward if you’ve read and understood the previous examples.
If this does not make sense, I recommend that you start at the top and review a few of the more simple examples more carefully.
Random sampling is really important for data science
Random sampling is really important for data science, speaking broadly.
The reason is that random sampling is a key concept and technique in probability. It’s also very important in statistics. Moreover, sampling is also applicable to machine learning and deep learning.
Essentially, random sampling is really important for a variety of sub-disciplines of data science.
You really need to know how to do this!
I’ve written this tutorial to help you get started with random sampling in Python and NumPy.
Having said that, I realize that random sampling can be confusing to beginners.
With that in mind, if you have specific questions about random sampling with NumPy or about the NumPy random choice function, please post your question in the comments section at the bottom of this page.
You should learn more about NumPy
Not only is the numpy.random.choice function important for data science and probability, the broader NumPy toolkit is important for data science in Python.
NumPy gives you a set of tools for working with numeric data in Python. To really get the most out of the NumPy package, you’ll need to learn many functions and tools … not just numpy.random.choice. For example, you’ll need to learn <href=”https://www.sharpsightlabs.com/blog/numpy-array-python/”>how to create NumPy arrays, how to calculate average values and other statistics, how to reshape NumPy arrays, and more.
I recommend that you read our free tutorials …. they will teach you a lot about NumPy.
For more tutorials, sign up for our email list
I also recommend that you sign up for our email list.
We regularly post tutorials about NumPy and data science in Python.
If you sign up for our email list, you’ll get our tutorials delivered directly to your inbox …
You’ll get free tutorials on:
- NumPy
- Pandas
- Base Python
- Scikit learn
- Machine learning
- Deep learning
- … and more.
If you want to learn more about NumPy and data science, sign up now.
Your explanations are good to conceive. You look at all involved aspects and your examples are well choosen. Very good.
Excellent explanations. Very thorough and well explained with an easy example (dice). Thank you!
Good to hear that you liked it. I try to make everything crystal clear.
Great write up … wish I had time to read more of your stuff !!!
Thanks Avnish
This tutorial is just the best for me. Makes it easy for me to learn and understand. Great work
That’s awesome. Great to hear.
This is a great tutorial. It explained a lot. However I did not find a solution for my problem. I need to sample n samples from m containers, each one having different number of elements. But the resulting count for a given container cannot exceed initial count for that container. Is it possible?
Hi Joshua.
What is dtype = ‘U7’ in the output of the last example?