NumPy arrays are an important component of the Python data science ecosystem.
When working with NumPy arrays, you’re going to need to be able to perform basic data manipulation.
In particular, you may need to change the “shape” of the data; you may need to change how the data are arranged in the NumPy array.
To do this, you can use the NumPy reshape method.
In this blog post, I’ll explain the NumPy reshape method. I’ll give you a quick overview of the shape attribute of NumPy arrays, explain how the syntax works, and show you a couple of examples of the NumPy reshape method.
Ok. Let’s get started.
Before we dive into the syntax of reshape(), I’ll quickly review some of the basics of NumPy arrays.
If you want, you can click here to skip ahead directly to the section about the reshape() syntax.
A quick review of NumPy arrays
NumPy arrays are a structure in Python that hold numerical values that are all of the same type.
Visually, you can represent a NumPy array as something like this:
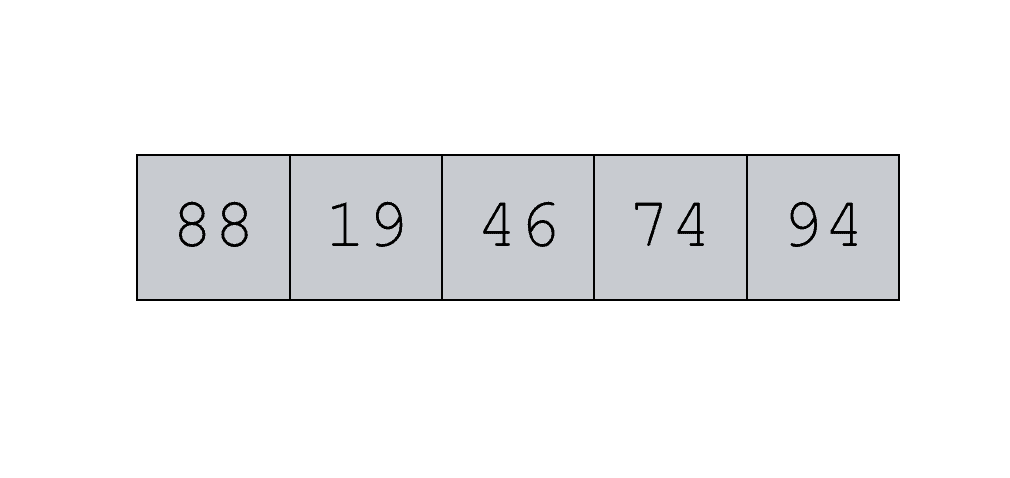
This is a visual representation of a NumPy array that contains five values: 88, 19, 46, 74, 94. All of these values have the same data type (in this case, they are integers).
If you’re not terribly familiar with them, you should read our quick introduction to NumPy arrays. That blog post will give you a solid foundation on arrays and how they work.
NumPy arrays have a shape
An important thing about NumPy arrays, is that they have a shape.
So if we create a simple NumPy array, the array will have a shape attribute that we can reference.
I’m going to show you more syntax later in this blog post, but here I’ll quickly give you an example so you can see what the shape attribute is.
simple_array = np.array([[1,2,3,4,5,6],[7,8,9,10,11,12]])

print(simple_array.shape)
OUTPUT:
(2, 6)
Notice what I did here.
I created an array with 2 rows and 6 columns.
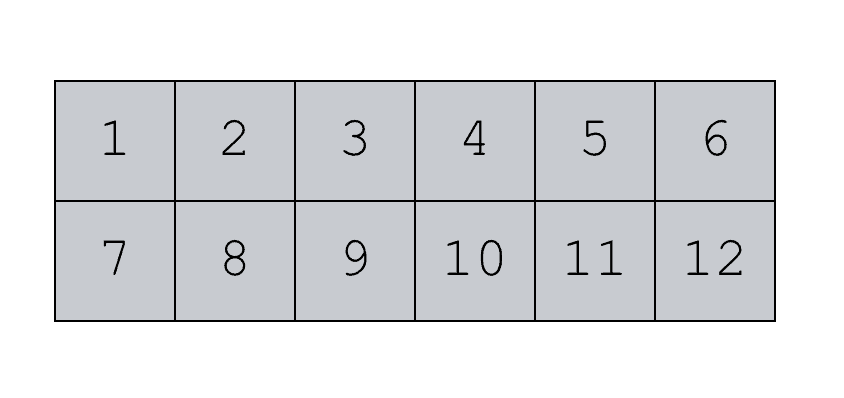
Then I referenced the shape attribute with the code simple_array.shape. Python displayed the shape attribute as a tuple of values: (2, 6). Python always returns the shape as a tuple.
So what exactly is the shape?
The shape attribute tells us how many elements are along each dimension. Said differently, the shape attribute essentially tells us how the values are laid out inside of the NumPy array.
Examples of the shape of NumPy arrays
That might not make sense yet, so it’s helpful to look at a few more examples. We’ll look at some toy examples to try to illustrate the shape attribute and how it relates to the reshape method.
Let’s create and examine another 2-dimensional array:
array_3x3 = np.array([[1,2,3],[4,5,6],[7,8,9]])
print(array_3x3)
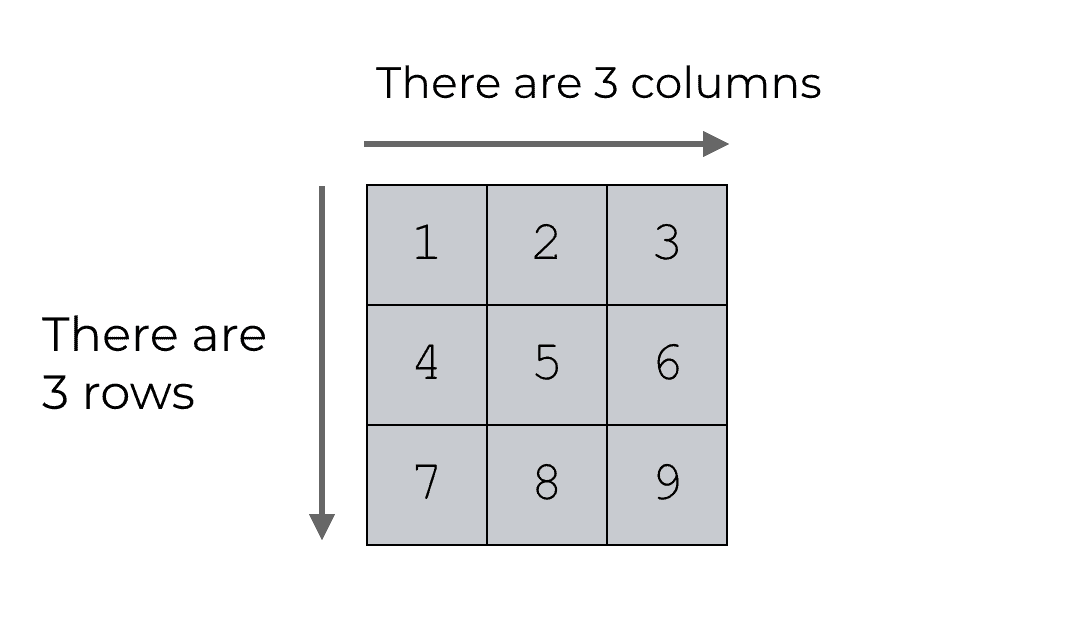
This array has 3 elements along the first dimension and 3 elements along the second dimension. Technically speaking, this particular array has a shape of (3,3). (Remember that Python displays the shape attribute as a tuple of values.)
Because this is two dimensional, you can think of the shape in terms of rows and columns. There are 3 rows and 3 columns. If we’re thinking in 2-dimensions, that’s basically what the shape tells us … the number of rows and columns.
Let’s take a look at another example.
array_2x6 = np.array([[1,2,3,4,5,6],[7,8,9,10,11,12]])

print(array_2x6.shape)
OUTPUT:
(2, 6)

This array has 2 rows and 6 columns. It is a 2 by 6 array. A little more technically, the shape is (2,6).
Ok. One more example.
array_6x2 = np.array([[1,2],[3,4],[5,6],[7,8],[9,10],[11,12]])
print(array_6x2.shape)
OUTPUT:
(6, 2)
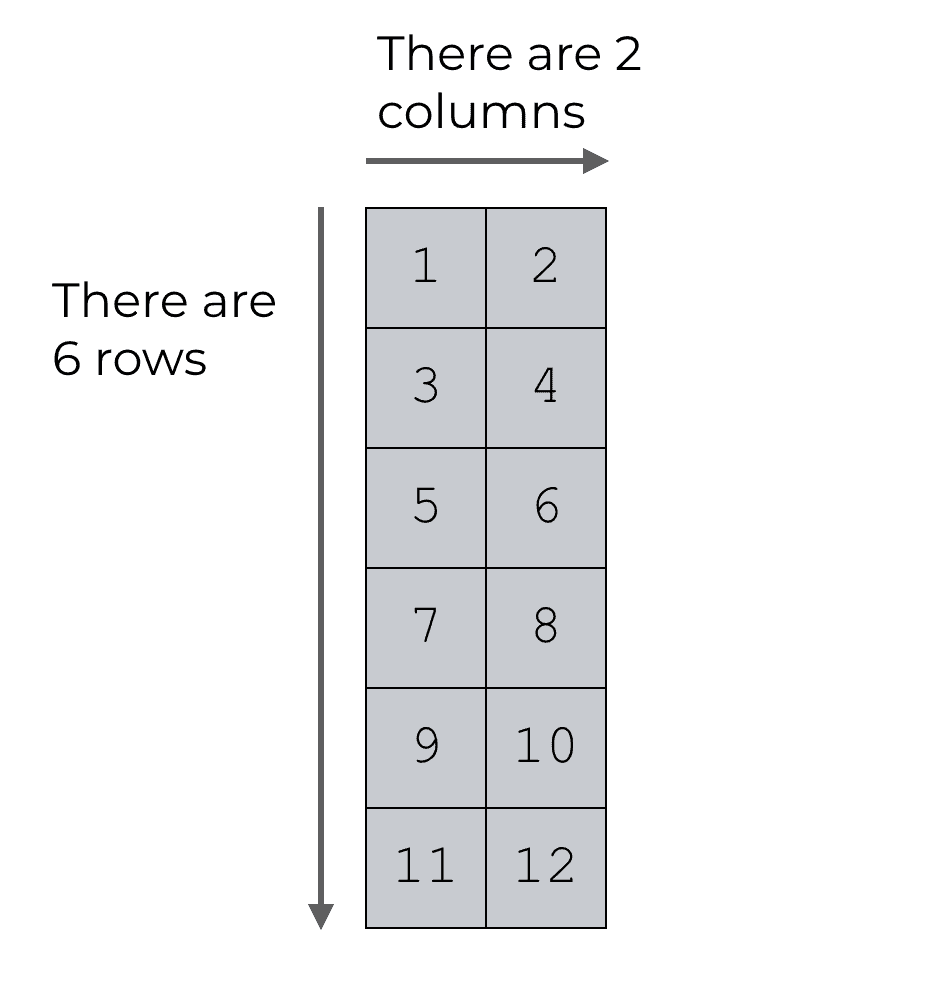
Here, this array has 6 rows and 2 columns. Its shape is (6, 2).
Do you get it?
The shape of a NumPy array tells us the number of elements along the dimensions of the array.
If we’re working with 2-dimensional arrays, the shape basically tells us the number of rows and columns. And if we’re working with higher dimensional arrays, the shape tells us the number of elements along all of the dimensions: dimension 1, dimension 2, dimension 3, etc.
NumPy reshape changes the shape of an array
Now that you understand the shape attribute of NumPy arrays, let’s talk about the NumPy reshape method.
NumPy reshape enables us to change the shape of a NumPy array.
For example, if we have a 2 by 6 array, we can use reshape() to re-shape the data into a 6 by 2 array:
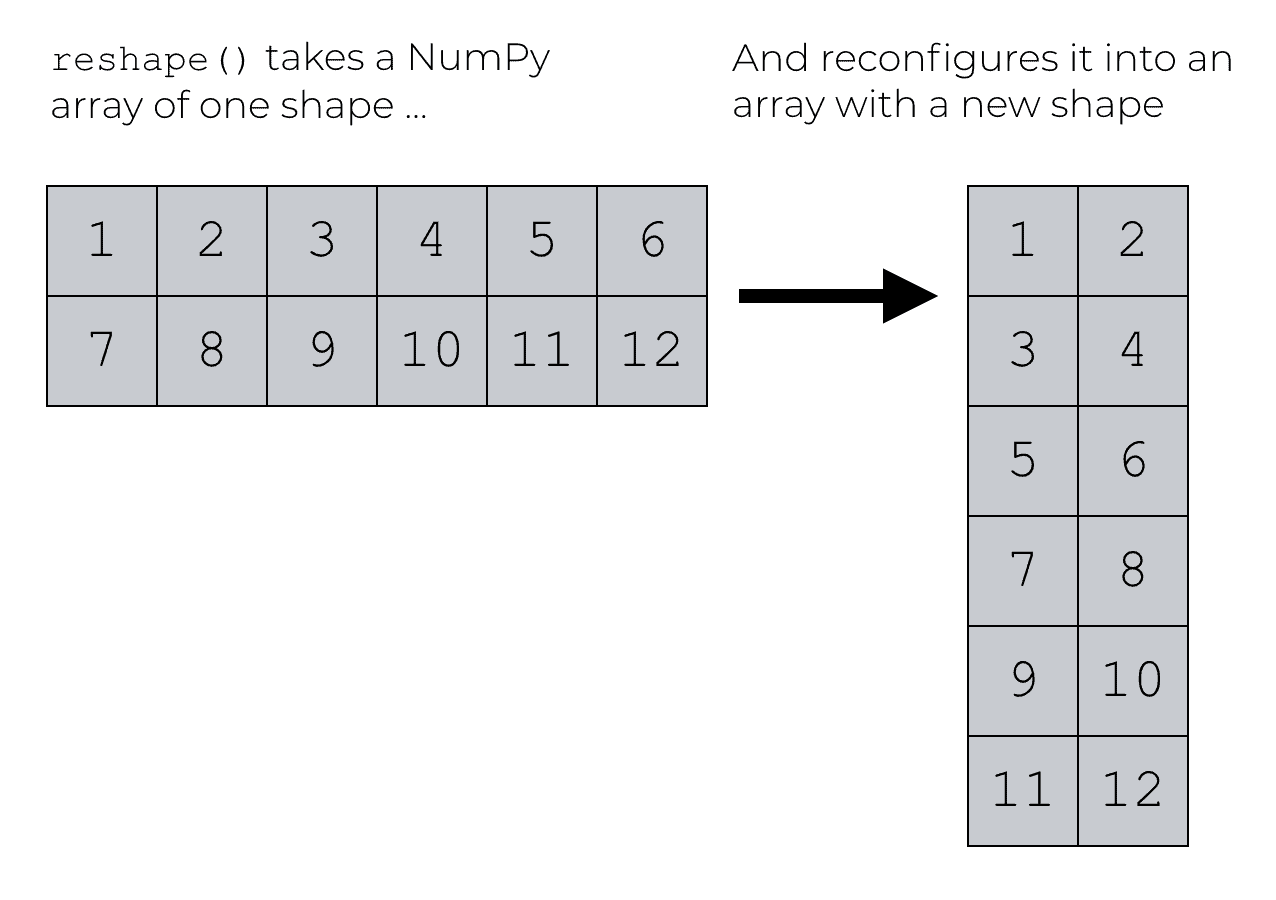
In other words, the NumPy reshape method helps us reconfigure the data in a NumPy array. It enables us to change a NumPy array from one shape to a new shape. It “re-shapes” the data.
How to use the NumPy reshape method
Let’s take a closer look at how reshape() works.
When we use the reshape() method, we need to have an existing NumPy array.
We then use the Python “dot” notation to call the method.
Inside of the call to reshape(), we need to provide a tuple of values that specify the shape of the new array.
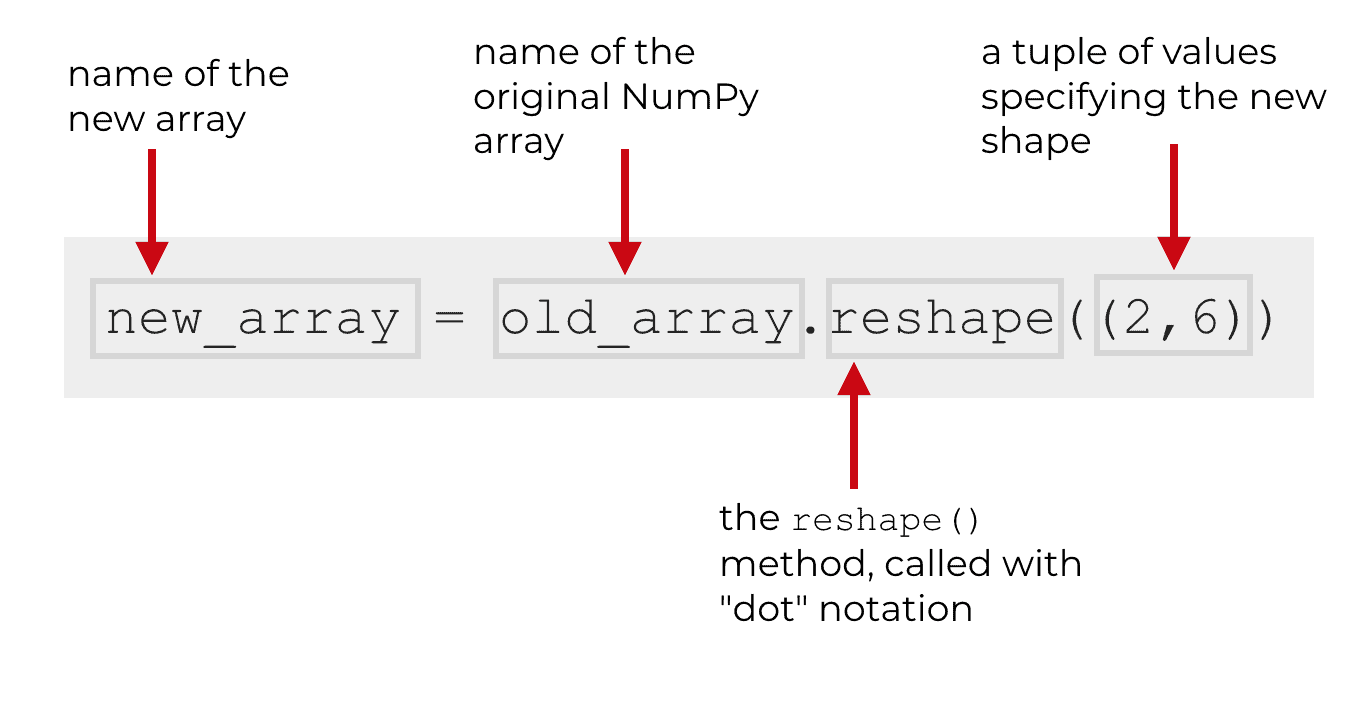
Keep in mind that the reshape() method doesn’t operate directly on the original NumPy array. It produces a new array. What that means is that you need to save the output in some way. Typically, that means that you’ll use the equal sign to assign the new array to a new name (which I’ve called “new_array” in the image above).
Also keep in mind that the new array must have the same number of elements as the original array.
Example: how to use numpy reshape
Ok. Now that I’ve shown you the syntax for reshape(), let’s quickly work through a simple example.
First, I’ll create a NumPy array. To use the reshape method, you need to have an existing NumPy array.
import numpy as np

simple_array = np.array([1,2,3,4,5,6,7,8,9,10,11,12])
print(simple_array.shape)
OUT:
(12,)
Here, we’ve created a simple NumPy array with 12 elements called simple_array. When we retrieve the shape attribute, you can see that the shape is (12,).
That might be a little confusing, so let me explain.
simple_array is a 1 dimensional array, not a 2 dimensional array. Therefore, we can’t think of this in terms of rows and columns, per se. There is strictly 1 dimension, and all 12 of the elements are aligned along that dimension. That’s why the shape attribute shows up as a single value within a tuple: (12,).
Ok. Now that we have an array, let’s reshape it.
new_array_2x6 = simple_array.reshape((2,6))
print(new_array_2x6)
When we use the print function to print out the array, you can see that the data have been re-shaped into a format with 2 rows and 6 columns:
[[ 1  2  3  4  5  6]
 [ 7  8  9 10 11 12]]
We can also directly examine the shape by retrieving the shape attribute:
print(new_array_2x6.shape)
Which gives us the following tuple of values:
(2, 6)
You can see that the shape of new_array_2x6 is (2, 6).
So what did we do here?
We used the reshape method to re-shape the data in simple_array into a new array with a new shape.
The original array had a shape of (12, ), but the new array – which we’ve called new_array_2x6 – has a shape of (2, 6). It has 2 rows and 6 columns.
Also, notice that the new array has the same number of elements as the original array. The original array, simple_array, had 12 total elements, all arranged in a single dimension. The new array, new_array_2x6, also has 12 elements. This is required. When you use the reshape method, it needs to produce an output array with the same number of elements as the original array. That is, the new array needs to have the same size as the original array.
Another example of how to use numpy reshape
Let’s work through another example by reshaping our data once more.
We’re going to take the array that we just created, new_array_2x6, and re-shape it into a NumPy array with a different shape.
We’re going to create an array with 6 rows and 2 columns.
new_array_6x2 = new_array_2x6.reshape((6,2))
print(new_array_6x2)
And here’s the output of the print() function:
[[ 1  2]
 [ 3  4]
 [ 5  6]
 [ 7  8]
 [ 9 10]
 [11 12]]
What did we do here?
We re-shaped the array new_array_2x6. That array had 2 rows and 6 columns.
This new array – new_array_6x2 – has 6 rows and 2 columns. The value have been flipped into a new shape, so to speak.
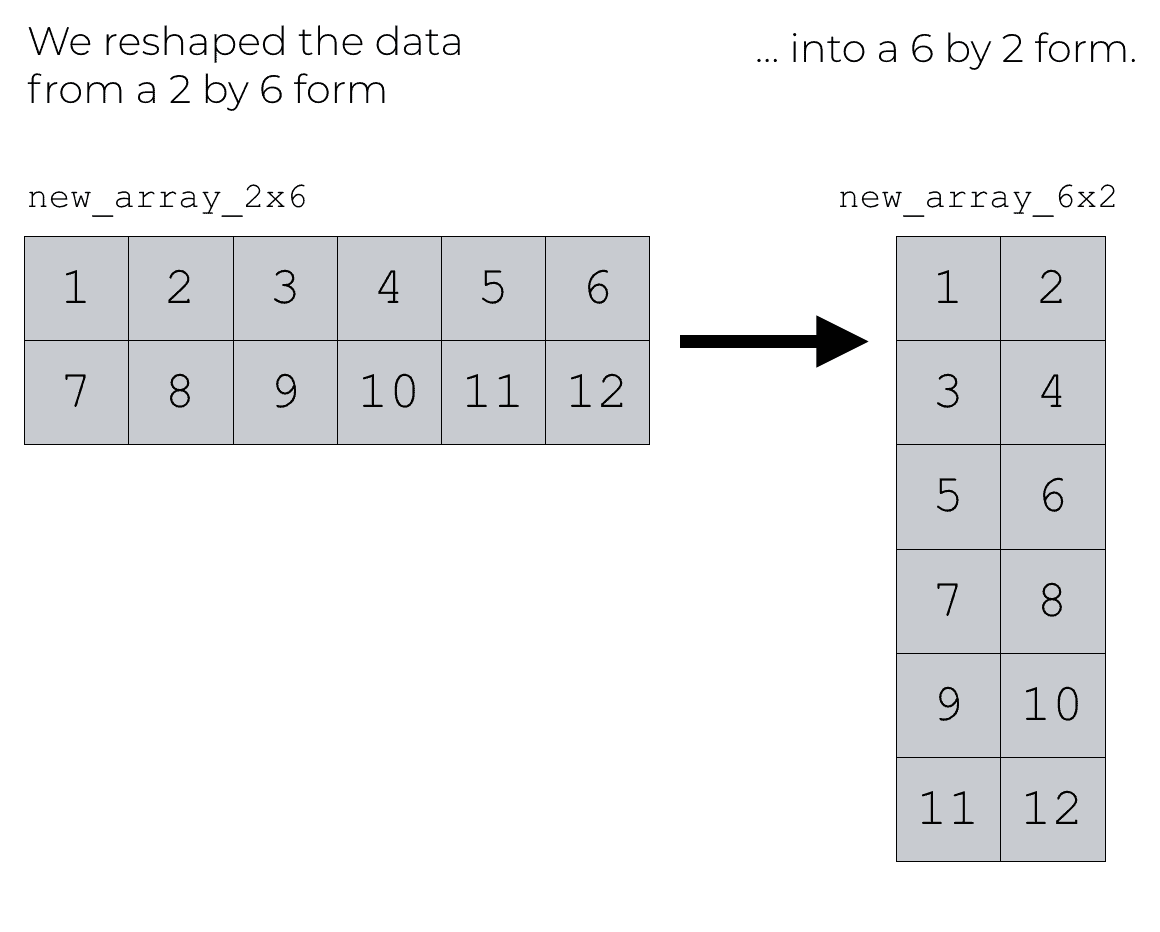
The data is the same. The individual observations are the same. The number of observations is the same. The primary difference is that they data in the new array are laid out in a new form. new_array_6x2 has a new shape.
Reshaping can be even more complicated
In this blog post, I’ve shown you examples of how to reshaped data in 1 and 2 dimensions. But, it’s possible to reshape data in more dimensions as well (e.g., reshaping data in 3-dimensions, etc).
In the interest of simplicity, I won’t cover those topics here (although I might address them in a future blog post).
If you’re just getting started with NumPy and data manipulation in Python, I strongly recommend that you work with very simple cases. Work on and master rehaping data in 1 and 2 dimensions first. That will help you build mastery of the basic syntax. It will also help build your intuition about how the toolkit works.
Once you’ve mastered the basics, you can increase the complexity to higher dimensions and larger datasets.
Leave your questions in the comments below
Are you still confused about how to use the NumPy reshape method?
Leave your questions in the comments below.
FYI, you have a typo in your first 6×2 example where your output is (2,6) (the text right after that image is correct).
Noted … fixed
Great stuff Josh. Really look forward to seeing more Python and R data science posts.
What is reshape(-1,1)?
This is not a working example, so I don’t really know what you’re trying to do.
At minimum, you need to provide an input dataset and code that shows how to use that dataset in reshape.
If you provide a better example, I might be able to help.
Also, try to provide some context …. where did you see this?
np.linspace(-3,3,12).reshape(-1,1)
In numpy you can use -1 when you want it to figure the value for the dimension. In this case, you are saying ” I want the array to be reshaped to 1 column and as many rows as needed (-1).
Can we reshape data in such away to split in to two data?
Yes, you can use
numpy.split(),numpy.hsplit(), ornumpy.vsplit().All of them will split a NumPy array (but they all work a little differently).
hello sir….your teaching way is very nice ,i may easily understand each concept .
sir i want to learn machine learning, please provide me machine learning full course……..so i can easily learn.
We’re going to be posting free tutorials here about machine learning in 2020 and beyond.
Sign up for the email list to make sure you get them …
hello sir im unable to search split in numpy….in your course website only 13 topics are available ….i want all topics of machine learning…plz help.
Well, I want a Ferrari 812 and a summer home on the Italian Riviera, but life is hard sometimes
This is so savage XD
????