This tutorial will show you how to use the NumPy sum function (sometimes called np.sum).
In the tutorial, I’ll explain what the function does. I’ll also explain the syntax of the function step by step. Finally, I’ll show you some concrete examples so you can see exactly how np.sum works.
Let’s jump in.
NumPy sum adds up the values of a NumPy array
Let’s very quickly talk about what the NumPy sum function does.
Essentially, the NumPy sum function sums up the elements of an array. It just takes the elements within a NumPy array (an ndarray object) and adds them together.
Having said that, it can get a little more complicated. It’s possible to also add up the rows or add up the columns of an array. This will produce a new array object (instead of producing a scalar sum of the elements).
Further down in this tutorial, I’ll show you examples of all of these cases, but first, let’s take a look at the syntax of the np.sum function. You need to understand the syntax before you’ll be able to understand specific examples.
The syntax of numpy sum
Like many of the functions of NumPy, the np.sum function is pretty straightforward syntactically.
We typically call the function using the syntax np.sum(). Note that this assumes that you’ve imported numpy using the code import numpy as np.
Then inside of the np.sum() function there are a set of parameters that enable you to precisely control the behavior of the function.
Let’s take a look.
The parameters of numpy sum
The NumPy sum function has several parameters that enable you to control the behavior of the function.
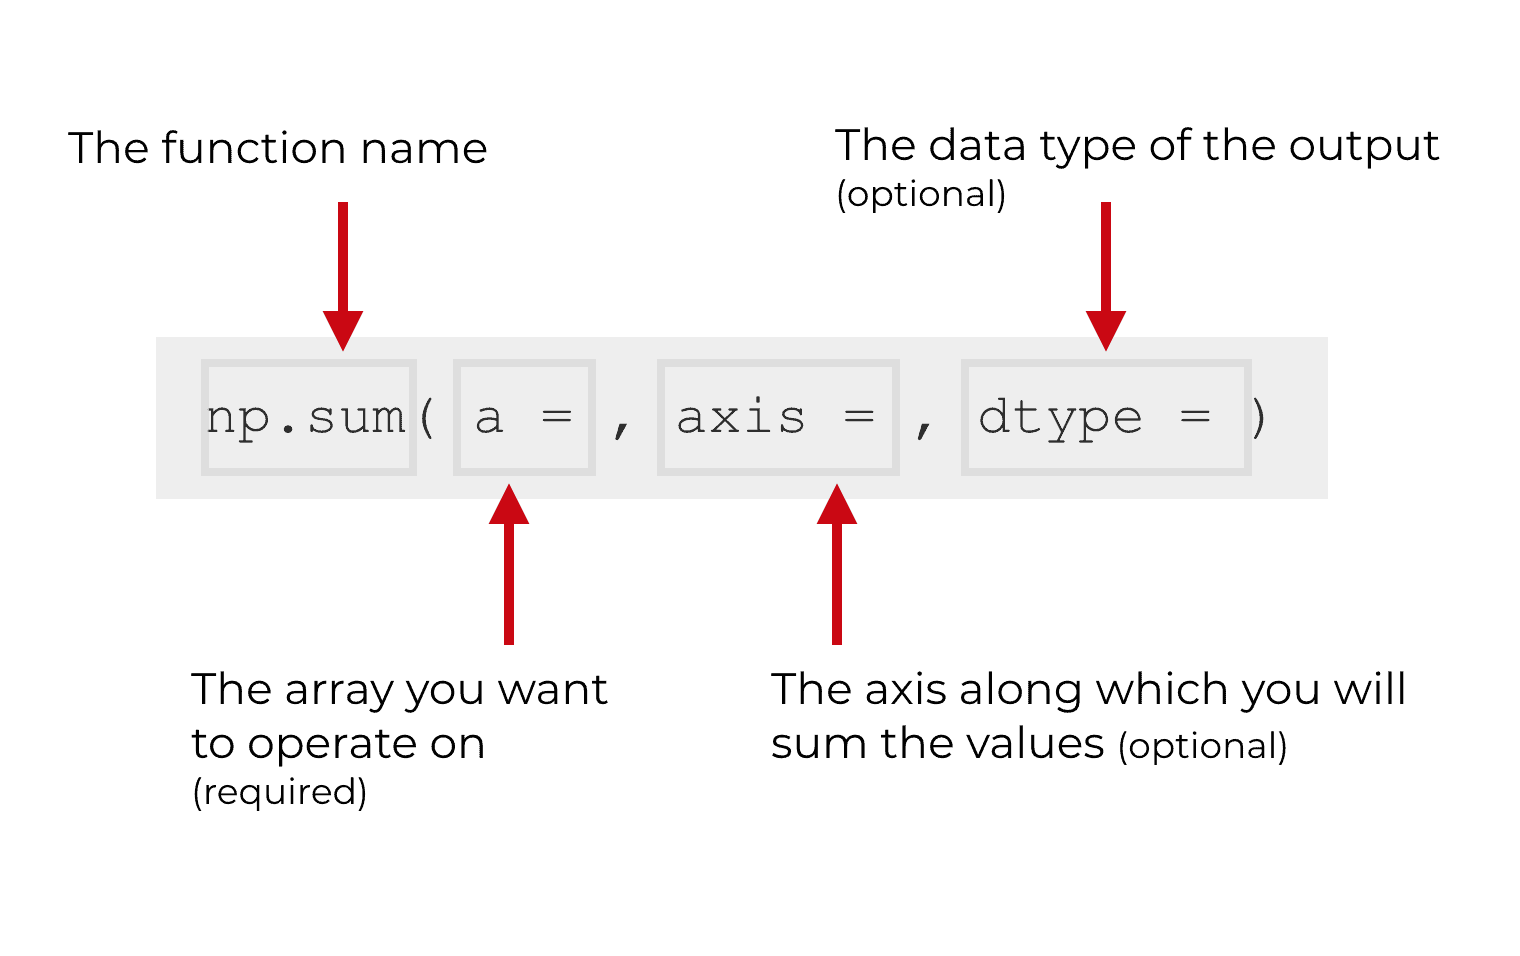
Although technically there are 6 parameters, the ones that you’ll use most often are a, axis, and dtype. I’ve shown those in the image above.
There are also a few others that I’ll briefly describe.
Let’s quickly discuss each parameter and what it does.
a (required)
The a = parameter specifies the input array that the sum() function will operate on. It is essentially the array of elements that you want to sum up.
Typically, the argument to this parameter will be a NumPy array (i.e., an ndarray object).
Having said that, technically the np.sum function will operate on any array like object. That means that in addition to operating on proper NumPy arrays, np.sum will also operate on Python tuples, Python lists, and other structures that are “array like.”
axis (optional)
The axis parameter specifies the axis or axes upon which the sum will be performed.
Does that sound a little confusing? Don’t feel bad. Many people think that array axes are confusing … particularly Python beginners.
I’ll show you some concrete examples below. The examples will clarify what an axis is, but let me very quickly explain.
The simplest example is an example of a 2-dimensional array.
When you’re working with an array, each “dimension” can be thought of as an axis. This is sort of like the Cartesian coordinate system, which has an x-axis and a y-axis. The different “directions” – the dimensions – can be called axes.
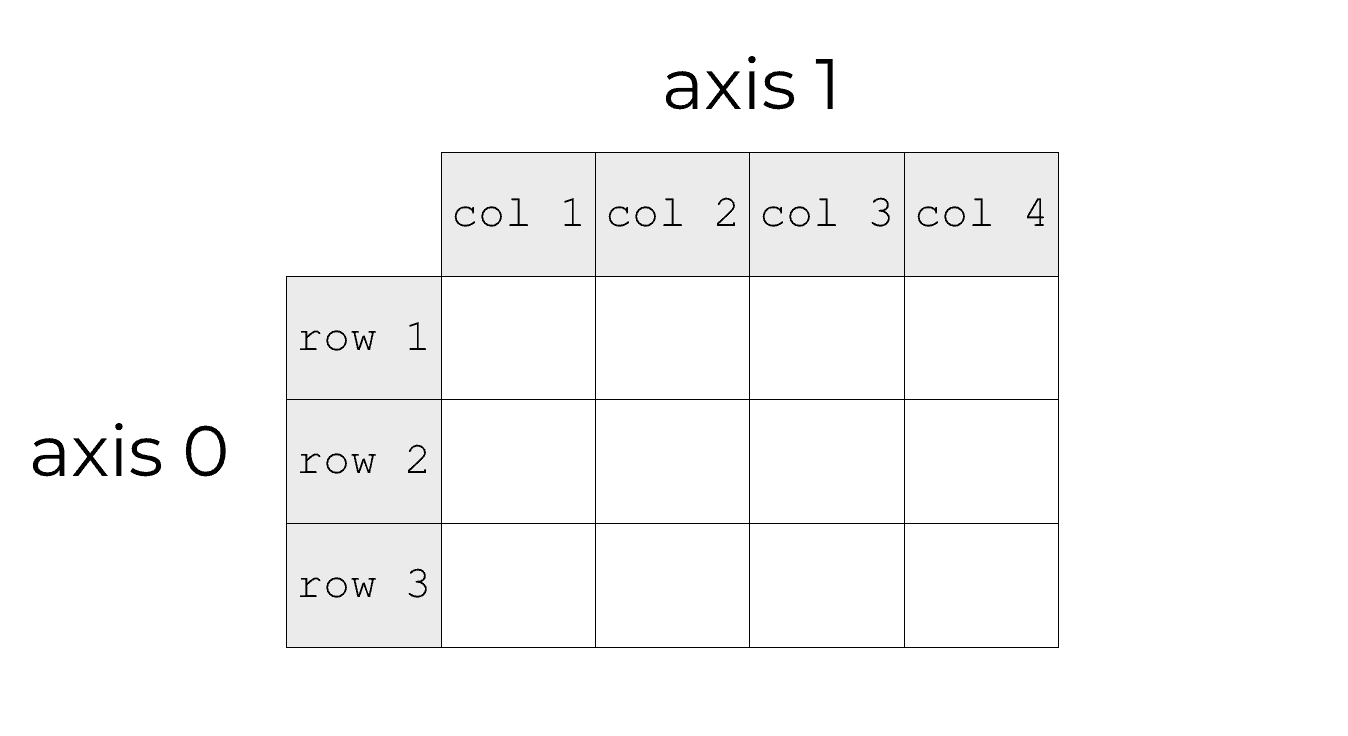
Array objects have dimensions. For example, in a 2-dimensional NumPy array, the dimensions are the rows and columns. Again, we can call these dimensions, or we can call them axes.
Every axis in a numpy array has a number, starting with 0. In this way, they are similar to Python indexes in that they start at 0, not 1.
So the first axis is axis 0. The second axis (in a 2-d array) is axis 1. For multi-dimensional arrays, the third axis is axis 2. And so on.
Critically, you need to remember that the axis 0 refers to the rows. Axis 1 refers to the columns.
Why is this relevant to the NumPy sum function? It matters because when we use the axis parameter, we are specifying an axis along which to sum up the values.
So for example, if we set axis = 0, we are indicating that we want to sum up the rows. Remember, axis 0 refers to the row axis.
Likewise, if we set axis = 1, we are indicating that we want to sum up the columns. Remember, axis 1 refers to the column axis.
If you’re still confused about this, don’t worry. There is an example further down in this tutorial that will show you how the axis parameter works. We also have a separate tutorial that explains how axes work in greater detail.
dtype (optional)
The dtype parameter enables you to specify the data type of the output of np.sum.
So for example, if you set dtype = 'int', the np.sum function will produce a NumPy array of integers. If you set dtype = 'float', the function will produce a NumPy array of floats as the output.
Python and NumPy have a variety of data types available, so review the documentation to see what the possible arguments are for the dtype parameter.
Note as well that the dtype parameter is optional.
out (optional)
The out parameter enables you to specify an alternative array in which to put the result computed by the np.sum function.
Note that the out parameter is optional.
keepdims (optional)
The keepdims parameter enables you to keep the number of dimensions of the output the same as the input.
This might sound a little confusing, so think about what np.sum is doing. When NumPy sum operates on an ndarray, it’s taking a multi-dimensional object, and summarizing the values. It either sums up all of the values, in which case it collapses down an array into a single scalar value. Or (if we use the axis parameter), it reduces the number of dimensions by summing over one of the dimensions. In some sense, we’re and collapsing the object down.
More technically, we’re reducing the number of dimensions. So by default, when we use the NumPy sum function, the output should have a reduced number of dimensions.
But, it’s possible to change that behavior. If we set keepdims = True, the axes that are reduced will be kept in the output. So if you use np.sum on a 2-dimensional array and set keepdims = True, the output will be in the form of a 2-d array.
Still confused by this? Don’t worry. I’ll show you an example of how keepdims works below.
Note that the keepdims parameter is optional.
initial (optional)
The initial parameter enables you to set an initial value for the sum.
Note that the initial parameter is optional.
Examples: how to use the numpy sum function
Ok, now that we’ve examined the syntax, lets look at some concrete examples. I think that the best way to learn how a function works is to look at and play with very simple examples.
In these examples, we’re going to be referring to the NumPy module as np, so make sure that you run this code:
import numpy as np
Sum the elements of a 1-d array with np.sum
Let’s start with the simplest possible example.
We’re going to create a simple 1-dimensional NumPy array using the np.array function.
np_array_1d = np.array([0,2,4,6,8,10])
If we print this out with print(np_array_1d), you can see the contents of this ndarray:
[0 2 4 6 8 10]
Now that we have our 1-dimensional array, let’s sum up the values.
Doing this is very simple. We’re going to call the NumPy sum function with the code np.sum(). Inside of the function, we’ll specify that we want it to operate on the array that we just created, np_array_1d:
np.sum(np_array_1d)
Which will produce the following output:
30
Because np.sum is operating on a 1-dimensional NumPy array, it will just sum up the values. Visually, we can think of it like this:
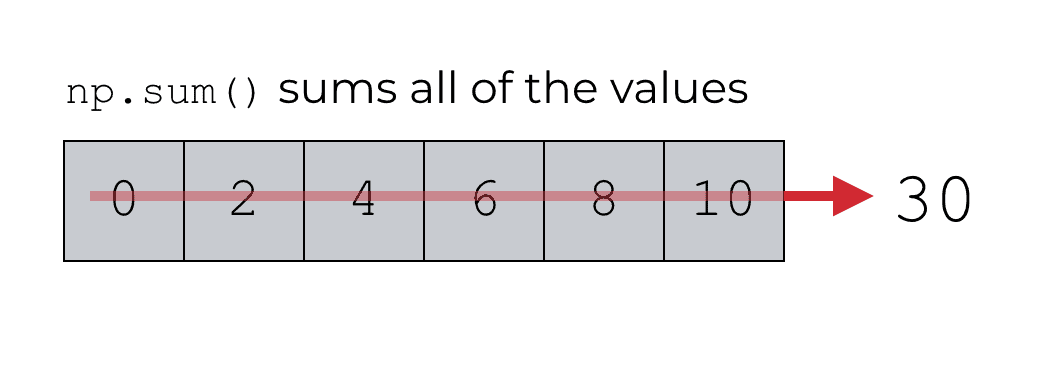
Notice that we’re not using any of the function parameters here. This is as simple as it gets.
When operating on a 1-d array, np.sum will basically sum up all of the values and produce a single scalar quantity … the sum of the values in the input array.
Sum the elements of a 2-d array with np.sum
Next, let’s sum all of the elements in a 2-dimensional NumPy array.
Syntactically, this is almost exactly the same as summing the elements of a 1-d array.
Basically, we’re going to create a 2-dimensional array, and then use the NumPy sum function on that array.
Let’s first create the 2-d array using the np.array function:
np_array_2x3 = np.array([[0,2,4],[1,3,5]])
The resulting array, np_array_2x3, is a 2 by 3 array; there are 2 rows and 3 columns.
If we print this out using print(np_array_2x3), you can see the contents:
[[0 2 4]
 [1 3 5]]
Next, we’re going to use the np.sum function to add up all of the elements of the NumPy array.
This is very straight forward. We’re just going to call np.sum, and the only argument will be the name of the array that we’re going to operate on, np_array_2x3:
np.sum(np_array_2x3)
When we run the code, it produces the following output:
15
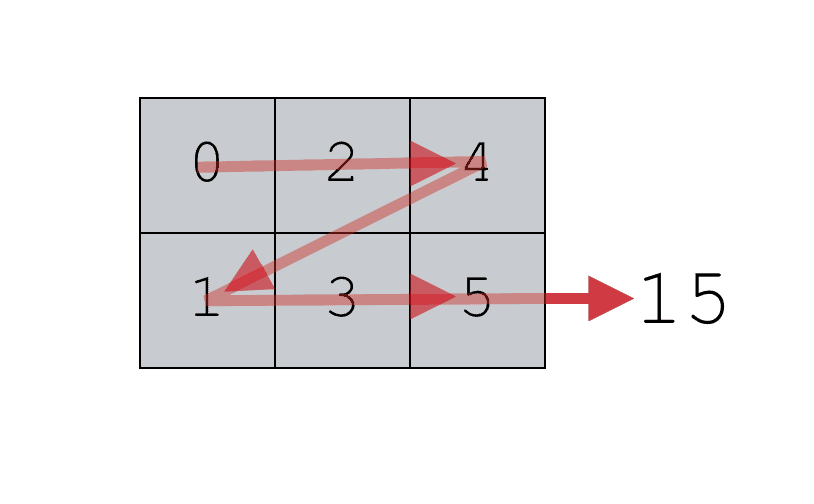
Essentially, the NumPy sum function is adding up all of the values contained within np_array_2x3. When you add up all of the values (0, 2, 4, 1, 3, 5), the resulting sum is 15.
This is very straightforward. When you use the NumPy sum function without specifying an axis, it will simply add together all of the values and produce a single scalar value.
Having said that, it’s possible to also use the np.sum function to add up the rows or add the columns.
Let’s take a look at some examples of how to do that.
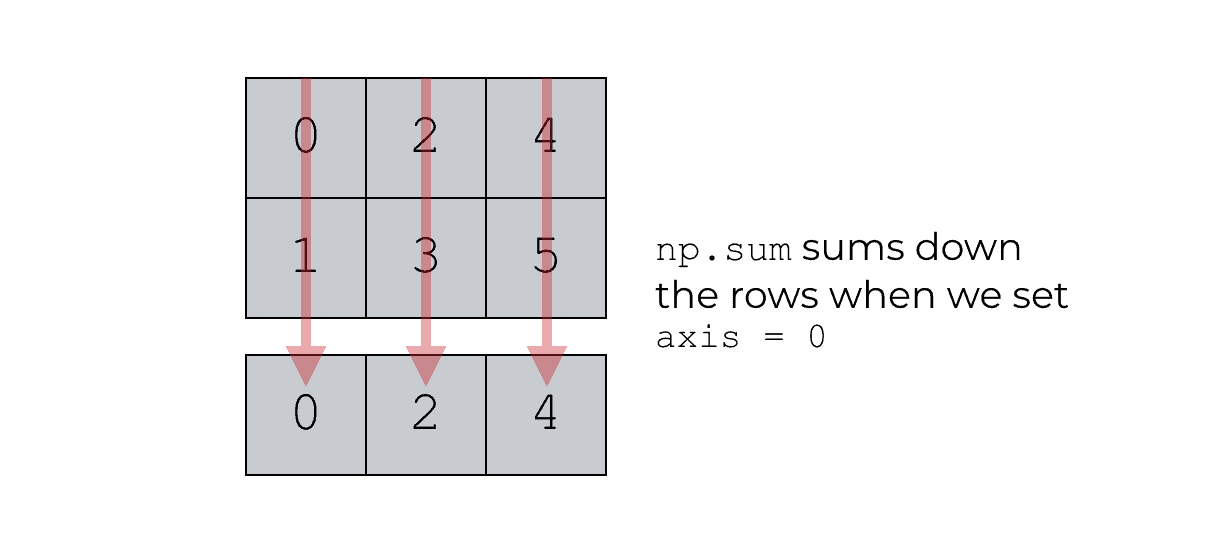
Sum down the rows with np.sum
Here, we’re going to sum the rows of a 2-dimensional NumPy array.
First, let’s just create the array:
np_array_2x3 = np.array([[0,2,4],[1,3,5]])
This is a simple 2-d array with 2 rows and 3 columns.
And if we print this out using print(np_array_2x3), it will produce the following output:
[[0 2 4]
 [1 3 5]]
Next, let’s use the np.sum function to sum the rows.
np.sum(np_array_2x3, axis = 0)
Which produces the following array:
array([1, 5, 9])
So what happened here?
When we use np.sum with the axis parameter, the function will sum the values along a particular axis.
In particular, when we use np.sum with axis = 0, the function will sum over the 0th axis (the rows). It’s basically summing up the values row-wise, and producing a new array (with lower dimensions).
To understand this, refer back to the explanation of axes earlier in this tutorial. Remember: axes are like directions along a NumPy array. They are the dimensions of the array.
Specifically, axis 0 refers to the rows and axis 1 refers to the columns.
So when we use np.sum and set axis = 0, we’re basically saying, “sum the rows.” This is often called a row-wise operation.
Also note that by default, if we use np.sum like this on an n-dimensional NumPy array, the output will have the dimensions n – 1. So in this example, we used np.sum on a 2-d array, and the output is a 1-d array. (For more control over the dimensions of the output array, see the example that explains the keepdims parameter.)
Sum across the columns with np.sum
Similar to adding the rows, we can also use np.sum to sum across the columns.
It works in a very similar way to our prior example, but here we will modify the axis parameter and set axis = 1.
First, let’s create the array (this is the same array from the prior example, so if you’ve already run that code, you don’t need to run this again):
np_array_2x3 = np.array([[0,2,4],[1,3,5]])
This code produces a simple 2-d array with 2 rows and 3 columns.
And if we print this out using print(np_array_2x3), it will produce the following output:
[[0 2 4]
 [1 3 5]]
Next, we’re going to use the np.sum function to sum the columns.
np.sum(np_array_2x3, axis = 1)
Which produces the following array:
array([6, 9])
Essentially, the np.sum function has summed across the columns of the input array.
Visually, you can think of it like this:
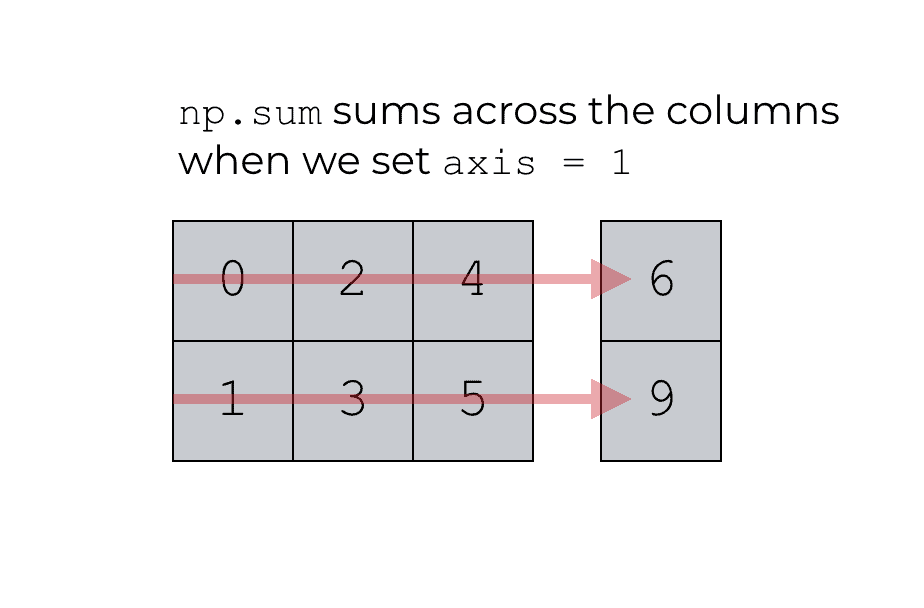
Once again, remember: the “axes” refer to the different dimensions of a NumPy array. Axis 0 is the rows and axis 1 is the columns. So when we set the parameter axis = 1, we’re telling the np.sum function to operate on the columns only. Specifically, we’re telling the function to sum up the values across the columns.
How to use the keepdims parameter
In the last two examples, we used the axis parameter to indicate that we want to sum down the rows or sum across the columns.
Notice that when you do this it actually reduces the number of dimensions.
You can see that by checking the dimensions of the initial array, and the the dimensions of the output of np.sum.
So if we check the ndim attribute of np_array_2x3 (which we created in our prior examples), you’ll see that it is a 2-dimensional array:
np_array_2x3.ndim
Which produces the result 2. The array np_array_2x3 is a 2-dimensional array.
Now, let’s use the np.sum function to sum across the rows:
np_array_colsum = np.sum(np_array_2x3, axis = 1)
How many dimensions does the output have? Let’s check the ndim attribute:
np_array_colsum.ndim
This produces the following output:
1
What that means is that the output array (np_array_colsum) has only 1 dimension. But the original array that we operated on (np_array_2x3) has 2 dimensions.
Why?
When we used np.sum with axis = 1, the function summed across the columns. Effectively, it collapsed the columns down to a single column!
This is an important point. By default, when we use the axis parameter, the np.sum function collapses the input from n dimensions and produces an output of lower dimensions.
The problem is, there may be situations where you want to keep the number of dimensions the same. If your input is n dimensions, you may want the output to also be n dimensions.
It’s possible to create this behavior by using the keepdims parameter.
Here’s an example. We’re going to use np.sum to add up the columns by setting axis = 1. But we’re also going to use the keepdims parameter to keep the dimensions of the output the same as the dimensions of the input:
np_array_colsum_keepdim = np.sum(np_array_2x3, axis = 1, keepdims = True)
If you take a look a the ndim attribute of the output array you can see that it has 2 dimensions:
np_array_colsum_keepdim.ndim
This will produce the following:
2
np_array_colsum_keepdim has 2 dimensions. It has the same number of dimensions as the input array, np_array_2x3.
To understand this better, you can also print the output array with the code print(np_array_colsum_keepdim), which produces the following output:
[[6]
 [9]]
Essentially, np_array_colsum_keepdim is a 2-d numpy array organized into a single column.
This is a little subtle if you’re not well versed in array shapes, so to develop your intuition, print out the array np_array_colsum. Remember, when we created np_array_colsum, we did not use keepdims:
print(np_array_colsum)
Here’s the output of the print statement.
[6 9]
Do you see that the structure is different?
When we use np.sum on an axis without the keepdims parameter, it collapses at least one of the axes. But when we set keepdims = True, this will cause np.sum to produce a result with the same dimensions as the original input array.
Again, this is a little subtle. To understand it, you really need to understand the basics of NumPy arrays, NumPy shapes, and NumPy axes. So if you’re a little confused, make sure that you study the basics of NumPy arrays … it will make it much easier to understand the keepdims parameter.
Numpy is important so make sure to master np.sum
If you want to learn data science in Python, it’s important that you learn and master NumPy.
NumPy is critical for many data science projects.
In particular, it has many applications in machine learning projects and deep learning projects.
So if you’re interested in data science, machine learning, and deep learning in Python, make sure you master NumPy.
For more Python data science tutorials, sign up for our email list
Here at Sharp Sight, we teach data science.
Here at the Sharp Sight blog, we regularly post tutorials about a variety of data science topics … in particular, about NumPy.
If you want to learn NumPy and data science in Python, sign up for our email list.
If you sign up for our email list, you’ll receive Python data science tutorials delivered to your inbox.
You’ll get free tutorials on:
- NumPy
- Pandas
- Base Python
- Scikit learn
- Machine learning
- Deep learning
- … and more.
Want to learn data science in Python? Sign up now.
One of the better tutorials for a numpy function I’ve seen. Thanks!
Great to hear.
If you like it, share it …
Thanks…