In this tutorial, I’ll explain how to use the Pandas assign method to add new variables to a Pandas dataframe.
In this tutorial, I’ll explain what the assign method does and how it works. I’ll explain the syntax, and I’ll show you step-by-step examples of how to use it.
If you need something specific, you can click on one of the following links and it will take you to the right section in the tutorial.
Table of Contents:
Having said that, if you really want to understand Pandas assign, I recommend that you read the whole article.
A quick introduction to Pandas Assign
So what does the assign method do?
Put simply, the assign method adds new variables to Pandas dataframes.
Quickly, I’ll explain that in a little more depth.
Pandas is a toolkit for working with data in Python
You’re probably aware of this, but just to clarify: Pandas is a toolkit for working with data in the Python programming language.
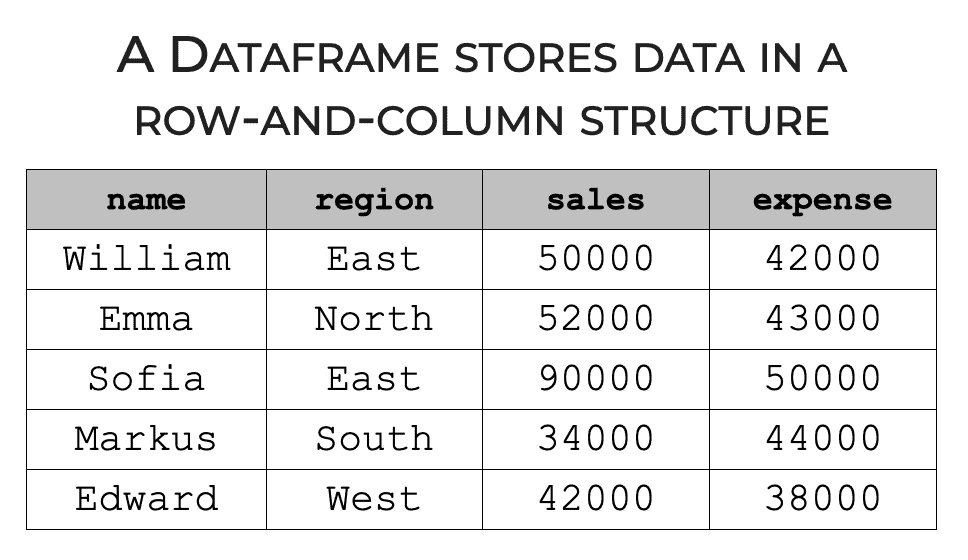
In Pandas, we typically work with a data structure called a dataframe.
A dataframe is a collection of data stored in a rows and column format.
Pandas gives us a toolkit for creating these Dataframes, and it also provides tools for modifying dataframes.
Pandas has tools for sorting dataframes, aggregating dataframes, reshaping dataframes, and a lot more.
And one of the most important things we need to be able to do, is add new columns to a dataframe.
Pandas Assign Adds New Columns to a Dataframe
The Pandas assign method enables us to add new columns to a dataframe.
We provide the input dataframe, tell assign how to calculate the new column, and it creates a new dataframe with the additional new column.
It’s fairly straightforward, but as the saying goes, the devil is in the details.
So with that said, let’s take a look at the syntax so we can see how the assign method works.
The syntax of the assign method
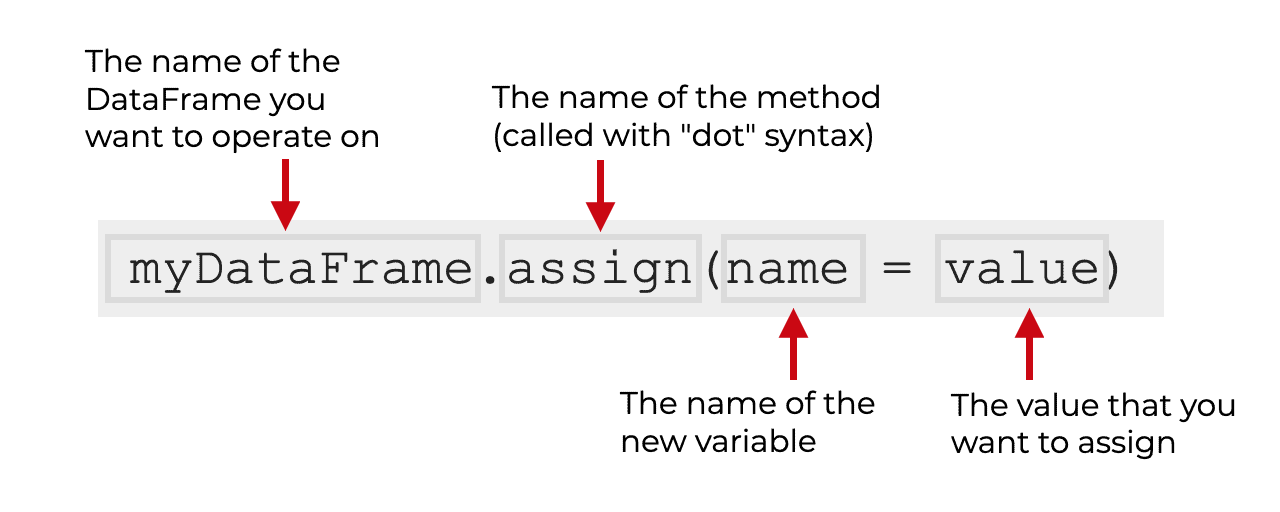
The syntax for the assign method is fairly simple.
You type the name of your dataframe, then a “dot”, and then type assign().
Remember, the assign method is a Python method that’s associated with dataframe objects, so we can use so-called “dot syntax” to call the method.
Next, inside the parenthesis, we need to provide a “name value pair.”
What does that mean?
We simply provide the name of the new variable and the value that we want to assign to that variable. The value that we assign can be simple (like an integer constant), but it can also be a complicated value that we calculate.
I’ll show you examples of exactly how we use it in the examples section of this tutorial.
Syntax to add multiple variables to a dataframe
One quick note on the syntax:
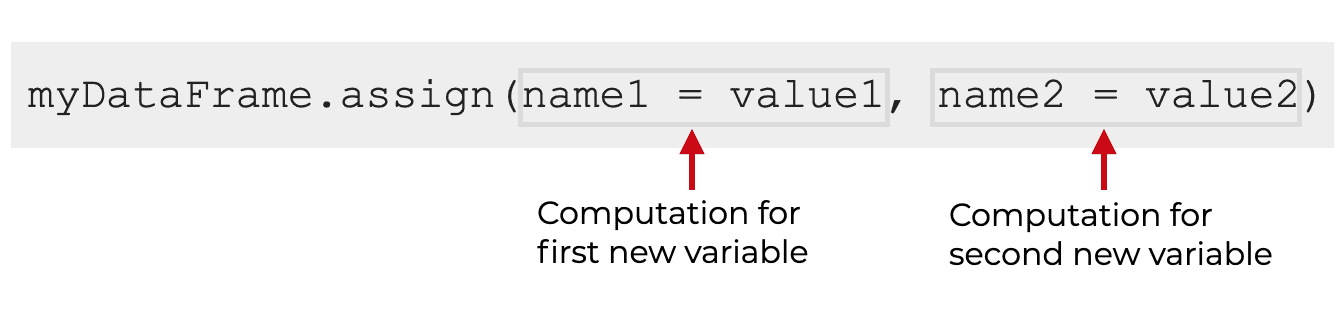
If you want to add multiple variables, you can do this with a single call to the assign method.
Just type the name of your dataframe, call the method, and then provide the name-value pairs for each new variable, separated by commas.
Honestly, adding multiple variables to a Pandas dataframe is really easy. I’ll show you how in the examples section.
The Output of the Assign Method
Before we look at the examples, let’s quickly talk about the output of the assign method.
This is really important, so you need to pay attention …
The output of the assign method is a new dataframe.
Read that again. It’s really important.
The output of the assign method is a new dataframe.
So if you use the assign method, you need to save the output in some way, or else the output will go to the console (if you’re working in an IDE).
The implication of this, is that if you just run the method, your original dataframe will be left unchanged unless you store the output to the original name.
(You can obviously also store the output to a new name. This is safer, unless you’re positive that you want to overwrite your original data.)
Examples: how to add a column to a dataframe in Pandas
Ok. Now that I’ve explained how the syntax works, let’s take a look at some examples of how to use assign to add new variables to a dataframe.
Examples:
- Create a new variable and assign a constant
- Add a variable that’s a computed value
- Add multiple variables to your dataframe
- Store the output of assign to a new name
- Assign a specific value conditionally, based on another column
Obviously, you can click on any of the above links, and it will take you to that example in the tutorial.
Run this code first
Before you run any of these examples, you need to do two things:
- import pandas
- create the dataframe we’ll use
Import Pandas
You can run this code to import Pandas:
import pandas as pd
Create DataFrame
Next, let’s create our dataframe.
sales_data = pd.DataFrame({
"name":["William","Emma","Sofia","Markus","Edward","Thomas","Ethan","Olivia","Arun","Anika","Paulo"]
,"region":["East","North","East","South","West","West","South","West","West","East","South"]
,"sales":[50000,52000,90000,34000,42000,72000,49000,55000,67000,65000,67000]
,"expenses":[42000,43000,50000,44000,38000,39000,42000,60000,39000,44000,45000]})
We’ve called this DataFrame sales_data.
This dataframe contains mock sales data for 11 people and it has variables for both sales and expenses.
From here, we can use the assign() method to add some new variables.
EXAMPLE 1: Create a new variable and assign a constant
In this first example, we’re going to add a new variable to the datafame and assign a constant value for every row.
Let’s think about something specific.
Say that you’re working with this dataset, and all of these people work for the same company. You might have some other dataframes that have records for salespeople who work for different companies, but everyone in sales_data works for the same company.
What if we want to create a variable that contains the company name for the people in this dataframe?
We can do that with assign as follows:
sales_data.assign(company = "Vandelay Industries")
OUT:
       name region  sales  expenses              company
0   William   East  50000     42000  Vandelay Industries
1      Emma  North  52000     43000  Vandelay Industries
2     Sofia   East  90000     50000  Vandelay Industries
3    Markus  South  34000     44000  Vandelay Industries
4    Edward   West  42000     38000  Vandelay Industries
5    Thomas   West  72000     39000  Vandelay Industries
6     Ethan  South  49000     42000  Vandelay Industries
7    Olivia   West  55000     60000  Vandelay Industries
8      Arun   West  67000     39000  Vandelay Industries
9     Anika   East  65000     44000  Vandelay Industries
10    Paulo  South  67000     45000  Vandelay Industries
Explanation
So what did we do in this example?
Here, we created a new variable called company.
For every row in the data, the value for the company variable is the same. The value is “Vandelay Industries.”
In technical terms, the value is a constant for every row. More specifically, it’s a string value.
Having said that, when we create variables with constant values, we can add string values like this example, but we can also assign a new variable with a constant numeric value. For example, try the code sales_data.assign(newvar = 1).
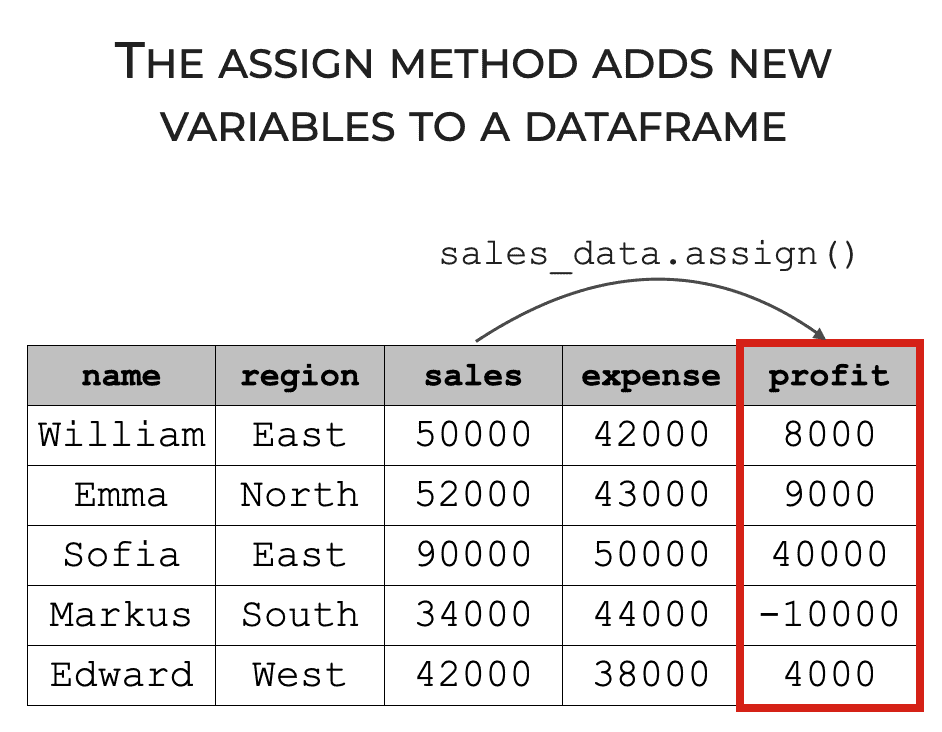
EXAMPLE 2: Add a variable that’s a computed value
Here, we’re going to assign a new variable that’s a computed value.
Specifically, we’re going to create a new variable called profit that equals sales minus expenses. (Finance and accounting geeks will know that this is not a precise way to compute profit, but we’ll use this simplified calculation for purposes of example.)
Let’s run the code, and I’ll explain below.
sales_data.assign(profit = sales_data.sales - sales_data.expenses)
OUT:
       name region  sales  expenses  profit
0   William   East  50000     42000    8000
1      Emma  North  52000     43000    9000
2     Sofia   East  90000     50000   40000
3    Markus  South  34000     44000  -10000
4    Edward   West  42000     38000    4000
5    Thomas   West  72000     39000   33000
6     Ethan  South  49000     42000    7000
7    Olivia   West  55000     60000   -5000
8      Arun   West  67000     39000   28000
9     Anika   East  65000     44000   21000
10    Paulo  South  67000     45000   22000
Explanation
Here, we created a new computed column called profit.
As you can see, profit is simply sales minus expenses.
Notice though, that when we reference the sales and expenses variables inside of assign(), we need to call them as sales_data.sales and sales_data.expenses.
Alternatively, we could call them as sales_data['sales'] and sales_data['expenses'].
I prefer the former because they’re much easier to read, but you can choose.
EXAMPLE 3: Add multiple variables to your dataframe
In the previous two examples, we were adding only one new variable at a time.
Here in this example, we’ll add two variables at the same time.
We’re going to add the profit variable and the company variable.
Let’s take a look.
sales_data.assign(profit = sales_data.sales - sales_data.expenses
                 ,company = "Vandelay Industries"
                 )
OUT:
       name region  sales  expenses  profit              company
0   William   East  50000     42000    8000  Vandelay Industries
1      Emma  North  52000     43000    9000  Vandelay Industries
2     Sofia   East  90000     50000   40000  Vandelay Industries
3    Markus  South  34000     44000  -10000  Vandelay Industries
4    Edward   West  42000     38000    4000  Vandelay Industries
5    Thomas   West  72000     39000   33000  Vandelay Industries
6     Ethan  South  49000     42000    7000  Vandelay Industries
7    Olivia   West  55000     60000   -5000  Vandelay Industries
8      Arun   West  67000     39000   28000  Vandelay Industries
9     Anika   East  65000     44000   21000  Vandelay Industries
10    Paulo  South  67000     45000   22000  Vandelay Industries
Explanation
Here in this example, we added two variables at the same time: profit and company.
Notice that syntactically, I actually put the second variable on a new line of code. This is mostly for readability. If you want, you can keep all of your code on the same line, but I don’t necessarily recommend it. I personally think that your code is much easier to read and debug if each different variable assignment is on a separate line.
That said, the two new variable assignments must be separated by a comma. Here, the comma that separates the two variable assignments comes before the assignment of the company variable. This is important, so don’t forget the comma.
EXAMPLE 4: Store the output of assign to a new name
Finally, let’s do one more example.
Here, we’re going to store the output to a new name.
Notice that in the previous examples, the code did not modify the original dataframe.
When we use assign, it produces a new dataframe as an output and leaves your original dataframe unchanged. This is very important to remember! Many beginner data science students get frustrated when they first use this technique, because they can’t figure out why their dataframe stays the same, even after they run assign(). Always remember: assign produces a new dataframe.
Having said that, we can store the new output dataframe to a new name.
If we want, we can store it to a new name, like sales_data_revised.
Or, we can store it to the original dataframe name, sales_data, and overwrite the original!
So it is possible to directly modify your original dataframe, but you need to do it with an equal sign to store the output of the assign method.
Ok, with all that said, let’s look at an example.
Here, we’ll take the output of assign and store it to a new name called sales_data_revised.
sales_data_revised =  sales_data.assign(profit = sales_data.sales - sales_data.expenses
                                        ,company = "Vandelay Industries"
                                        )
Now, the new dataframe is stored in sales_data_revised.
Let’s print it out.
print(sales_data_revised)
OUT:
       name region  sales  expenses  profit              company
0   William   East  50000     42000    8000  Vandelay Industries
1      Emma  North  52000     43000    9000  Vandelay Industries
2     Sofia   East  90000     50000   40000  Vandelay Industries
3    Markus  South  34000     44000  -10000  Vandelay Industries
4    Edward   West  42000     38000    4000  Vandelay Industries
5    Thomas   West  72000     39000   33000  Vandelay Industries
6     Ethan  South  49000     42000    7000  Vandelay Industries
7    Olivia   West  55000     60000   -5000  Vandelay Industries
8      Arun   West  67000     39000   28000  Vandelay Industries
9     Anika   East  65000     44000   21000  Vandelay Industries
10    Paulo  South  67000     45000   22000  Vandelay Industries
Explanation
When we run the code in this example, assign() is creating a new dataframe with the newly assigned variables, profit and company.
But instead of letting that new output be passed to the console, we’re storing it with a new name so we can access it later.
Remember: assign produces a new dataframe as an output and leaves the original unchanged. If you want to store the output, you need to use the equal sign to pass the output to a new name.
How to Overwrite your Original Data
One last comment on this.
You can actually overwrite your original data directly. To do this, just run the assign method and pass the output to the original dataframe name, sales_data.
sales_data = sales_data.assign(profit = sales_data.sales - sales_data.expenses
                               ,company = "Vandelay Industries"
                               )
This is totally appropriate to do in some circumstances. Sometimes, you really do want to overwrite your data.
But be careful!
Test your code before you do this, otherwise you might overwrite your data with incorrect values!
EXAMPLE 5: Assign a specific value conditionally, based on another column
Ok, one more example to answer a new question in the comments section.
Here, we’re going to answer the question “What if the company name is different for each individual, how do you assign that?”
So, we’re going to assume that every person is from a different company, and we’re going to assign a specific company name based on the “name” of the sales agent.
To do this, we’re going to create a mapping from name to company name, and then create the new company variable based on that mapping.
Create Mapping from Name to Company
First, we’re going to create a mapping from the name variable to the company name we want to assign.
To do this, we’ll simply use a dictionary. The “keys” of the dictionary will be the names of our sales reps, and the corresponding “values” of our dictionary will be the company name we want to assign.
company_mapping = {'William':'Alpha Company'
                   ,'Emma':'Beta Company'
                   ,'Markus':'Gamma Company'
                   ,'Sofia':'Delta Company'
                   ,'Markus':'Epsilon Company'
                   ,'Edward':'Zeta Company'
                   ,'Thomas':'Eta Company'
                   ,'Ethan':'Theta Company'
                   ,'Olivia':'Iota Company'
                   ,'Arun':'Kappa Company'
                   ,'Anika':'Lambda Company'
                   ,'Paulo':'Mu Company'
                   }
Assign Company Name
Next, we’ll use the map() method to map from the name variable to company name, and assign the output to a new variable called company.
sales_data.assign(company = sales_data.name.map(company_mapping))
OUT:
       name region  sales  expenses          company
0   William   East  50000     42000    Alpha Company
1      Emma  North  52000     43000     Beta Company
2     Sofia   East  90000     50000    Delta Company
3    Markus  South  34000     44000  Epsilon Company
4    Edward   West  42000     38000     Zeta Company
5    Thomas   West  72000     39000      Eta Company
6     Ethan  South  49000     42000    Theta Company
7    Olivia   West  55000     60000     Iota Company
8      Arun   West  67000     39000    Kappa Company
9     Anika   East  65000     44000   Lambda Company
10    Paulo  South  67000     45000       Mu Company
Explanation
Here, we’re using the Pandas series method, map().
To do this, we’re retrieving the name variable and calling map().
We’re sending the output of this operation to a variable called company, and this whole expression is happening inside of a call to Pandas assign.
The output creates a new variable called company, where the value of company is conditionally assigned according to the mapping we created in our dictionary, company_mapping.
Frequently Asked Questions about the Pandas Assign Method
Let’s very quickly address one common question about the Pandas assign method.
Question 1: Why is my dataframe unchanged, after using assign?
This is a very common question, and the answer is very straightforward.
As I mentioned several times in this tutorial, the assign method returns a new dataframe that contains the newly assigned variables, and it leaves your input dataframe unchanged.
If you want to overwrite your dataframe, and add the new variables, you need to take the output and use the equal sign to re-store the output into the original name.
So you need to set sales_data = sales_data.assign(...), like this:
sales_data =  sales_data.assign(profit = sales_data.sales - sales_data.expenses
                                ,company = "Vandelay Industries"
                                )
Keep in mind that this will overwrite your data! So you need to be very careful when you do this. Test your code and make sure that it’s working exactly as expected before you do this. If you don’t you might overwrite your original data with an incorrect dataset, and you’ll have to re-start your data retrieval and data wrangling from scratch. This is sometimes a huge pain in the a**, so be careful.
Alternatively, you can store the output of assign with a new name, like this:
sales_data_revised =  sales_data.assign(profit = sales_data.sales - sales_data.expenses
                                        ,company = "Vandelay Industries"
                                        )
Storing the output with a new name, like sales_data_revised, is safer because it doesn’t overwrite the original.
You may actually want to overwrite the original, just make sure that your code works before you do.
Leave your other questions in the comments below
Do you have other questions about the assign method?
Leave your questions in the comments section near the bottom of the page.
Discover how to master data wrangling with Pandas
This tutorial should give you a taste of how to use Pandas to manipulate your data, but there’s a lot more to learn.
If you really want to master data wrangling with Pandas, you should join our premium online course, Pandas Mastery.
Pandas Mastery is our online course that will teach you these critical data manipulation tools.
Inside the course, you’ll learn all of the essentials of data manipulation in pandas, like:
- adding new variables
- filtering data by logical conditions
- subsetting data
- working with Pandas indexes
- reshaping data
- and much more …
Additionally, you’ll discover our unique practice system that will enable you to memorize all of the syntax you learn.
And, it will only take a few weeks.
Find out more here:
There are alternatives to the apply method but none is as clean as using apply.
Thank you so much for the clear explanation.
How can I assign at a specific column index? Every time I use assign() is appends the new column at the end of the table. Is there a way to move that column around?
I’d recommend using .loc[] after using .assign().
Ideally, you can chain these together, like this:
sales_data = pd.DataFrame({
"name":["William","Emma","Sofia","Markus","Edward","Thomas","Ethan","Olivia","Arun","Anika","Paulo"]
,"region":["East","North","East","South","West","West","South","West","West","East","South"]
,"sales":[50000,52000,90000,34000,42000,72000,49000,55000,67000,65000,67000]
,"expenses":[42000,43000,50000,44000,38000,39000,42000,60000,39000,44000,45000]})

(sales_data
  .assign(company = 'Vandalay Industries')
  .loc[:,['name','company','region','sales','expenses']]
)
Notice that here, I’m using a list of column name inside .loc[] to specify the order of the columns.
What if the company name is different for each individual, how do you assign that?
I just added a new example to explain how to do this.
Check out Example 5.