In this tutorial, I’ll explain how to drop rows and columns from a dataframe using the Pandas drop method.
I’ll explain what the drop method does, explain the syntax, and show you clear examples.
If you need something specific, you can click on any of the following links.
Table of Contents:
The drop technique is fairly simple to use, but there are a few important details that you should know. So, let’s start with a quick explanation of what it does and how it works.
A quick introduction to Pandas Drop
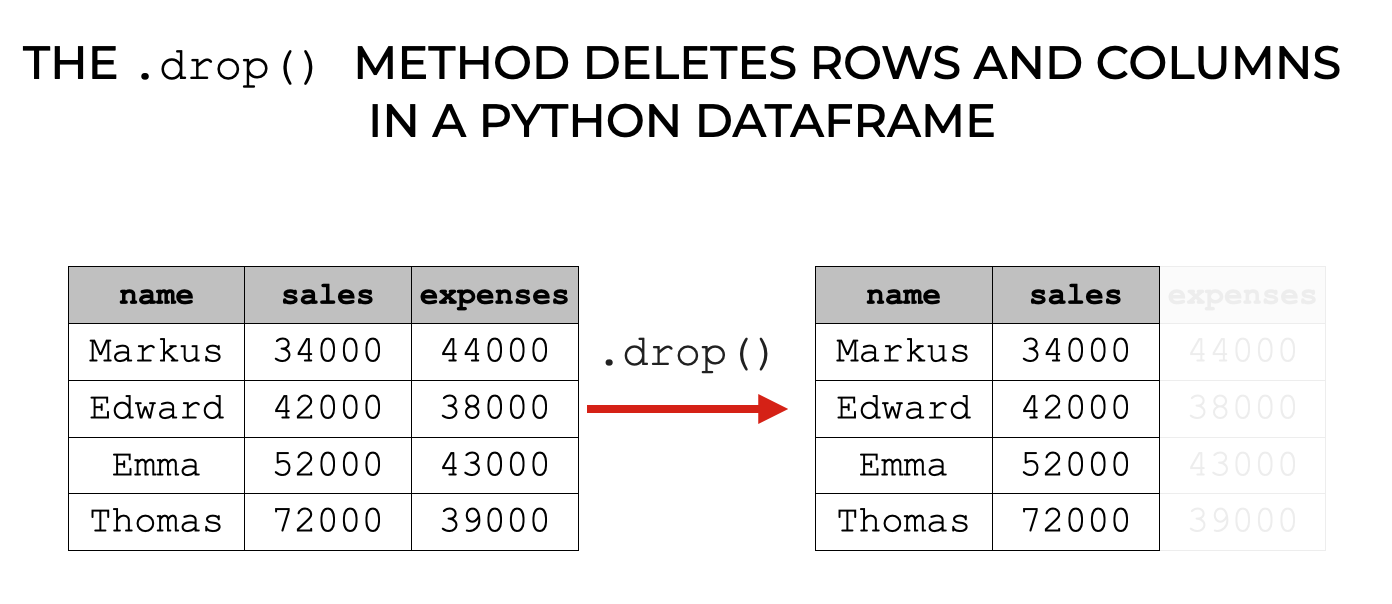
The Pandas drop method deletes rows and columns from Python dataframes and Series objects.
You can acutally use this technique to:
- delete rows
- delete columns
Although, I use this technique most frequently to delete columns (i.e., variables).
Deleting rows and columns is very common when you’re doing “data wrangling” or data cleaning. So to master data wrangling in Python, you really need to know how to use this technique.
Having said that, exactly how you use it depends on the syntax. That being the case, let’s take a look at the syntax of the drop() method.
The Syntax of Pandas drop
In this section, I’ll show you the syntax to:
We’ll look at those separately, and then I’ll explain some optional parameters afterwards.
A quick note
One quick note before we look at the syntax.
All of these syntax explanations assume that you’ve already imported Pandas and that you have a Pandas dataframe available (or a Series).
You can import Pandas with the following code:
import pandas as pd
And if you need a refresher on how to create dataframes, you can read our tutorial on Pandas dataframes.
syntax: delete a column
First, let’s look at the syntax to delete a single column.
To delete a column, you type the name of your dataframe, and then .drop() to call the method.
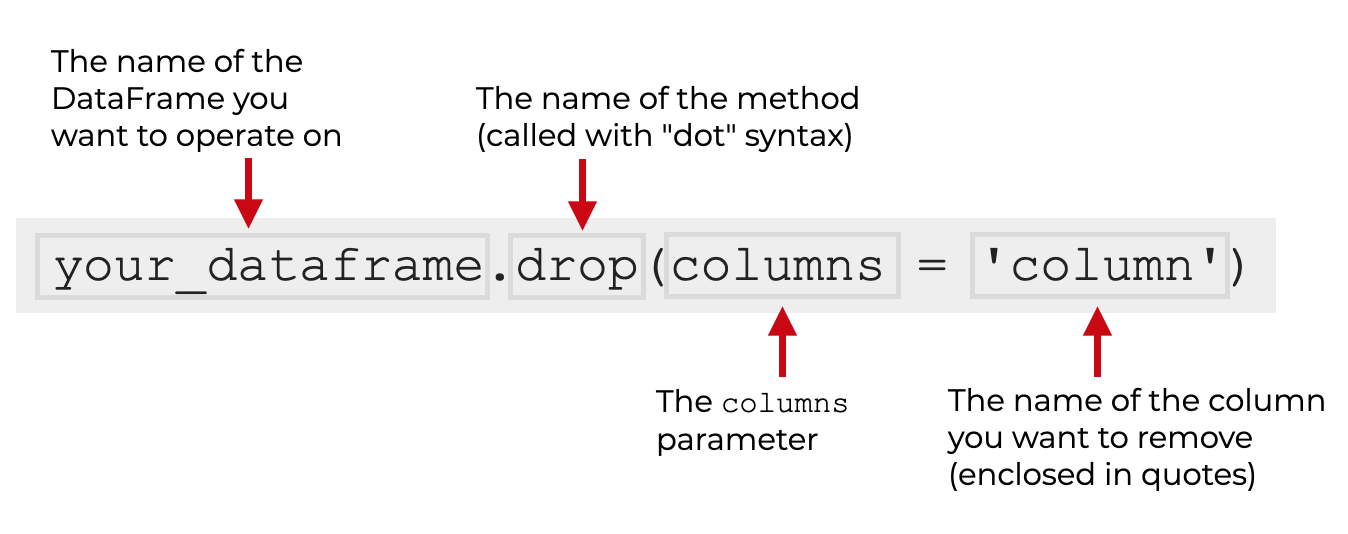
Inside the parenthesis, you need to use the columns parameter.
The argument to the parameter will be the name of the column that you want to delete. The name of the column should be enclosed inside quotation marks.
I’ll show you an example of this in example 1.
syntax: delete multiple columns
The syntax to delete multiple columns is similar to the syntax to delete a single column.
You type the name of your dataframe and .drop() to call the method. You also still use the columns parameter.
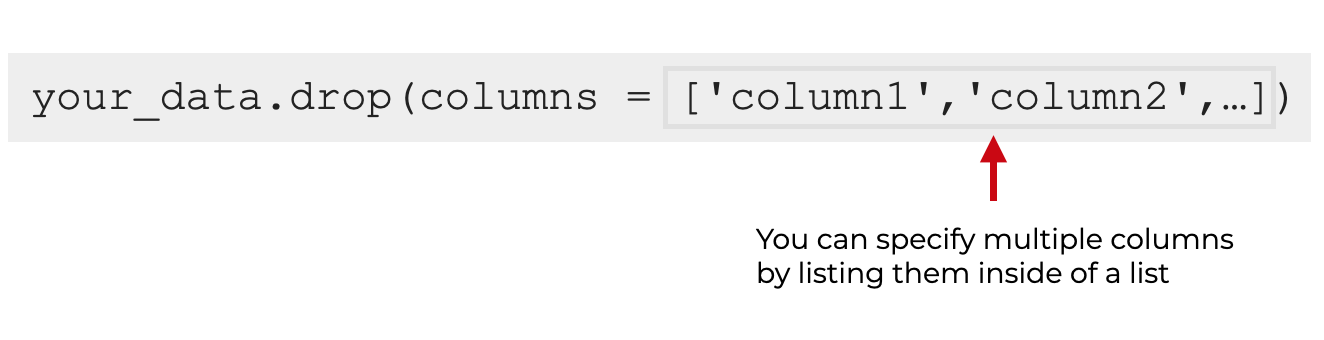
But here, to drop multiple columns, you provide a list of column names.
I’ll show you an example of this in example 2.
syntax: delete rows
Finally, let’s look at the syntax to delete a row or rows.
The syntax to delete rows is very similar to the previous to syntax variations.
You call the method by typing the name of the dataframe and then .drop() to call the method.
But here, to delete rows, you use the labels parameter.
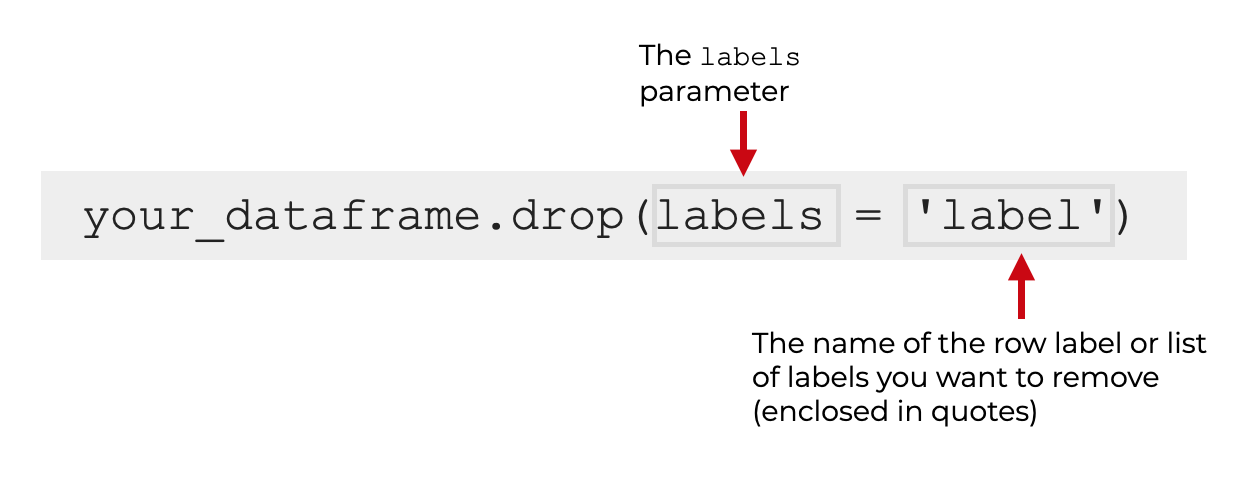
The argument to the labels parameter is the ‘label’ of the row from the dataframe index. You can use either a single row label, or multiple labels inside of a Python list.
This is fairly simple to do, but to do it properly, you really need to understand Python dataframe indexes. If you need a refresher, you can read our tutorial on Pandas indexes.
I’ll show you an example of how to delete rows in example 3.
The parameters of Pandas drop
Now that we’ve looked at the basic syntax of Pandas drop, let’s look at some parameters.
The important parameters that I think you should know are:
columnslabelsinplace
There are a few other parameters, but I think several of them are simply confusing for most beginners and there are a few unnecessary parameters. So, the three above are the ones I recommend using.
Let’s discuss each of them.
columns
The columns parameter enables you to specify the columns that you want to delete.
The argument to this parameter can be a single column name or a list of column names. The column names themselves must be enclosed inside quotes.
I’ll show you how to use the columns parameter in example 1 and example 2.
labels
The labels parameter enables you to specify the rows that you want to delete.
The argument to this parameter can be a single row label or a list of row labels.
The format of the labels depends on how you’ve structured the index. If the labels are integers, the labels you provide will be integers. But if the index labels are strings, then you’ll provide strings to this parameter.
I’ll show you how to use the labels parameter in example 3.
inplace
The inplace parameter enables you to modify your dataframe directly.
Remember: by default, the drop() method produces a new dataframe and leaves the original dataframe unchanged. That’s because by default, the inplace parameter is set to inplace = False.
If you set inplace = True, the drop() method will delete rows or columns directly from the original dataframe. Said differently, if you set inplace = True, Pandas will overwrite your data instead of producing a new dataframe as an output.
Be careful when you use this parameter, since it will overwrite your data.
The output of Pandas drop
By default, the drop() technique outputs a new dataframe and leaves your original dataframe unchanged.
That’s because by default, the inplace parameter is set to inplace = False.
If you set inplace = True, Pandas will directly modify the data you’re operating on instead of producing a new object. Be careful when you use inplace = True, since it will overwrite your data.
Examples: how to drop rows and columns of a Pandas dataframe
Now that we’ve looked at the syntax, let’s take a look at how we can use the drop() method to delete rows and columns of a Python dataframe.
Examples:
- Delete a single column from a dataframe
- Delete multiple columns from a dataframe
- Drop specific rows from a dataframe
- Delete columns and modify the data “in place”
Run this code first
Before you run any of the examples, you’ll need to run some preliminary code first.
Specifically, you need to:
- import Pandas
- create a dataframe
Import Pandas
Fist, let’s import Pandas.
You can do that with the following code:
import pandas as pd
Obviously, we’ll need Pandas to use the Pandas drop technique. We’ll also need Pandas to create our data. Let’s do that next.
Create Dataframe
Here, we’ll create a simple dataframe called sales_data.
To do this, we’ll call the pd.DataFrame() function, but we’ll also set the dataframe index with the set_index() method.
# CREATE DATAFRAME
sales_data = pd.DataFrame({
"name":["William","Emma","Sofia","Markus","Edward","Thomas","Ethan","Olivia","Arun","Anika","Paulo"]
,"region":["East","North","East","South","West","West","South","West","West","East","South"]
,"sales":[50000,52000,90000,34000,42000,72000,49000,55000,67000,65000,67000]
,"expenses":[42000,43000,50000,44000,38000,39000,42000,60000,39000,44000,45000]})

# SET INDEX
sales_data.set_index('name', inplace = True)
This dataframe contains mock sales data. We’ll be able to use this in our examples.
Let’s quickly print it out so we can see the contents:
print(sales_data)
OUT:
        region  sales  expenses
name
William   East  50000     42000
Emma     North  52000     43000
Sofia     East  90000     50000
Markus   South  34000     44000
Edward    West  42000     38000
Thomas    West  72000     39000
Ethan    South  49000     42000
Olivia    West  55000     60000
Arun      West  67000     39000
Anika     East  65000     44000
Paulo    South  67000     45000
As you can see, this dataframe has 3 columns: region, sales, and expenses.
The dataframe also has an index with the names of the salespeople in the data. We’ll be able to use the index to reference the rows and delete specific rows.
So now that we have our dataframe, let’s run some examples.
EXAMPLE 1: Delete a single column from a dataframe
First, let’s start very simple.
Here, we’re going to delete a single column from our dataframe.
To do this, we’ll call the drop method, and we’ll use the columns parameter.
Let’s take a look:
sales_data.drop(columns = 'expenses')
OUT:
        region  sales
name
William   East  50000
Emma     North  52000
Sofia     East  90000
Markus   South  34000
Edward    West  42000
Thomas    West  72000
Ethan    South  49000
Olivia    West  55000
Arun      West  67000
Anika     East  65000
Paulo    South  67000
Explanation
This is fairly simple, but let me explain.
Here, we deleted the expenses column.
To do this we typed the name of the dataframe, and then .drop() to call the method.
Inside the parenthesis, we used the code columns = 'expenses' to specify that we want to drop the expenses column. Note that the name of the column is inside quotation marks (i.e., it’s presented as a string).
In the output, we see that the entire expenses column has been removed.
Also note: the output is a new dataframe and the original data remains unchanged. This is because by default, the inplace parameter is set to inplace = False. When inplace = False, drop() will output a new dataframe but leave the original dataframe unchanged.
I’ll show you how to directly modify the original dataframe in example 4.
EXAMPLE 2: Delete multiple columns from a dataframe
Next, let’s delete multiple columns from a Pandas dataframe.
To do this, we’ll still use the columns parameter.
But instead of providing a single column name as the argument, we’ll provide a list of column names.
Specifically, here, we’ll delete the region variable and the expenses variable.
Let’s take a look:
sales_data.drop(columns = ['region','expenses'])
OUT:
         sales
name
William  50000
Emma     52000
Sofia    90000
Markus   34000
Edward   42000
Thomas   72000
Ethan    49000
Olivia   55000
Arun     67000
Anika    65000
Paulo    67000
Explanation
In the output we see that both the region variable and the expenses variable have been removed.
To do this, we called the drop() method, but we used the columns parameter to specify multiple variables to drop.
Specifically, inside the parenthesis, we used the code columns = ['region','expenses'] to indicate that we want to remove the region variable and the expenses variable. Notice that the names of these variables are inside quotations (i.e., they are presented as strings). Furthermore, they are passed to the columns parameter as a list of variable names.
Keep in mind that here, we only deleted two variables. But if you have a larger dataframe and you want to delete many more variables, you can simply create a list of all of the names you want to delete.
EXAMPLE 3: Drop specific rows from a dataframe
Now, let’s drop some rows from our dataframe.
Deleting rows is very similar to deleting columns. But instead of using the columns we’ll use the labels parameter.
By using the labels parameter, we can specify specific rows to delete by the index label.
Let’s take a look:
sales_data.drop(labels = ['William','Paulo'])
OUT:
       region  sales  expenses
name
Emma    North  52000     43000
Sofia    East  90000     50000
Markus  South  34000     44000
Edward   West  42000     38000
Thomas   West  72000     39000
Ethan   South  49000     42000
Olivia   West  55000     60000
Arun     West  67000     39000
Anika    East  65000     44000
Explanation
Here, we deleted the records for William and Paulo. We did this with the code drop(labels = ['William','Paulo']).
The labels parameter enables us to delete rows by index label and the list of values (i.e., ['William','Paulo']) indicate exactly which rows to remove.
This is fairly simple, but to really understand it, you need to understand what a dataframe index is. If you need a refresher, you should check out our tutorial on Pandas indexes.
Note that in this example, we deleted multiple rows, so we presented the labels inside of a Python list, similar to deleting multiple columns like we did in example 2.
EXAMPLE 4: Delete columns and modify the data “in place”
Finally, let’s directly modify our data by deleting a column “in place.”
Remember: when we use the drop() method, the technique produces a new dataframe as the output by default, and leaves the original dataframe unchanged.
We can change this behavior by setting inplace = True.
Let’s take a look, and then I’ll explain.
Create dataframe copy
Before we run the example, we’ll first create a copy of the data.
That’s because we’ll be directly modifying our data. As a safeguard, we’ll work with a copy right now.
sales_data_copy = sales_data.copy()
If you inspect this data, you’ll see that it’s the same as sales_data.
Drop column “in place”
Ok. Now, we’ll drop a column directly from sales_data_copy.
sales_data_copy.drop(columns = 'expenses', inplace = True)
And let’s print out the data:
print(sales_data_copy)
OUT:
        region  sales
name
William   East  50000
Emma     North  52000
Sofia     East  90000
Markus   South  34000
Edward    West  42000
Thomas    West  72000
Ethan    South  49000
Olivia    West  55000
Arun      West  67000
Anika     East  65000
Paulo    South  67000
Explanation
When you run the code and then look at sales_data_copy, you can see that the expenses variable has been permanently removed from the dataframe.
Remember: when we use the drop() technique with inplace = True, Pandas will directly operate on the dataframe.
This is in contrast with inplace = False. If you set inplace = False (which is the default behavior), Pandas will produce a new dataframe and leave the original unchanged.
So when you use inplace = True, Pandas will directly change your data. This can be dangerous. Before you use this, you should test your code to make sure that it works properly!
Frequently asked questions about Pandas drop
Now that we’ve looked at some examples, let’s look at some common questions about the drop() technique.
Frequently asked questions:
Question 1: I used the drop method, but my dataframe is unchanged. Why?
If you use the drop method, you might notice that your original dataframe remains unchanged after you call the method.
For example, in example 1, we used the following code:
sales_data.drop(columns = 'expenses')
If you print out sales_data after you run the code, you’ll realize that sales_data is unchanged. The expenses column is still there.
That’s because the drop() method produces a new dataframe, and leaves both original dataframes unchanged.
By default, the output of the method is sent to the console. We can see the output in the console, but to save it, we need to store it with a name.
For example, you could store the output like this:
sales_data_updated = sales_data.drop(columns = 'expenses')
You can name the output whatever you want. You could even name it with the original name sales_data.
Alternatively, you can set inplace = True, which will also overwrite your original dataset. I showed an example of this in example 4.
But be careful, if you use either of these techniques, they will overwrite your original dataset. Make sure that you check your code so it works properly before you overwrite an input dataframe.
Question 2: What does the axis parameter do?
The axis parameter is an alternative way of controlling whether you delete rows or columns.
Personally, I think that the use of the axis parameter for the drop() method is very poorly designed. I won’t go into the details, but the way the Pandas developers implemented this parameter makes it very confusing to work with.
The good news is that there’s another way. You can completely skip using the axis parameter.
Instead, you can use the columns parameter when you want to delete columns, and you can use the labels parameter when you want to delete rows.
I show the syntax for using these other parameters these in the syntax section, and I show examples of deleting columns and rows in example 1, example 2, and example 3.
Leave your other questions in the comments below
Do you have any other questions about the Pandas drop method?
Is there something else that you need to understand that I haven’t covered here?
If so, leave your question in the comments section below.
To learn more about Pandas, sign up for our email list
This tutorial should have given you a good introduction to the Pandas drop technique, but if you really want to master data manipulation and data science in Python, there’s a lot more to learn.
So if you’re ready to learn more about Pandas and more about data science, then sign up for our email newsletter.
We publish FREE tutorials almost every week on:
- Base Python
- NumPy
- Pandas
- Scikit learn
- Machine learning
- Deep learning
- … and more.
When you sign up for our email list, we’ll deliver these free tutorials directly to your inbox.
Thank so much
Very simply introduced and explained. Thank you very much. Really it is very easy to understand.
Great. Good to hear that it was useful for you.