In this tutorial, I’ll explain how to use the Pandas replace technique to change values inside of a Pandas dataframe.
I’ll explain what the technique does, explain the syntax, and show you step-by-step examples.
If you need something specific, you can click on any of the following links.
Table of Contents:
Having said that, this is a somewhat complicated technique to use, so it might be best to read the whole tutorial.
A Quick Introduction to Pandas Replace
The Pandas replace method replaces values inside of a Pandas dataframe or other Pandas object. We often use this technique for data cleaning and data manipulation in Python.

Having said that, in practice, the technique can actually be quite complicated to use.
We can use this technique to replace:
- specific values in any column of the dataframe
- multiple values in any column of the dataframe
- specific values in a specific column of the dataframe
- … and more
For better or worse, this flexibility can make the replace() technique somewhat difficult to understand and difficult to use.
Having said that, I’m going to try to simplify things as much as possible.
To help you understand though, we really need to look at the syntax.
The Syntax of Pandas Replace
Here, we’ll look at the syntax of the replace() technique.
Since there are multiple ways to use this technique, we’ll actually look at three different variations on the syntax:
- replace a single value throughout the dataframe
- replace a multiple values throughout the dataframe
- and, replace a specific value in a specific column
A quick note
Before we look at the syntax, I should mention that we make some assumptions.
First, we assume that you’ve already imported Pandas. You can do that with the following code:
import pandas as pd
Second, we assume that you already have a Pandas dataframe or similar Pandas object like a Series.
You can learn more about how to create dataframes in our blog post on Python dataframes.
syntax: replace a single value throughout the dataframe
First, let’s start with the simplest case. Here, I’ll show you how to use the syntax to replace a specific value in every column of a dataframe.
To do this, we use two paramters:
to_replacevalue
The to_replace parameter specifies the value you want to replace.
The value parameter specifies the new replacement value.
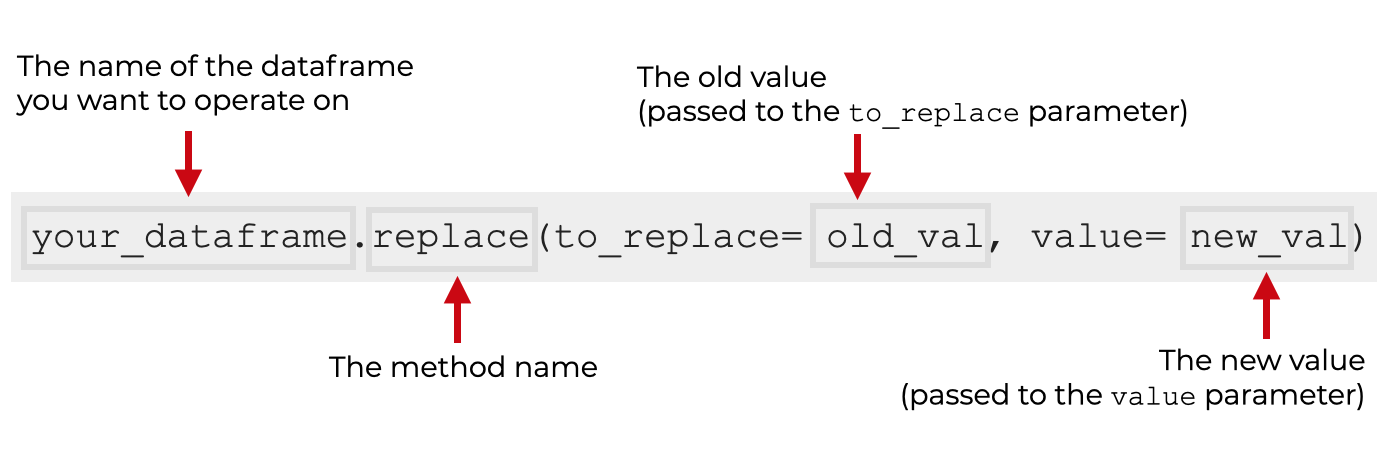
When you use this, the replace() method will replace every instance of the to_replace value in any column of the dataframe.
We’ll look at an example of this in example 1.
syntax: replace a multiple values throughout the dataframe
The syntax for variation 2 is actually similar to the first syntax variation.
Here, we’ll replace multiple specific values with a new value.
To do this, we’ll still use the to_replace parameter and the value parameter.
But instead of providing a single value as the argument to the to_replace parameter, we’ll provide a list of values.

When you use this syntax, the replace() method will replace any of the specified values with the new replacement value.
We’ll look at an example of this in example 2.
syntax: replace a specific value in a specific column
Finally, I’ll show you a third variation on the syntax.
This syntax will replace a specific value in a specific column.
To do this we actually need to use dictionaries.
When we call the replace() method, the argument will be a dictionary. The “key” of the dictionary will be the name of the new column. The “value” of the dictionary will be a second dictionary.
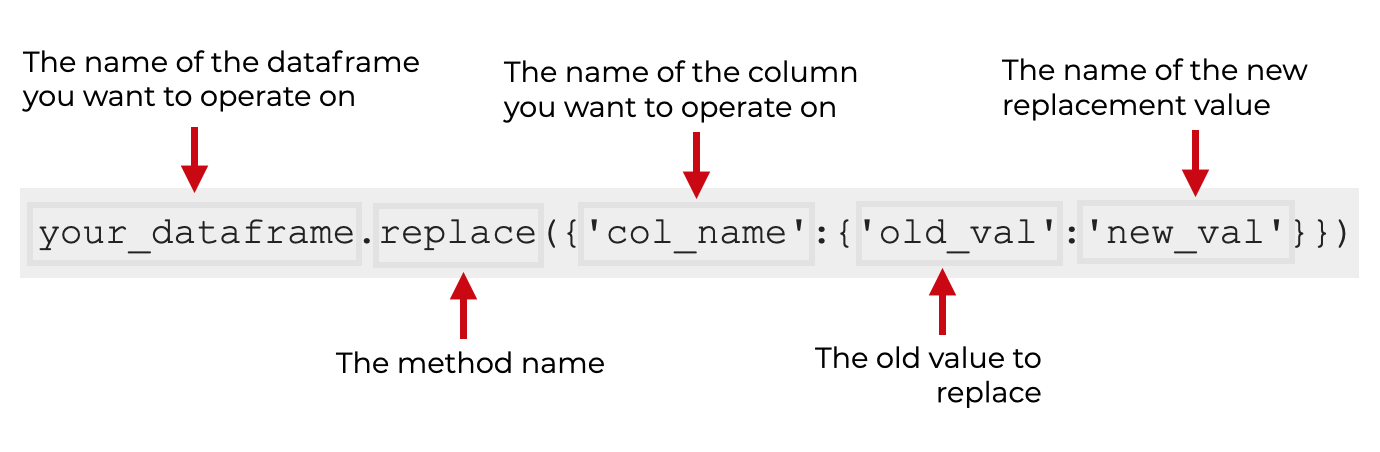
Inside this second nested dictionary is the value you want to search for and the value you want to replace it with.
This syntax is somewhat complicated, but it’s the best way to replace a specific value in a specific column.
I’ll show you an example of this in example 4.
The parameters of Pandas replace
We already talked about two parameters in the previous section, but there are some other optional parameters that you can use.
Let’s look at the parameters that are available.
to_replacevalueinplace
to_replace (required)
The to_replace parameter controls the item to replace, or the column to operate on. To be clear, this can be somewhat difficult to understand, so let me simplify:
- if the argument is a number or character, replace will search for and replace that number
- if the argument is a list, replace will search for and replace the values in the list
- and if the argument is nested dictionary of the form
{'column':{'old_value':'new_value'}}, it will search forold_valueincolumn, and replace it withnew_value
There are also other options for using this parameter, but I discourage you from using them because they just make the syntax more complicated.
value
The value parameter specifies the replacement value.
If you use the “nested dictionary” syntax described above, then value should be set to value = None.
inplace
The inplace parameter enable you to modify the dataframe directly.
Remember that by default, replace() produces a new dataframe or new Python object and leaves the original object unchanged.
The replace() technique also has limit, regex, and method parameters, but those are more complex and less commonly used, so I won’t address them here.
The output of Pandas replace
By default, the Pandas replace method returns a new dataframe. (This is the default behavior because by default, the inplace parameter is set to inplace = False.)
If you set inplace = True, the method will return nothing, and will instead directly modify the dataframe that’s being operated on.
Examples: How replace values in a Pandas dataframe
Ok. Now that we’ve looked at the syntax for the Pandas replace method, let’s look at some examples of how to use it.
Examples:
- Replace one specific value across all columns of a dataframe
- Replace several possible values across all columns of a dataframe
- Modify a dataframe inplace (i.e., replace and modify the original dataframe)
- Replace a specific value in a specific dataframe column
- Replace different values in multiple different columns
Run this code first
Before you run any of these examples, you’ll need to run some preliminary code in order to:
- import necessary packages
- create a dataframe
Let’s do each of those.
Import necessary packages
First let’s just import the packages that we’ll need to run our examples.
You can do that with the following code:
import pandas as pd
import numpy as np
We’ll obviously need the Pandas package to use the Pandas replace method.
We’ll also use both Pandas and Numpy in order to create our dataframe.
Let’s do that next.
Create example dataframe
Here, we’ll create a simple dataframe that we can use for our examples.
sales_data = pd.DataFrame({"name":["William","Emma","Sofia","Markus","Edward","Thomas","Ethan","Olivia","Arun","Anika","Paulo"]
,"region":["East",'N',"East","South","West","West","S","West","West","East","South"]
,"sales":[50000,52000,90000,-1,42000,72000,49000,-1,67000,65000,67000]
,"expenses":[42000,43000,-999,44000,38000,39000,42000,-1,39000,44000,45000]})
And let’s print it out so we can see the contents:
print(sales_data)
OUT:
       name region  sales  expenses
0   William   East  50000     42000
1      Emma      N  52000     43000
2     Sofia   East  90000      -999
3    Markus  South     -1     44000
4    Edward   West  42000     38000
5    Thomas   West  72000     39000
6     Ethan      S  49000     42000
7    Olivia   West     -1        -1
8      Arun   West  67000     39000
9     Anika   East  65000     44000
10    Paulo  South  67000     45000
As you can see, this dataframe contains mock “sales” data about several salespeople. The dataframe has four variables, and if you look carefully, you can see some unusual values. For example, the values ‘N‘, ‘S‘, -1, and -99 are all values that we might want to replace with something different.
EXAMPLE 1: Replace one specific value across all columns of a dataframe
First, let’s start very simple.
Here, we’ll replace the value -1 with the value NaN.
Let’s take a look:
sales_data.replace(to_replace = -1, value = np.NaN)
OUT:
       name region    sales  expenses
0   William   East  50000.0   42000.0
1      Emma      N  52000.0   43000.0
2     Sofia   East  90000.0    -999.0
3    Markus  South      NaN   44000.0
4    Edward   West  42000.0   38000.0
5    Thomas   West  72000.0   39000.0
6     Ethan      S  49000.0   42000.0
7    Olivia   West      NaN       NaN
8      Arun   West  67000.0   39000.0
9     Anika   East  65000.0   44000.0
10    Paulo  South  67000.0   45000.0
Explanation
Here, we only replaced the value -1 in the dataframe. Wherever it was found, this value was replaced with the value np.NaN.
Notice that by using replace() like this on the whole dataframe, by default, it operated on all of the columns. In particular, since the value -1 existed in both the sales column and the expenses column, replace() ended up replacing the -1 values found in both of those columns.
There is a way to target only a single column as well (instead of all of the columns). I’ll show you that in example 4.
EXAMPLE 2: Replace several possible values across all columns of a dataframe
Next, let’s replace several possible values.
Specifically, we’ll replace any occurrence of -1 or -999 with the value np.NaN.
Let’s take a look:
sales_data.replace(to_replace = [-1,-999], value = np.NaN)
OUT:
       name region    sales  expenses
0   William   East  50000.0   42000.0
1      Emma      N  52000.0   43000.0
2     Sofia   East  90000.0       NaN
3    Markus  South      NaN   44000.0
4    Edward   West  42000.0   38000.0
5    Thomas   West  72000.0   39000.0
6     Ethan      S  49000.0   42000.0
7    Olivia   West      NaN       NaN
8      Arun   West  67000.0   39000.0
9     Anika   East  65000.0   44000.0
10    Paulo  South  67000.0   45000.0
Explanation
Notice in the output that all instances of -1 or -999 throughout the dataframe have been replaced by np.NaN.
To do this, we simply typed the name of the dataframe, and then .replace() to call the method.
We specified the values that we wanted to replace with the code to_replace = [-1,-999]. The argument here to the to_replace parameter is a list of values that we want to replace.
The value parameter specifies the value we want to use as the replacement value. By setting value = np.NaN, we’re specifying that the replacement value will be np.NaN.
Again: this syntax allows us to specify several possible values that we want to replace, using a Python list.
EXAMPLE 3: Modify a dataframe inplace (i.e., replace and modify the original dataframe)
Now, let’s modify our dataframe “in place.”
Essentially, we’re going to modify our dataframe directly.
Remember: when we use the replace() method, by default, it keeps the original dataframe unchanged and outputs a new dataframe.
By setting inplace = True, however, replace() will directly operate on the original dataframe.
Create copy of dataframe
Since directly modifying a dataframe can sometimes be risky, we’re going to make a copy of our dataframe first, and we’ll work with the copy.
sales_data_copy = sales_data.copy()
Use the replace method
Now, let’s use the replace method.
Here, we’re going to replace the values -1 or -999 with np.NaN. So this code is very similar to example 2.
But we’re also going to set inplace = True. This will directly modify our dataframe sales_data_copy.
Let’s take a look:
sales_data_copy.replace(to_replace = [-1,-999], value = np.NaN, inplace = True)
And now let’s print out the data:
print(sales_data_copy)
OUT:
       name region    sales  expenses
0   William   East  50000.0   42000.0
1      Emma      N  52000.0   43000.0
2     Sofia   East  90000.0       NaN
3    Markus  South      NaN   44000.0
4    Edward   West  42000.0   38000.0
5    Thomas   West  72000.0   39000.0
6     Ethan      S  49000.0   42000.0
7    Olivia   West      NaN       NaN
8      Arun   West  67000.0   39000.0
9     Anika   East  65000.0   44000.0
10    Paulo  South  67000.0   45000.0
Explanation
Here, by setting inplace = True, we have permanently changed sales_data_copy.
Be careful when you do this! You’ll effectively overwrite your data.
Before you use inplace = True, you should probably test your code to make sure that it works properly.
EXAMPLE 4: Replace a specific value in a specific dataframe column
Next, we’ll replace a specific value in a specific column.
The syntax for doing this is a little different. To accomplish this, we need to use the “dictionary” style syntax for the replace() method.
Let’s run the code, and then I’ll explain:
sales_data.replace({'region':{'N':'North'}})
OUT:
       name region  sales  expenses
0   William   East  50000     42000
1      Emma  North  52000     43000
2     Sofia   East  90000      -999
3    Markus  South     -1     44000
4    Edward   West  42000     38000
5    Thomas   West  72000     39000
6     Ethan      S  49000     42000
7    Olivia   West     -1        -1
8      Arun   West  67000     39000
9     Anika   East  65000     44000
10    Paulo  South  67000     45000
Explanation
Here, we’re looking for the value ‘N‘ only in the region variable.
To do this we typed the name of the dataframe and called the .replace() method as we typically do.
But inside the parenthesis, we provided a nested dictionary; a dictionary within a dictionary.
Here, the “key” of the dictionary is the column we want to operate on. The “value” of the dictionary is another dictionary. This second dictionary contains the value we’re looking for, and the replacement value.
So inside the parenthesis, the expression {'region':{'N':'North'}} means:
- look inside the
regionvariable - replace all instances of
'N'with the value'North'
This is a somewhat more complicated syntax, but it enables you to target specific values in specific columns.
EXAMPLE 5: Replace different values in multiple different columns
Finally, let’s replace several different values in different columns.
Pandas has a special syntax for doing this with dictionaries, but I think that the typical way of doing it in Pandas is just too d*mn complicated.
So here, I’ll show you a different way. (I think this is a better and easier way.)
Here, we’re going to use replace multiple times in a “chain”. Each time we use the method, we’ll replace a different value in a different column.
By doing it this way, the code is easier to read, easier to debug, and easier to understand overall.
Let’s take a look and then I’ll explain:
(sales_data
 .replace({'region':{'N':'North'}})
 .replace({'region':{'S':'South'}})
 .replace({'sales':{-1:np.nan}})
 .replace({'expenses':{-1:np.nan}})
 .replace({'expenses':{-999:np.nan}})
)
OUT:
       name region    sales  expenses
0   William   East  50000.0   42000.0
1      Emma  North  52000.0   43000.0
2     Sofia   East  90000.0       NaN
3    Markus  South      NaN   44000.0
4    Edward   West  42000.0   38000.0
5    Thomas   West  72000.0   39000.0
6     Ethan  South  49000.0   42000.0
7    Olivia   West      NaN       NaN
8      Arun   West  67000.0   39000.0
9     Anika   East  65000.0   44000.0
10    Paulo  South  67000.0   45000.0
Explanation
Here, we effectively used replace() five times in a row.
Specifically, we used it to:
- replace
'N'with'North'in theregionvariable - replace
'S'with'South'in theregionvariable - replace
-1withnp.NaNin thesalesvariable - replace
-1withnp.NaNin theexpensesvariable - replace
-999withnp.NaNin theexpensesvariable
So we’re doing multiple different replacements in a “chain” to clean up all of the inappropriate values.
Notice also that to do this, we needed to enclose the whole expression inside of parenthesis. This is somewhat unorthodox, but it is a very powerful technique in Pandas. This “chaining” syntax enables you to perform many data wrangling operations in series to do complex manipulations in a single block of code.
If you want to learn more about how to use this “chaining” syntax for data manipulation in Pandas, then sign up for our email newsletter. You probably won’t see this coding style almost anywhere else.
Frequently asked questions about Pandas replace
Now that we’ve looked at some examples, let’s look at some common questions about the replace() technique.
Frequently asked questions:
Question 1: I used replace(), but my dataframe is unchanged. Why?
If you use the replace method, you might notice that your original dataframe remains unchanged after you call the method.
For example, in example 1, we used the following code:
sales_data.replace(to_replace = -1, value = np.NaN)
If you print out sales_data after you run the code, you’ll realize that sales_data is unchanged.
That’s because the replace() method produces a new dataframe, and leaves both original dataframes unchanged.
By default, the output of the method is sent to the console. We can see the output in the console, but to save it, we need to store it with a name.
For example, you could store the output like this:
sales_data_cleaned = sales_data.replace(to_replace = -1, value = np.NaN)
You can name the output whatever you want. You could even name it with the original name sales_data.
Alternatively, you can set inplace = True, which will also overwrite your original dataset. I showed an example of this in example 3.
But be careful, if you use either of these techniques, they will overwrite your original dataset. Make sure that you check your code so it works properly before you overwrite an input dataframe.
Leave your other questions in the comments below
Do you have any other questions about the Pandas replace method?
Is there something else that you need to know that I haven’t covered here?
If so, leave your question in the comments section below.
To learn more about Pandas, sign up for our email list
This tutorial should have given you a good introduction to the Pandas replace technique, but if you really want to master data wrangling and data science in Python, there’s a lot more to learn.
So if you’re ready to learn more about Pandas and more about data science, then sign up for our email newsletter.
We publish FREE tutorials almost every week on:
- Base Python
- NumPy
- Pandas
- Scikit learn
- Machine learning
- Deep learning
- … and more.
When you sign up for our email list, we’ll deliver these free tutorials directly to your inbox.
What is the difference between np.nan and np.NaN?