In this tutorial, I’ll show you how to use the Pandas sample technique to retrieve a random sample from a Python dataframe.
I’ll explain what Pandas sample does, I’ll explain the syntax, and I’ll show you step-by-step examples of how to use this technique.
You can click on any of the following links, and it will take you to the appropriate section in the tutorial.
Table of Contents:
Having said that, I recommend that you read the whole tutorial. Everything will make more sense that way.
An Introduction to Pandas Sample
Let’s start with a quick overview.
What does the Pandas sample technique do?
At a high level, the Pandas sample technique draws a random sample of items from a Pandas dataframe.
(Technically, the sample() technique also works on Pandas Series objects, but we’re mostly going to focus on dataframes.)
Let’s quickly review a few things, so you can really understand what this technique is doing.
Pandas is a Toolkit for Working with Data
Let’s start with a quick refresher on Pandas.
Pandas is a data manipulation toolkit for Python.
But specifically, Pandas is a toolkit for working with and manipulating data in a special type of data structure, called a dataframe.
Dataframes have a Row-and-Column Structure
Pandas Dataframes are a specialized structure for storing and working with “structured data.”
It’s important to understand that Pandas dataframes are organized into rows and columns.
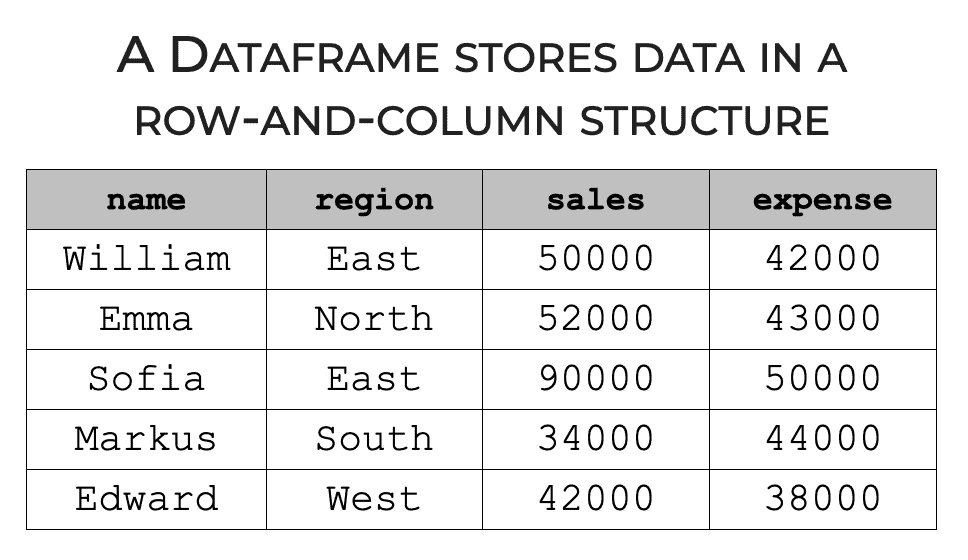
Typically, each row in a dataframe is a record and each column is a variable.
Structurally, Pandas dataframes are very similar to Excel spreadsheets.
Pandas Sample Creates a Random Sample of Rows From A Dataframe
When we’re doing data science or data analysis in Python, and we’re working with structured data, it’s very common to organize that data into a Pandas dataframe.
Typically creating these dataframes can be a complex process, that involves gathering data from CSV files or databases; reshaping the data into the proper shape; joining multiple data files together; and cleaning up the data by filling in missing values, etc.
But once we have our data into the proper shape, we often need to analyze it in various ways to “find insights” or build predictive models.
In doing this, we often need to generate a random sample of rows.
The Pandas Sample Method is the Best Way to Create Random Samples of Python Dataframes
Python has a few tools for creating random samples. For example, if you’re working in Numpy, you can create a random sample of a Numpy array with Numpy random choice.
But when you’re working with a Pandas dataframe, the best and arguably the easiest way to create a random sample is with the sample() method.
Pandas sample() is a fairly straightforward tool for generating random samples from a Pandas dataframe.
But exactly how it creates those random samples is controlled by the syntax.
So with that in mind, let’s look at the syntax.
The Syntax of Pandas Sample
Here, we’ll take a look at the syntax of the Pandas sample method.
I’ll show you the syntax for the dataframe method, and I’ll also show you the syntax for the Series method.
Additionally, I’ll explain the important parameters that we use to control this technique.
The Syntax for dataframe.sample
Calling the Pandas dataframe.sample technique is fairly simple, but it does require that you already have a Pandas dataframe. (See our tutorial about the Pandas dataframe to learn more about creating dataframes.)
You start by typing the name of your dataframe. Let’s assume that your dataframe is called your_dataframe.
You type the name your_dataframe, then type a “dot” and then type sample(). Remember, the sample() technique is a dataframe method, so we need to use so-called “dot syntax” to call the method.
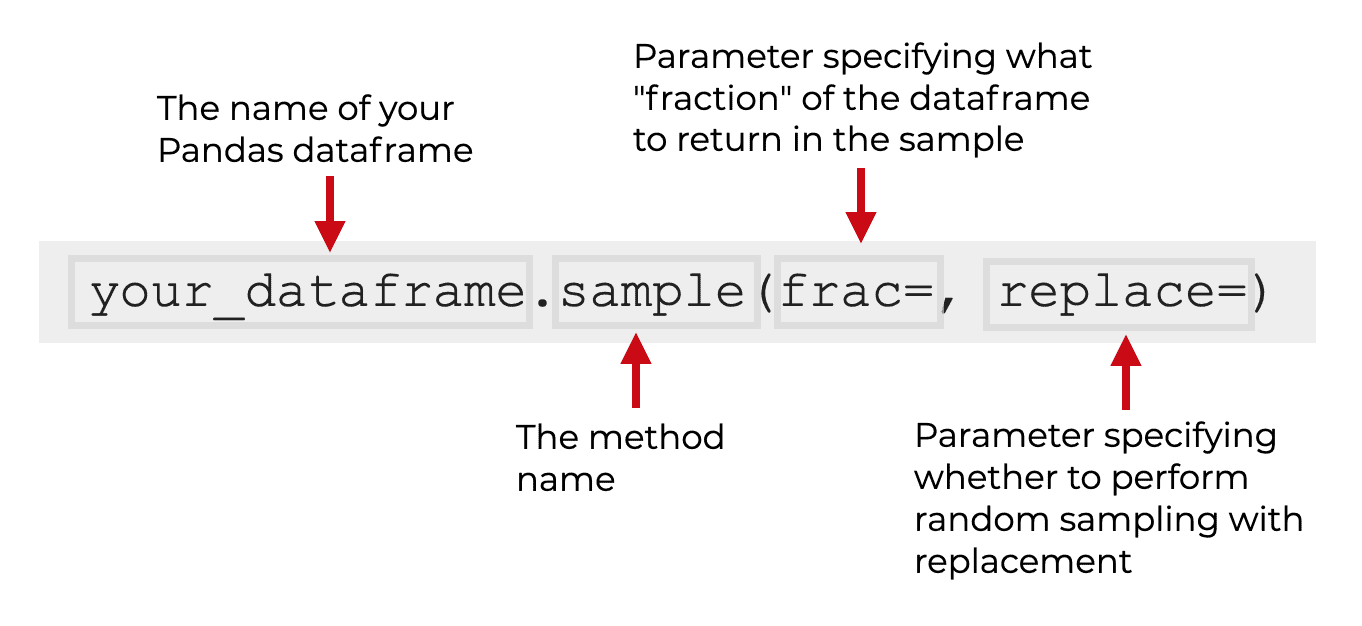
Then, inside the parenthesis, we can use several parameters to specify the exact behavior of the method. In the above picture, I’ve shown the frac and replace parameters, which are commonly used. There are also a few other parameters that we’ll look at in a moment.
First though, we’ll look at the syntax for the Series method as well.
The Syntax for Series.sample
The syntax for how we use sample() on Series objects is almost identical for the syntax for the dataframe method.
Typically, when we use the sample() method on a Series, we do this by selecting a column from a dataframe (remember that dataframe columns are Series).
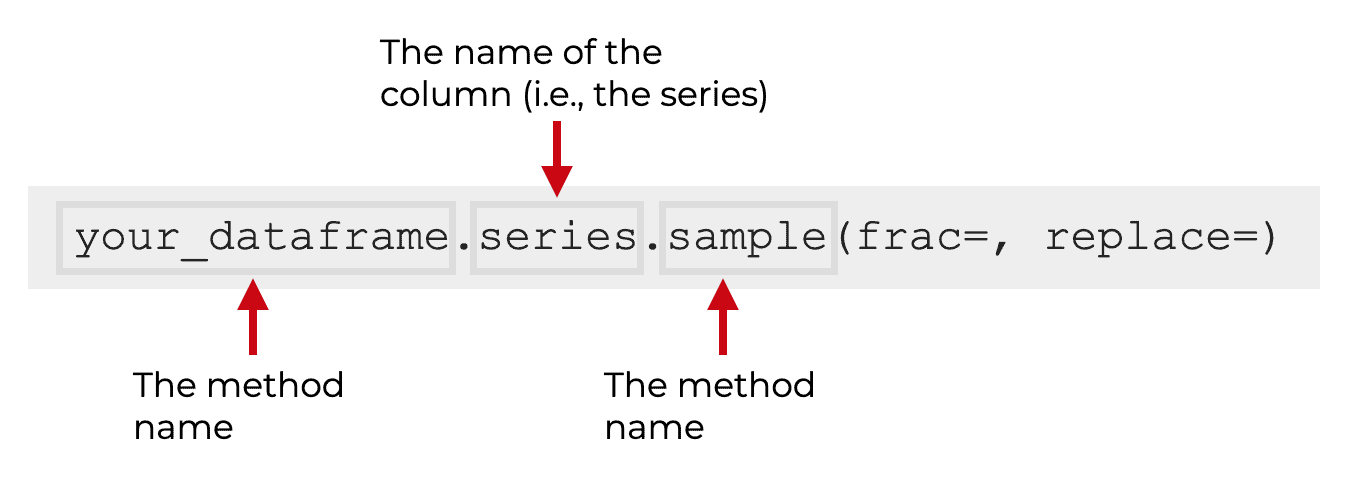
So to do this, we type the name of the dataframe, then a “dot”, then the name of the column. This will retrieve the column as a Series object.
Then we use dot syntax to call the sample() method.
Again, just like for the dataframe method, the behavior of the Series sample method depends on several method parameters.
Let’s take a look at those.
The Parameters of Pandas Sample
The Pandas sample method has six parameters.
nfracreplaceweightsrandom_stateaxis
Keep in mind that these parameters are the same whether you’re using the dataframe method or the Series method.
Let’s discuss each one individually.
n
The n parameter enables you to specify how many items to return in the sample.
The argument to this parameter should be an integer.
For example, if you’re working with a dataframe, n will specify how many rows of data to return. (Technically, you can also sample columns, but it’s much less common.)
By default, this parameter is set to n = 1.
Note also that this parameter cannot be used with the frac parameter.
frac
The frac parameter enables you to specify the fraction of items to return in the sample.
The argument to this parameter should be a floating point number.
So for example, if you set frac = .5, then the sample() method will return 50% of the rows from the dataframe.
Note that frac can not be used with the n parameter. You need to use one or the other.
replace
Replace specifies whether or not the sample method will perform random sampling with replacement.
By default, replace is set to replace = False. In this case, a row can be sampled only one time, and will not be available for selection again.
However, if you set replace = True, it will be possible for an element to be chosen multiple times. Essentially, when replace = True, if an element is selected for the sample, it will be “replaced” back into the population of available elements, and will be available for selection multiple times.
This might be confusing, so I’ll show you an example of this in the examples section.
weights
The weights parameter enables you to specify a set of weights for each element.
By default, all of the elements are weighted equally, and have an equal probability of being selected.
However, if you use the weights parameter, you can specify an array-like object that contains numerical weights, which will change the probability of being selected.
Appropriate array-like arguments are things like Python lists or Numpy arrays.
The weight values should sum to 1. If they don’t the values will be normalized to 1.
If a weight value is missing for a particular element, it will be treated as 0.
random_state
The random_state parameter enables you to specify a seed value for the underlying pseudo-random number generator for the sample() method.
We typically use this to make our code reproducable. I’ll show you an example in the examples section.
axis
The axis parameter enables you to specify the axis from which to sample.
Another way of saying this, if you’re working with a dataframe, is that the axis parameter enables you to specify whether you want to draw a sample of rows or columns.
By default, the sample will be taken from axis 0, which in a dataframe is the axis that points downwards against the rows. Essentially, by default, the samples() method will draw a sample of rows.
Although it is possible to draw a sample of columns by setting axis = 1, it’s somewhat uncommon to do this, so I won’t show it in the examples.
Ok. So now that you’ve learned about all of the parameters, let’s look at some concrete examples of how to use the Pandas sample method.
Examples: How to Get a Random Sample from a Pandas Dataframe
Here, I’ll show you several examples of how to create random samples in Pandas.
We’ll mostly work with dataframes, but I’ll show you at least one example on a Pandas Series as well.
Examples:
- Draw one row randomly from the dataframe
- Create a reproducible example with random_state
- Create a random sample of a specific size
- Draw a specific fraction
- Use random sampling with replacement
- Get a random sample from a Pandas Series
Run this code first
Before you run the examples, you’ll need to import Pandas, and create a dataframe.
Import Pandas
First, you need to import Pandas.
You can do that with the following code:
import pandas as pd
Create Dataframe
Next, you need to create the dataframe that we’ll be working with.
We’re going to create a dataframe with some “dummy” sales data.
You can do that by running the following:
sales_data = pd.DataFrame({
"name":["William","Emma","Sofia","Markus","Edward","Thomas","Ethan","Olivia","Arun","Anika","Paulo"]
,"region":["East","North","East","South","West","West","South","West","West","East","South"]
,"sales":[50000,52000,90000,34000,42000,72000,49000,55000,67000,65000,67000]
,"expenses":[42000,43000,50000,44000,38000,39000,42000,60000,39000,44000,45000]})
And let’s print it out.
print(sales_data)
OUT:
       name region  sales  expenses
0   William   East  50000     42000
1      Emma  North  52000     43000
2     Sofia   East  90000     50000
3    Markus  South  34000     44000
4    Edward   West  42000     38000
5    Thomas   West  72000     39000
6     Ethan  South  49000     42000
7    Olivia   West  55000     60000
8      Arun   West  67000     39000
9     Anika   East  65000     44000
10    Paulo  South  67000     45000
As you can see sales_data contains 11 rows of data with data for sales and expenses for several people.
Ok. Now that we have our dataframe, let’s look at some examples.
EXAMPLE 1: Draw one row randomly from the dataframe
First, we’ll randomly select a single row from the dataframe.
This is the default behavior of the method, so we’ll just call it without any parameters.
Let’s take a look.
sales_data.sample()
OUT:
  name region  sales  expenses
1  Emma  North  52000     43000
Explanation
By default when we call the sample method on a dataframe, the sample method will randomly select one row.
Keep in mind, that if you run this code yourself, you’ll probably get a different row.
That’s because the row is being selected completely at random.
There is, however, a way to draw a “random” sample, but make it reproducible.
Let’s take a look.
EXAMPLE 2: Create a reproducible example with random_state
Here, we’re going to use the random_state parameter to set a “seed” value for the random number generator.
When we do this, the output is still “random” in the sense that it will be selected in a way that’s not predictable from the input.
Having said that, when we use random_state, the output will be the same every time.
Let’s take a look.
sales_data.sample(random_state = 22)
OUT:
    name region  sales  expenses
2  Sofia   East  90000     50000
Explanation
Here, the sample method is still selecting only a single value.
But because we used random state, the output will be the same random value every time. It’s random in the sense that it’s not predictable from the input. But it’s reproducible, because the value will be the same if I run it again, and should be the same if you run it too.
Typically, we use random_state when we want to share our code and/or make it reproducible for some reason.
Note that it makes absolutely no difference what number you pass as the argument to random_state. Different random states will create different “random” outputs, but if you’re only interested in generating reproducible pseudo-random numbers, you can use any argument for random_state that you like.
As an aside, I realize that this is a little difficult to understand. I recommend that you read our tutorial on Numpy random seed to increase your understanding of pseudo-random number generators.
EXAMPLE 3: Create a random sample of a specific size
Next, we’ll create a random sample of a specific size.
To do this, we’ll use the n parameter.
Note that we’ll also use the random_state parameter to make the output repeatable.
Let’s take a look.
sales_data.sample(n = 3, random_state = 22)
OUT:
     name region  sales  expenses
2   Sofia   East  90000     50000
1    Emma  North  52000     43000
10  Paulo  South  67000     45000
Explanation
Here, we set the n parameter to n = 3.
This has caused the sample method to randomly select 3 rows. That’s what the n parameter does … it specifies the number of elements in the output.
Notice also that if you re-run this code, you’ll get the same 3 rows. That’s because we’re using random_state to make the code reproducible.
If you want to turn that off you can remove the random_state parameter, and you’ll get 3 randomly selected rows that will be different every time.
EXAMPLE 4: Draw a specific fraction of the elements
Now we’ll draw a specific fraction of the rows.
In the previous example, we selected a specific number of rows.
But here, we’ll select a specific fraction. We’ll select 50% of the rows.
We can do this with the frac parameter.
sales_data.sample(frac = .5, random_state = 33)
OUT:
       name region  sales  expenses
0   William   East  50000     42000
10    Paulo  South  67000     45000
6     Ethan  South  49000     42000
3    Markus  South  34000     44000
5    Thomas   West  72000     39000
1      Emma  North  52000     43000
Explanation
Here, we set the frac parameter to frac = .5.
This has caused the sample() method to select 50% of the rows. (Actually, it selected 6 rows. There are 11 rows in the input data, and since half of 11 is 5.5, it rounded up to 6).
Here, we also used random_state to make the code reproducible. If you want the numbers to be different every time you run the code, you can remove random_state.
Also note that if you use the frac parameter, you cannot use the n parameter. You need to use one at a time.
EXAMPLE 5: Use random sampling with replacement
Here, we’ll use random sampling with replacement.
By default, the replace parameter is set to replace = False. This means that by default, the sample() method performs random sampling without replacement. You might have noticed in the previous examples, there were no duplicate rows in the output. That’s because the technique was using replace = False.
But here, we’re going to change that.
Here, we’re going to explicitly set replace = True in order to perform random sampling with replacement. This will make it possible for a row to be selected multiple times for the output.
Let’s take a look.
In this example, we’ll select 5 rows, with replacement.
sales_data.sample(n = 5, random_state = 33, replace = True)
OUT:
     name region  sales  expenses
4  Edward   West  42000     38000
7  Olivia   West  55000     60000
8    Arun   West  67000     39000
2   Sofia   East  90000     50000
2   Sofia   East  90000     50000
Explanation
Because we set replace = True, it was possible for a row to be selected multiple times.
Effectively, once a row was selected for the output, it was replaced back into the pool of potential rows that could be selected for the output.
As you can see in the output, row 2 (Sofia) was selected multiple times.
EXAMPLE 6: Get a random sample from a Pandas Series
In the previous examples, we drew random samples from our Pandas dataframe.
Here, we’re going to change things slightly and draw a random sample from a Series.
Specifically, we’ll draw a random sample of names from the name variable. (Remember, columns in a Pandas dataframe are effectively Series objects.)
Let’s take a look.
sales_data.name.sample(n = 5, random_state = 33)
OUT:
0     William
10      Paulo
6       Ethan
3      Markus
5      Thomas
Explanation
Here, we used so-called “dot syntax” to retrieve the name variable from the sales_data dataframe. We retrieved that column with the syntax sales_data.name. When we do this, the column that we retrieve can be treated like a Pandas Series object. Remember that the sample() method works on Series objects in addition to dataframes.
Ok. So we retrieved the name variable using dot syntax.
Then, we called the sample() method, also using dot syntax.
Inside the parenthesis we set n = 5 and random_state = 33, which as you already learned, causes sample() to generate a random sample of a specific size (5 elements).
But because we’re using sample() strictly on the name variable, sample retrieved 5 names.
It’s really fairly straightforward. We can use the sample() method on dataframes (as in the previous examples) but we can also use sample() on Series objects or dataframe columns.
In either case, the method will behave in a similar way, but taking full rows when you use it on a dataframe, and taking a sample of values when you use it on a Series.
Leave your other questions in the comments below
Do you have other questions about the Pandas sample() technique?
If so, leave your questions in the comments section below.
If you want to master Pandas, join our course
In this tutorial, I’ve explained how to use the sample method, but if you want to master data manipulation in Pandas, there’s really a lot more to learn.
So if you really want to master data wrangling with Pandas, you should join our premium online course, Pandas Mastery.
Pandas Mastery is our online course that will teach you these critical data manipulation tools.
Inside the course, you’ll learn all of the essentials of data manipulation in pandas, like:
- subsetting data
- filtering data by logical conditions
- adding new variables
- reshaping data
- working with Pandas indexes
- and much more …
Additionally, you’ll discover our unique practice system that will enable you to memorize all of the syntax you learn. Memorizing the syntax will only take a few weeks!
Find out more here: