If you want to master data science in R, you need to master foundational tools like the mutate() function.
Readers here at the Sharp Sight blog will know how much we emphasize “foundational” data science skills.
If you want to be effective as a junior data scientist, you need to master the fundamental skills.
If you want to eventually move on to more advanced skills like machine learning and advanced data visualization, you need to master the fundamental skills.
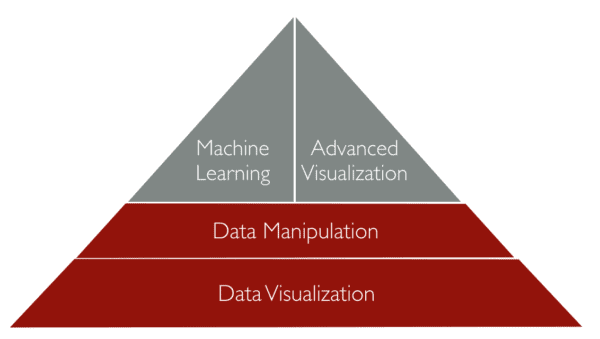
One of those fundamental skills is data manipulation. To be a really effective data scientist, you need to be masterful at performing essential data manipulations. This is because a very large proportion of your work will just involve getting and cleaning data.
Among the simple data manipulation tasks that you need to be able to perform are:
- selecting columns from data
- subsetting rows of data
- aggregating data
- summarising data (calculating summary statistics)
- sorting data
- creating new variables
In this blog post, we’ll talk about the last skill in that list. Using mutate in R to create new variables.
A quick introduction to the dplyr mutate function
Let’s quickly run through the basics of mutate.
Before we do that though, let’s talk about dplyr.
What is dplyr?
If you’re reading this blog post, you’re probably an R user. And there’s a good chance that you’re trying to figure out how to use the functions from dplyr.
If you’re not 100% familiar with it, dplyr is an add-on package for the R programming language. The dplyr package is a toolkit that is exclusively for data manipulation. More specifically, it is a toolkit for performing the data manipulation tasks that I listed above. It has one function for each of those core data manipulation tasks:
select()selects columns from datafilter()subsets rows of datagroup_by()aggregates datasummarise()summarises data (calculating summary statistics)arrange()sorts datamutate()creates new variables
For the most part, dplyr only does these tasks. It essentially has one function for each of them. (Note that these dplyr “functions” are sometimes called “verbs”.)
Part of what makes dplyr great is that it is “compact.” There are only 5 or 6 major tools and they are simple to use.
Now that we’ve discussed what dplyr is, let’s focus in on the mutate() function so you can learn how to use mutate in R.
What is the mutate function?
The mutate() function is a function for creating new variables. Essentially, that’s all it does. Like all of the dplyr functions, it is designed to do one thing.
How to use mutate in R
Using mutate() is very straightforward. In fact, using any of the dplyr functions is very straightforward, because they are quite well designed.
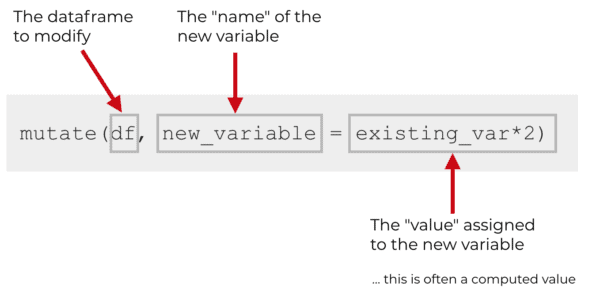
When you use mutate(), you need typically to specify 3 things:
- the name of the dataframe you want to modify
- the name of the new variable that you’ll create
- the value you will assign to the new variable
So when you use mutate(), you’ll call the function by name. Then the first argument is the dataframe that you want to manipulate.
For example, if you had a dataframe named df, that would be the first item inside of the parenthasis (i.e., the first “argument” to the mutate function):
Remember that mutate() – like all of the dplyr functions – strictly operates on dataframes. It’s not set up to work with lists, matrices, vectors, or other data structures.
Ok, so the first argument is the name of the dataframe.
The second argument is a “name-value” pair. That might sound a little arcane, so let me explain it.
When you use mutate(), you’re basically creating a variable. The new variable needs a name, but it also needs a value that gets assigned to that name. So when you use mutate, you provide the name and the new value … a name-value pair.
Let’s take a look at our syntax example again:
You can see here in this dummy code example that we’re creating a new variable called new_variable. The value assigned to new_variable is the value of existing_var multiplied by 2. Note that in this example, we’re assuming a dataframe called df that already has a variable called existing_var.
That’s really it. To use mutate in R, all you need to do is call the function, specify the dataframe, and specify the name-value pair for the new variable you want to create.
Example: how to use mutate in R
The explanation I just gave is pretty straightforward, but to make it more concrete, let’s work with some actual data.
Here, I’ll show you how to use the mutate() function from dplyr.
First, let’s load a few packages. We’ll load dplyr so we have access to the mutate() function. We’ll also load the ISLR package. ISLR is a package that contains several datasets. For the record, this package is actually related to the excellent book, an Introduction to Statistical Learning … a book about machine learning. We won’t be doing any machine learning here, but if you’re interested, get that book.
Ok. Here’s the code to load the packages.
#--------------
# LOAD PACKAGES
#--------------
library(dplyr)
library(ISLR)
We’ll be working with the Auto dataframe from ISLR.
Before we actually do anything with the data, let’s just inspect it.
Here we’ll print out the dataframe.
#-------------
# INSPECT DATA
#-------------

print(Auto)
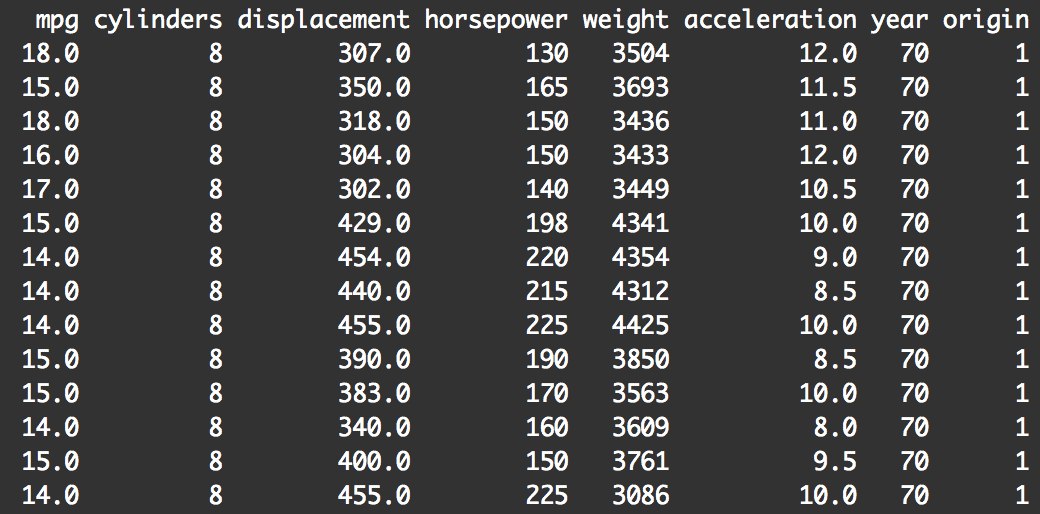
When you print it out, you can see that the data is a little hard to read. print() will print out every row of data.
Before we move on, let’s fix that.
The reason that the print() function prints out every row of data is because the Auto dataframe is an old-fashioned data.frame object, not a tibble. Tibbles print better. Keep in mind that tibbles actually are dataframes, but they are modified dataframes. One of the things that is different about tibbles is that they print out with better formatting.
That being the case, I’m going to quickly coerce Auto to a tibble using as.tibble().
As I do this, I’ll also rename it to auto_specs. The name Auto is a little non-descript, and it starts with a capital letter, which I don’t like. So very quickly, I’ll rename it while I’m coercing it to a tibble.
#-------------------------------
# RENAME DATA & COERCE TO TIBBLE
#-------------------------------
auto_specs <- as.tibble(Auto)

print(auto_specs)
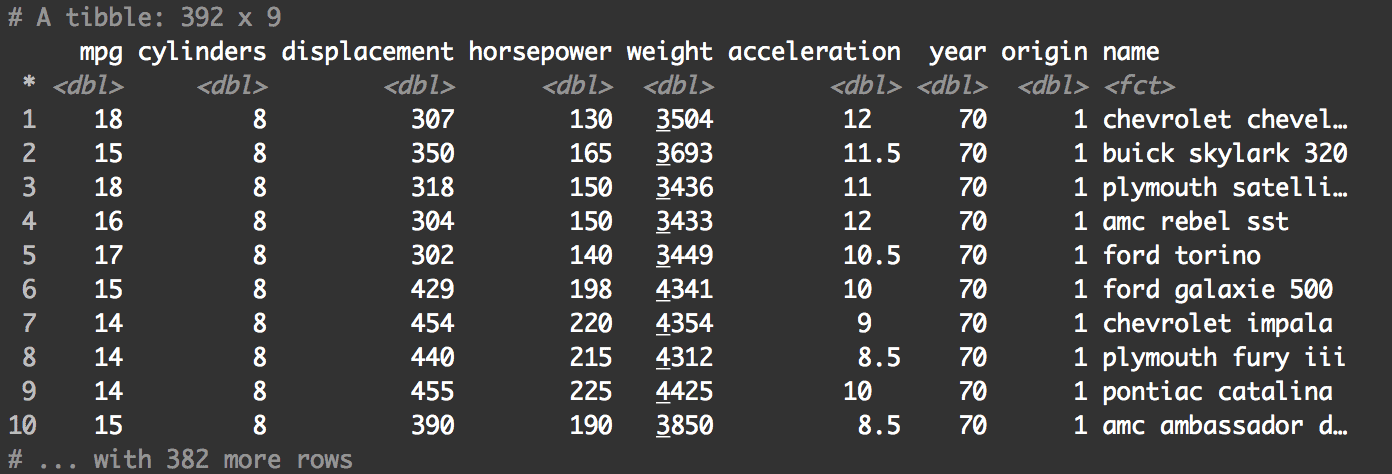
This is much better.
You can see that when we print it out now, the auto_specs has a slightly more readable structure. This is because we coerced this data to a tibble.
Ok. Now we're ready to use mutate().
This is very straightforward.
We're going to call the mutate() function, and the first argument (the first item inside the paranthesis) is the dataframe we're going to modify, auto_specs.
After that (and separated by a comma) we have the name-value pair for our new variable. The name of the new variable is hp_to_weight and the value is horsepower divided by weight.
#----------------------------------
# CREATE NEW VARIABLE WITH mutate()
#----------------------------------

auto_specs_new <- mutate(auto_specs, hp_to_weight = horsepower / weight)

print(auto_specs_new)
That's basically it. Using mutate in R to create a new variable is as simple as that.
A quick warning ... save your data
There's one thing that I want to point out. Notice that to the left hand side of the mutate() function, I've used the assignment operator, <-.
Why?
I did this so that the new output of mutate() is "saved" to the auto_specs data.
All of the dplyr functions work with dataframes. The inputs to the dplyr functions are dataframes. The outputs are also dataframes. So, mutate outputs a dataframe.
But by default, the dplyr functions send the output directly to the console.
What that means is that the dplyr functions do not automatically change the input dataframe.
Let me repeat that. The dplyr functions do not automatically change the input dataframe.
What that means is that if you don't use the assignment operator to save the output with a name, the changes will not be saved to the input dataset.
To see this, try running mutate() without saving the output to a new dataframe. Run the mutate() function, and then print out the original input dataframe.
mutate(auto_specs, hp_to_weight = horsepower / weight)

colnames(auto_specs)

Take a look at the column names. hp_to_weight is not one of them!
That's because mutate() does not directly modify the input dataframe. It leaves the input dataframe unchanged and then produces an output dataframe which is sent to the console by default (i.e., the console just prints the output).
If you want to save the output, you need to use the assignment operator and and save the output to an object name:
auto_specs_new <- mutate(auto_specs, hp_to_weight = horsepower / weight)
print(auto_specs_new)
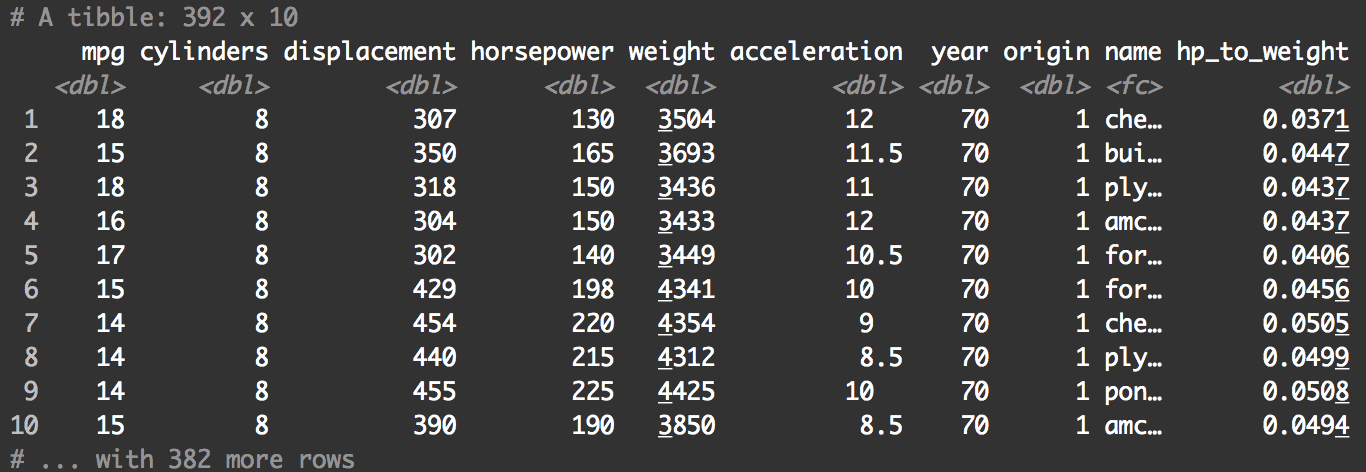
Notice that when we print out auto_specs_new, it now has the new variable hp_to_weight.
Let this be a reminder: if you want to add a new variable to a dataframe with mutate(), and you want that change to be permanent, you need to save the output by using the assignment operator.
If you want to learn more about data manipulation, sign up for our email list
The mutate() function is just one of several data manipulation tools that you'll need to master if you want to master data science in R.
Here at Sharp Sight, we teach data science. And we want to help you master data science as fast as possible.
If you sign up now for our email list, you'll get more free tutorials about data manipulation in R.
You'll also get free tutorials about a variety of other data science topics like data visualization, geospatial visualization, and machine learning.
Nice explanation.
Thanks for the article which helps explain how to use the function but would you be able to comment on why you’d want to use mutate as opposed to
auto_specs$hp_to_weight = auto_specs$horsepower / auto_specs$weight
which would add the new column to the existing dataframe and doesn’t require an extra package.
I really don’t like the ‘
$‘ syntax and avoid it whenever I can.First, it can be dangerous to directly access your dataframe like this. Writing your code this way will immediately overwrite your dataframe, whereas if you use
mutate(your_dataframe), it will not immediately overwrite your dataframe,your_dataframe. You have to go the extra step and save the output ofmutate().Second,
mutate()is better for dplyr method chaining, which makes R data manipulation code vastly easier to write, read, and debug.The Tidyverse is really like it’s own dialect of R, and it’s different.
… but I think it’s completely superior to base R way of doing many things.
Some people will disagree and that’s fine, but strongly prefer the Tidyverse methods, and I teach my students to use Tidyverse functions wherever possible.
You must be a genius to be able to explain things the way you do. Thank(you).
Thank you for the compliment.
At Sharp Sight, I work hard to explain things so they are crystal clear.
As a beginner to R, this article was just what I needed. The last section, “A QUICK WARNING … SAVE YOUR DATA” was particularly helpful because it is an issue that I didn’t found elsewhere. I used a lot of time to find why my calculations didn’t last. After reading you, I understand completely and everything makes sense. Thank you.
You’re welcome. Great to hear.
Nice clear explanation! As mentioned nice and clear, site set out well also. Thanks
Thanks for the kind words … good to hear that it was useful to you
Thanks for the explanation. In particular I liked the commons sense things of “A tibble is a dataframe” and that you need to assign the ‘mutate()’ to a dataframe or it will not persist.
You’re welcome. I try to make everything as clear as possible, so it’s good to hear that it hit the target.