This blog post will show you how to implement Numpy relu. We’ll define a new function in Python that implements a rectifier activation function.
So I’ll quickly explain what the ReLU function is.
We’ll define the syntax for a Numpy relu function.
And I’ll show you how it works in the examples section.
If you need something specific, you can click on any of the following links.
Table of Contents:
Ok. Let’s start with a quick introduction to the ReLU function.
A Quick Introduction to the ReLU function
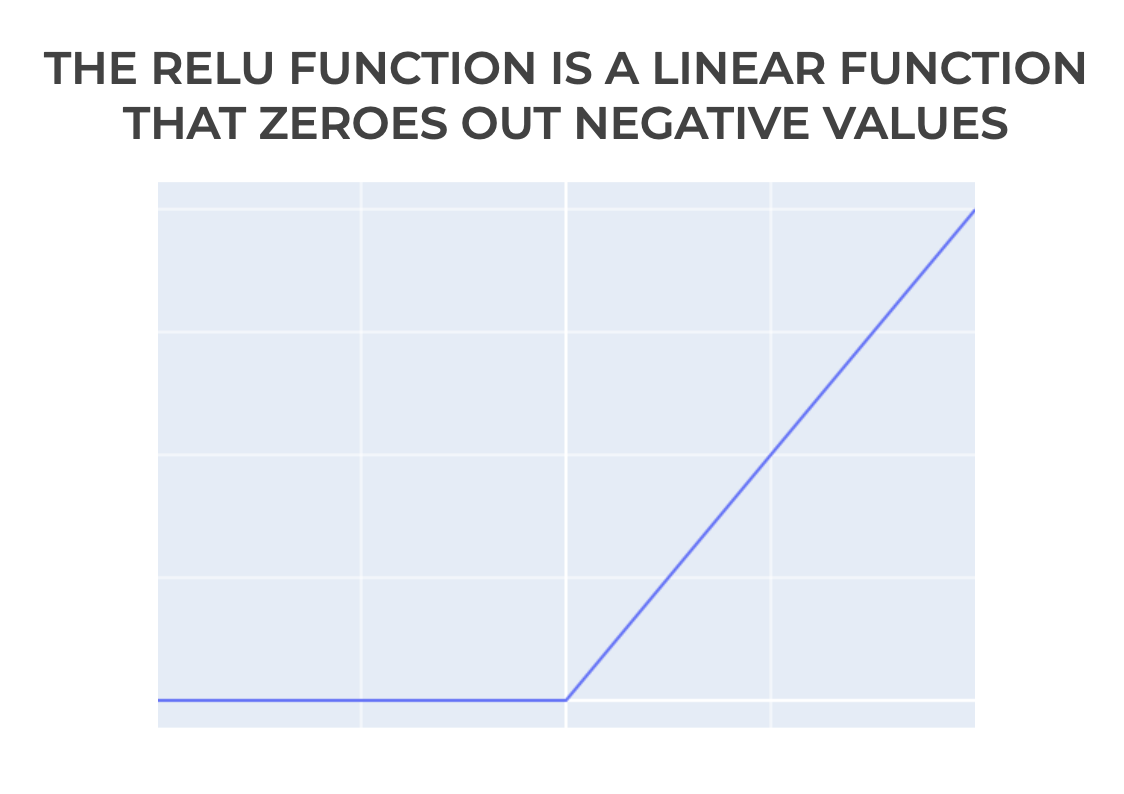
“ReLU” means rectified linear unit.
Mathematically, the relu function is defined as:
(1) 
So its a linear function of x, but it zeroes out negative values.
If we plot it, it looks like this:
The ReLU function is important for machine learning, because it’s very commonly used as an activation function in deep learning and artificial neural networks.
Because it’s commonly used in deep learning, it can be useful to know how to implement it in common machine learning programming languages, like Python.
That being said, let’s look at how to implement the ReLu function in Python.
The syntax for a Python ReLU Function
We can define a relu function in Python as follows:
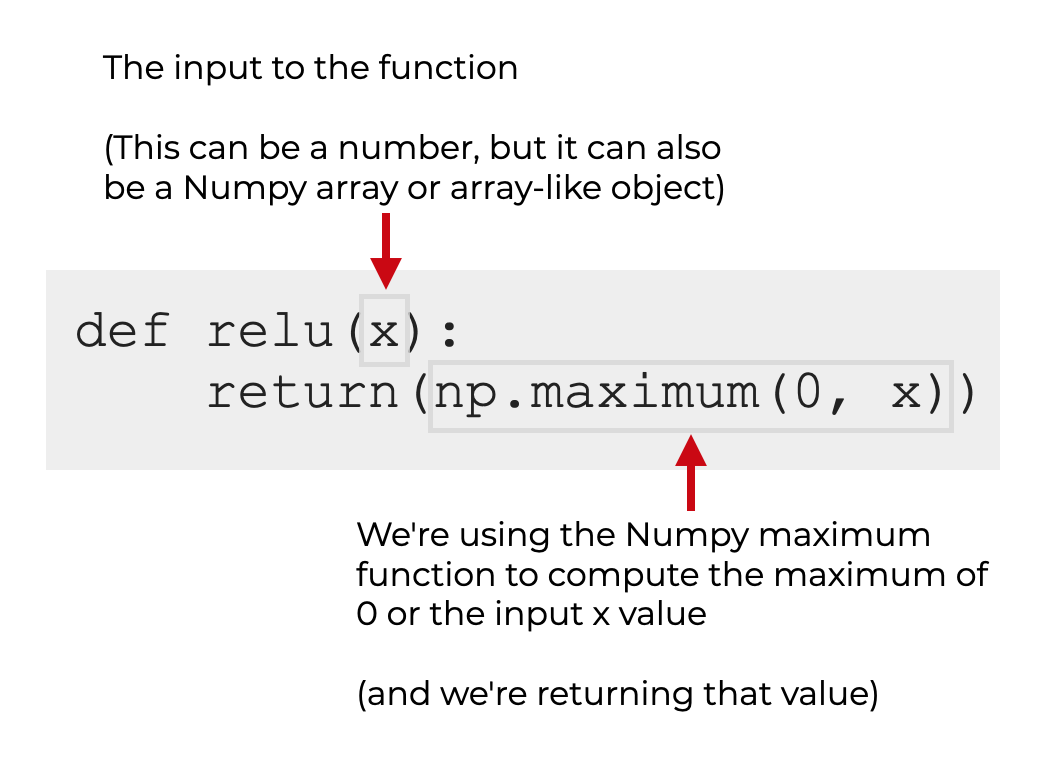
We’re using the def keyword to indicate that we’re defining a new function.
The name of the function here is “relu” … although we could name it whatever we like.
The input argument is named x.
The body of the function contains only one line: return(np.maximum(0, x)).
Here, we’re calling the Numpy maximum function and computing the maximum of 0 and x (the input value).
So return(np.maximum(0, x)) will:
- return x if x is positive
- return 0 if x is 0 or negative
So this function is effectively a linear function that zeroes out negative values.
Format of the input values
Before we move on, I want to comment on the allowed input values.
This function will work on:
- single numbers
- Numpy arrays
- array-like objects
If we give it a number, then the output will be a number.
If we give it an array or array-like object, then the output will be a Numpy array.
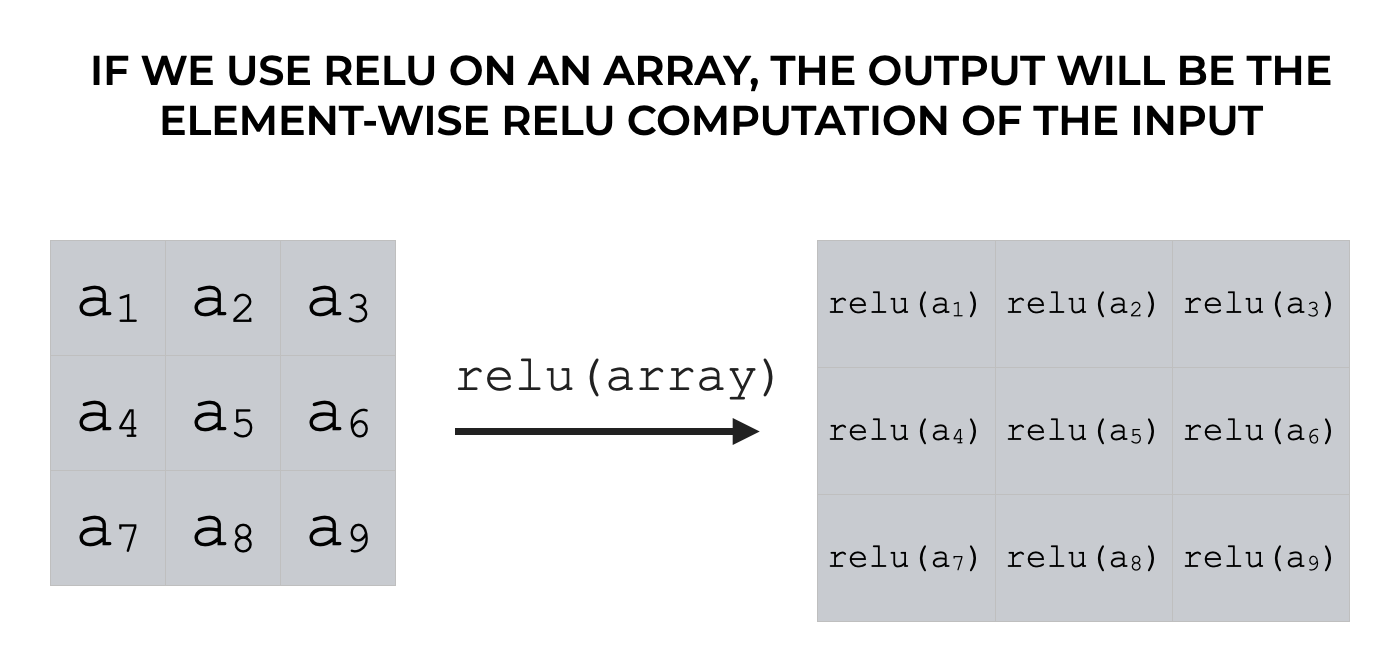
Specifically, in this case, the output will be an array with the same size and shape as the input, and the values will be the element-wise relu computation of the input values.
Examples: how to implement and use a Numpy Relu function
Now that we’ve looked at the syntax for how to implement a Numpy relu function, let’s actually run the code and work on some examples.
Examples:
- Define the Numpy relu function
- Compute relu of 0
- Compute relu of -2
- Compute relu of 2
- Use Numpy relu on an array of numbers
- Plot the Numpy relu function
Preliminary code: Import Numpy and Set Up Plotly
Before you run these examples, you’ll need to import some packages and also possibly set up Plotly.
Import Packages
First, let’s import Numpy and Plotly Express.
import numpy as np
import plotly.express as px
We’re going to use Numpy in our implementation of the relu function.
And we’ll use Plotly Express to plot the relu function in example 6.
Set Up Image Rendering
Next, you may need to configure Plotly so that it will plot images in your IDE.
By default, Plotly attempts to render its output visualizations in a browser.
This is fine if you’re using a notebook, but if you’re using an IDE, it can cause problems. For example, if you’re using Spyder or PyCharm, Plotly may not render images properly, by default.
To change this, if you’re using an IDE, you need to run some code that tells Plotly to visualize the output in the IDE.
(Note: if you’re using Jupyter, you can skip this code!)
import plotly.io as pio
pio.renderers.default = 'svg'
Once you’ve finished running the setup code, you should be ready to run the examples.
EXAMPLE 1: Define the Numpy relu function
First, let’s just define the relu function:
def relu(x):
    return(np.maximum(0, x))
Explanation
Here, we’re using the def key word to define a new function, with the name “relu”.
There’s one input: x.
The return value is the maximum of 0 and x, which we’re computing with the Numpy maximum function.
EXAMPLE 2: Compute the relu of 0
Next, let’s compute the relu of 0.
relu(0)
OUT:
0
Explanation
Computing the relu of 0 is effectively computing np.maximum(0,0), which is 0.
EXAMPLE 3: Compute relu of -2
Next, let’s compute the relu of -2.
relu(-2)
OUT:
0
Explanation
Computing the relu of 0 is effectively computing np.maximum(0,-2), which is 0.
Remember: the relu function effectively zeros out negative numbers.
EXAMPLE 4: Compute relu of 2
Now, let’s compute the relu of 2.
relu(2)
OUT:
2
Explanation
Computing the relu of 2 is effectively computing np.maximum(0,2), which is 2.
Notice that if we apply the relu function to a positive number, the output is the same as the input.
EXAMPLE 5: Use Numpy relu on an array of numbers
Here, instead of using the Numpy relu function on a single number, we’ll use the function on an array of numbers.
Create Numpy Array
To do this, we’ll start by creating a Numpy array of numbers.
Specifically, we’ll use Numpy linespace to create an array of 41 evenly spaced values from -2 to 2.
x_values = np.linspace(start = -2, stop = 2, num = 41)
And let’s take a look:
print(x_values)
OUT:
[-2.  -1.9 -1.8 -1.7 -1.6 -1.5 -1.4 -1.3 -1.2 -1.1 -1.  -0.9 -0.8 -0.7
 -0.6 -0.5 -0.4 -0.3 -0.2 -0.1  0.   0.1  0.2  0.3  0.4  0.5  0.6  0.7
  0.8  0.9  1.   1.1  1.2  1.3  1.4  1.5  1.6  1.7  1.8  1.9  2. ]
Essentially, x_values contains the values from -2 to 2, in increments of .1.
Compute Relu Values
Next, we’ll apply the relu function to x_values.
relu_values = relu(x_values)
And we can take a look at the results:
print(relu_values)
OUT:
[0.  0.  0.  0.  0.  0.  0.  0.  0.  0.  0.  0.  0.  0.  0.  0.  0.  0.
 0.  0.  0.  0.1 0.2 0.3 0.4 0.5 0.6 0.7 0.8 0.9 1.  1.1 1.2 1.3 1.4 1.5
 1.6 1.7 1.8 1.9 2. ]
Explanation
If you look closely, the values in relu_values are all 0 up to the input value of 0. Then after that, the values equal the input x value.
Effectively, the relu function has zeroed-out the negative values.
EXAMPLE 6: Plot the Numpy relu function
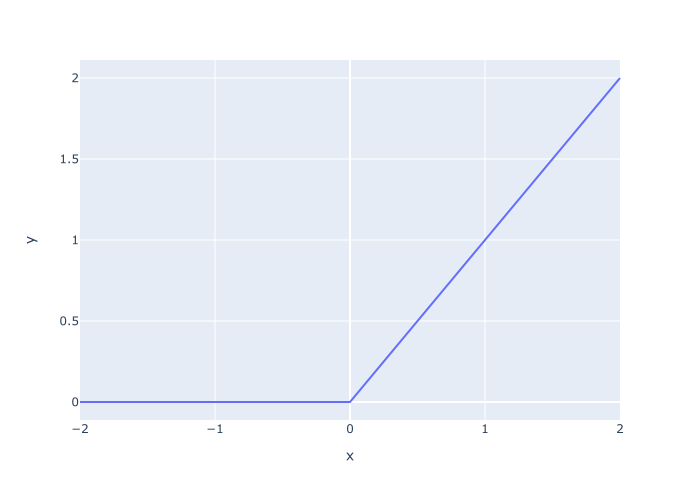
Finally, let’s plot the relu values that we just created.
We’re going to do this with the Plotly line function.
px.line(x = x_values, y = relu_values)
OUT:
Explanation
Here, we’ve used the px.line function from Plotly to plot the relu values we computed in example 5.
On the x-axis, we’ve mapped the values contained in x_values.
On the y-axis, we’ve mapped the values contained in the Numpy array called relu_values.
Leave your other questions in the comments below
Do you have other questions about how to create or use a Numpy relu function?
If so, leave your questions in the comments section below.
Join our course to learn more about Numpy
In this tutorial, I’ve explained how implement and use the relu function in Python, using Numpy.
This should help you with implementing Relu, but if you really want to learn Numpy, there’s a lot more to learn.
If you’re serious about mastering Numpy, and serious about data science in Python, you should consider joining our premium course called Numpy Mastery.
Numpy Mastery will teach you everything you need to know about Numpy, including:
- How to create Numpy arrays
- How to reshape, split, and combine your Numpy arrays
- What the “Numpy random seed” function does
- How to use the Numpy random functions
- How to perform mathematical operations on Numpy arrays
- and more …
Moreover, this course will show you a practice system that will help you master the syntax within a few weeks. We’ll show you a practice system that will enable you to memorize all of the Numpy syntax you learn. If you have trouble remembering Numpy syntax, this is the course you’ve been looking for.
Find out more here:
You can make ReLU 2 sided by thinking about the weights it is forward connected to, as per this blog post.
https://ai462qqq.blogspot.com/2023/03/2-siding-relu-via-forward-projections.html