This tutorial will show you how to use the NumPy median function, which we often call np.median.
This tutorial will teach you a few things.
First, it will show you how the NumPy median function works syntactically. We’ll cover the basic syntax and parameters of the np.median function.
I’ll also show you some examples of how to use it. As always, one of the best ways to learn new syntax is studying and practicing simple examples.
If you’re a relative beginner with NumPy, I recommend that you read the full tutorial.
But if you only need help with a specific aspect of the NumPy median function, then you can click on one of the links below. The following links will take you to the appropriate section of the tutorial:
A quick introduction to the NumPy median function
If you’re a real beginner, you may not be 100% familiar with NumPy. So before I explain the np.median function, let me explain what NumPy is.
What exactly is NumPy?
Numpy is a data manipulation module for Python
NumPy is a data manipulation module for the Python programing language.
At a high level, NumPy enables you to work with numeric data in Python. A little more specifically, it enables you to work with large arrays of numeric data.
You can create and store numeric data in a data structure called a NumPy array.
NumPy also has a set of tools for performing computations on arrays of numeric data. You can do things like combine arrays of numeric data, split arrays into multiple arrays, or reshape arrays into arrays with a new number of rows and columns.
NumPy also has a set of functions for performing calculations on numeric data. The NumPy median function is one of these functions.
Now that you have a broad understanding of what NumPy is, let’s take a look at what the NumPy median function is.
NumPy median computes the median of the values in a NumPy array
The NumPy median function computes the median of the values in a NumPy array. Note that the NumPy median function will also operate on “array-like objects” like Python lists.
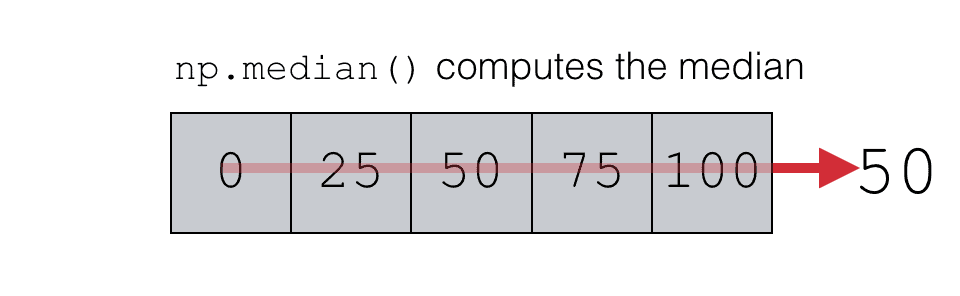
Let’s take a look at a simple visual illustration of the function.
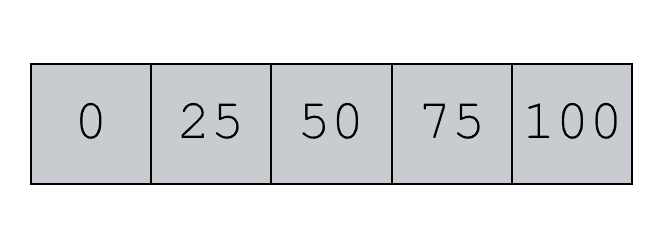
Imagine we have a 1-dimensional NumPy array with five values:
We can use the NumPy median function to compute the median value:
It’s pretty straight forward, although the np.median function can get a little more complicated. It can operate on 2-dimensional or multi-dimensional array objects. It can also calculate the median value of each row or column. You’ll see some examples of these operations in the examples section.
Ok. Now let’s take a closer look at the syntax of the NumPy median function.
The syntax of numpy median
A quick note
One quick note. This explanation of the syntax and all of the examples in this tutorial assume that you’ve imported the NumPy module with the code import numpy as np.
This is a common convention among NumPy users. When you write and run a NumPy/Python program, it’s common to import NumPy as np. This enables you to refer to NumPy with the “nickname” np, which makes the code a little simpler to write and read.
I just wanted to point this out to you to make sure you understand.
An explanation of the syntax
Ok. Let’s take a look at the syntax.
Assuming that you’ve imported NumPy as np, you call the function by the name np.median(). In some programs, you might also see the function called as numpy.median(), if the coder imported NumPy as numpy. Both are relatively common, and it really depends on how the NumPy module has been imported.
Inside of the median() function, there are several parameters that you can use to control the behavior of the function more precisely. Let’s talk about those.
The parameters of numpy median
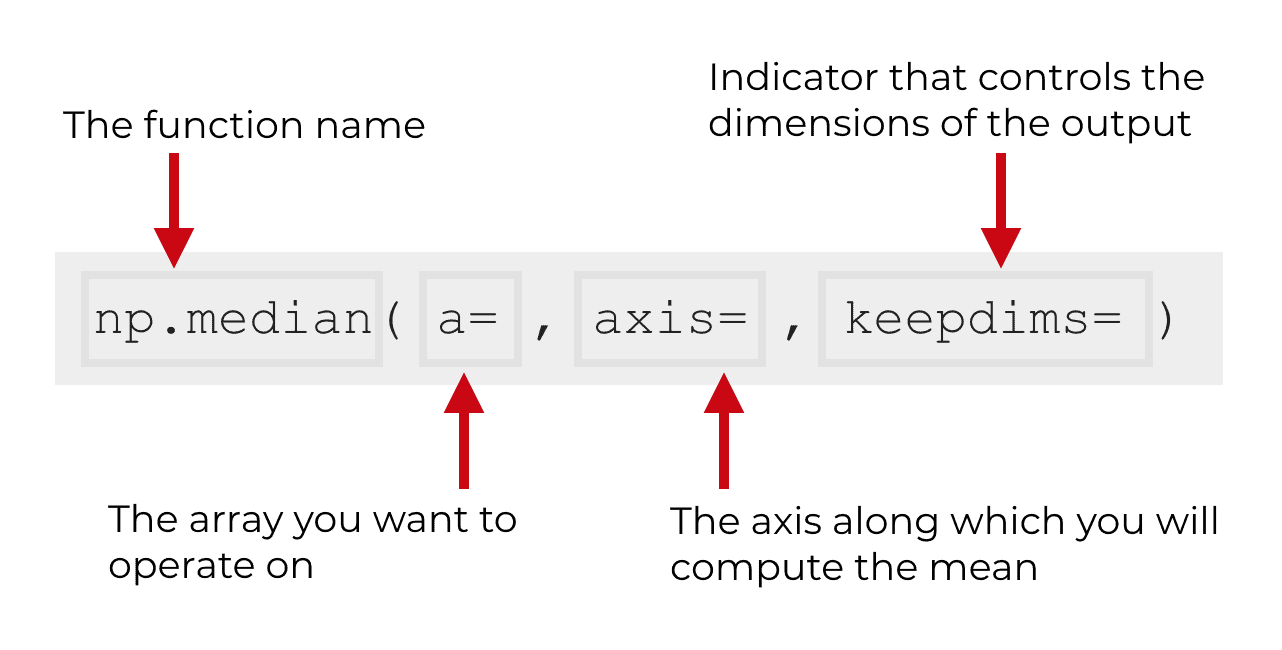
The np.median function has four parameters that we will discuss:
aaxisoutkeepdims
There’s actually a fifth parameter called overwrite_input. The overwrite_input parameter is not going to be very useful for you if you’re a beginner, so for the sake of simplicity, we’re not going to discuss it in this tutorial.
Ok, let’s quickly review what each parameter does:
a (required)
a
The a parameter specifies the data that you want to operate on. It’s the data on which you will compute the median.
Typically, this will be a numpy array. However, the np.median function can also operate on “array-like objects” such as Python lists. For the sake of simplicity, this tutorial will work with NumPy arrays, but remember that many (if not all) of the examples would work the same way if you used an array-like object instead.
Note that this parameter is required. You need to provide something to the a parameter, otherwise the np.median function won’t work.
axis (optional)
The axis parameter controls the axis along which the function will compute the median.
More simply, the axis parameter enables you to compute median values along the rows of an array, or the median values along the columns of an array (instead of computing the median of all of the values).
Using the axis parameter confuses many people.
Later in this tutorial, I’ll show you an example of how to use the axis parameter; hopefully that will make it more clear.
But quickly, let me explain how this works.
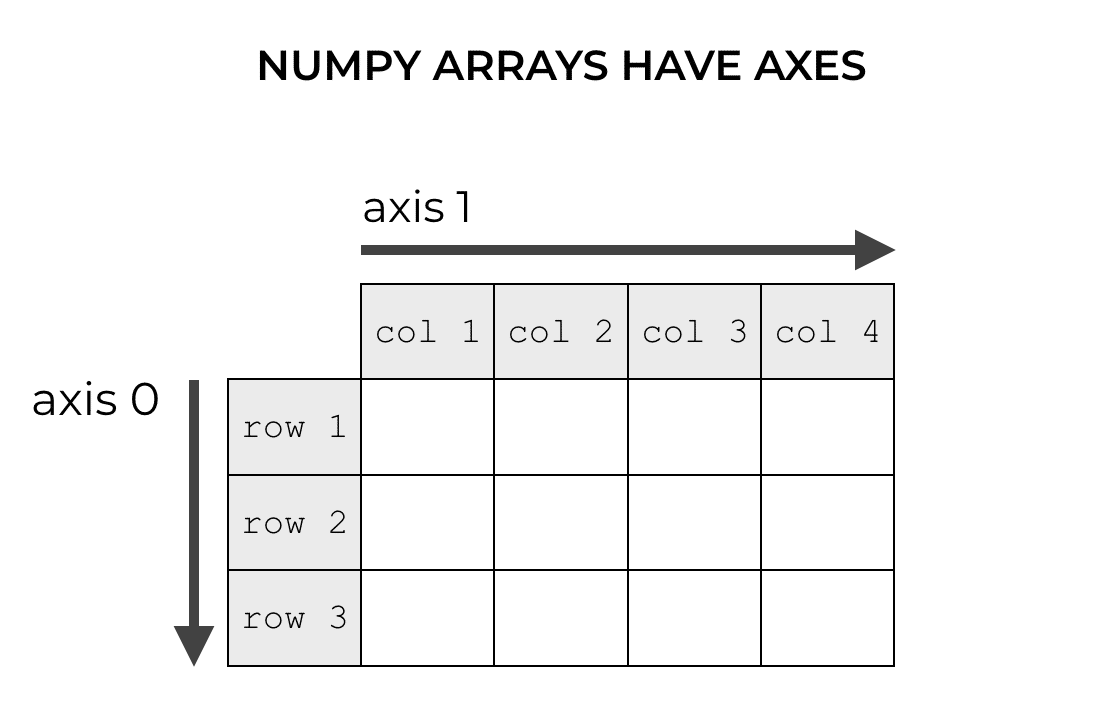
NumPy arrays have axes. It’s best to think of axes as directions along the array.
So if you have a 2-dimensional array, there are two axes: axis 0 is the direction down the rows and axis 1 is the direction across the columns. (Keep in mind that higher-dimensional arrays have additional axes.)
When we use NumPy functions like np.median, we can often specify an axis along which to perform the computation.
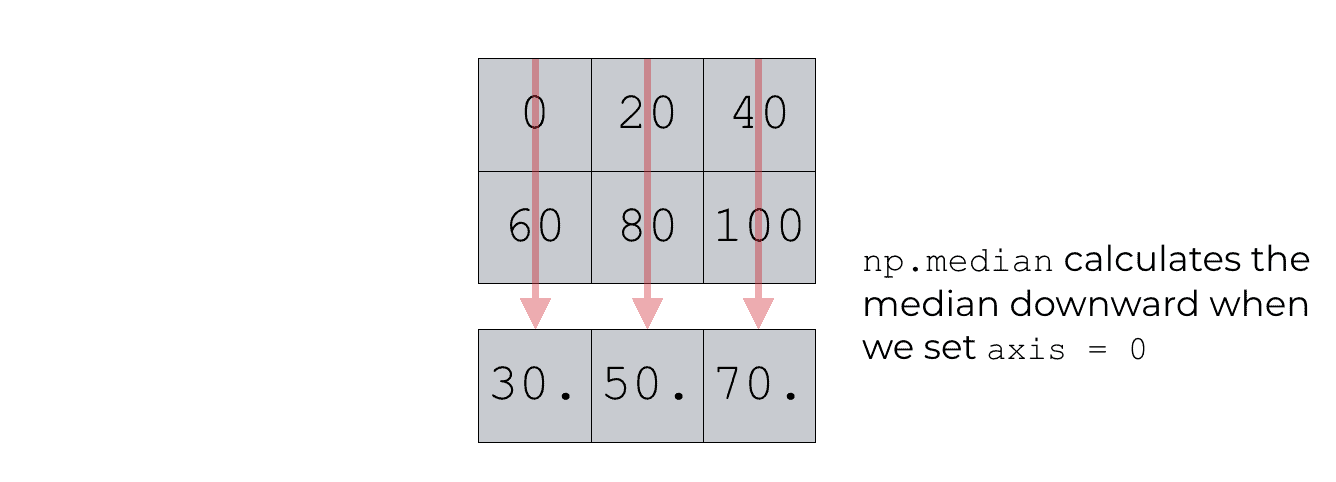
So when we set axis = 0, the NumPy median function computes the median values downward along axis 0. This effectively computes the column medians.
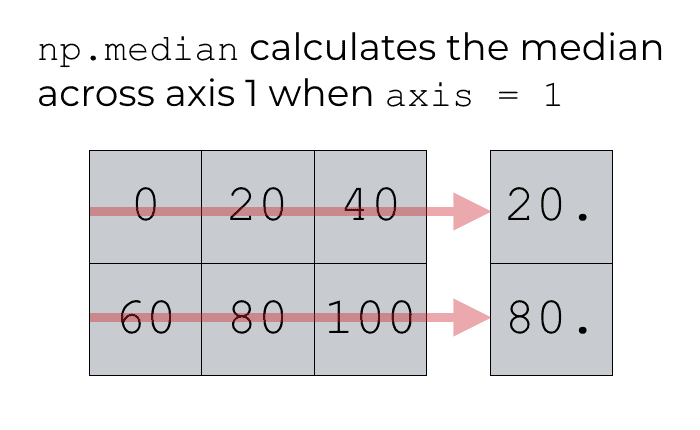
Similarly, when we set axis = 1, the NumPy median function computes the median values horizontally across axis 1. This effectively computes the row medians.
Hopefully these images illustrate the concept and help you understand.
But if you’re still confused, I’ll show you examples of how to use the axis parameter later in the examples section.
out (optional)
The out parameter enables you to specify a different output array where you can put the result.
So if you want to store the result of np.median in a different array, you can use the out parameter to do that.
This is an optional parameter.
keepdims (optional)
The keepdims parameter enables you to make the dimensions of the output the same as the input.
This is a little confusing to many people, so let me explain.
Remember that the np.median function (and other similar functions like np.sum and np.mean) summarize your data in some way. They are computing summary statistics.
When you summarize the data in this way, you are effectively collapsing the number of dimensions of the data. For example, if you have a 1-dimensional NumPy array, and you compute the median, you are collapsing the data from a 1-dimensional structure down to a 0 dimensional structure (a single scalar number).
Or similarly, if you compute the column means of a 2-d array, you’re collapsing the data from 2 dimensions down to 1 dimension.
Essentially, the output of the NumPy median function has a reduced number of dimensions.
What if you don’t want that? What if you want the output to have the same number of dimensions as the input?
You can force NumPy median to make keep the dimensions the same by using the keepdims parameter. We can set keepdims = True to make the dimensions of the output the same as the dimensions of the input.
I understand that this might be a little abstract, so I’ll show you an example in the examples section.
Note: the keepdims parameter is optional. By default it is set to keepdims = False, meaning that the output of np.array will not necessarily have the same dimensions as the input.
Examples: how to use the numpy median function
Ok. Let’s work through some examples. In the last section I explained the syntax, which is probably helpful. But to really understand the code, you need to play with some examples.
Run this code first
Before you get started with the examples though, you’ll need to run some code.
Import numpy
You need to import NumPy. Run this code to properly import NumPy.
import numpy as np
By running this code, you’ll be able to refer to NumPy as np when you call the NumPy functions.
Compute the median of a 1-dimensional array
Ok.
This first example is very simple. We’re going to compute the median value of a 1-dimensional array of values.
First, you’ll need to create the data.
To do this, you can call the np.array function with a list of numeric values.
np_array_1d = np.array([0,20,40,60,80,100])
And now we’ll print out the data:
print(np_array_1d)
And here’s the output:
[0 20 40 60 80 100]
This is pretty straight forward. Using the np.array function, we’ve created an array with six values from 0 to 100, in increments of 20.
Now, we’ll calculate the median of these values.
np.median(np_array_1d)
Which gives us the following output:
50.0
This is fairly straightforward, but I’ll quickly explain.
Here, the NumPy median function takes the NumPy array and computes the median.
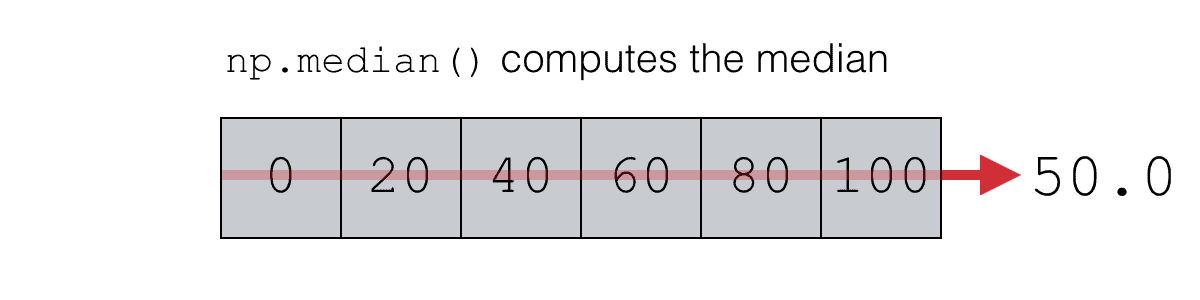
The median of these six values is 50, so the function outputs 50.0 as the result.
Compute the median of a 2-d array
Next, let’s work through a slightly more complicated example.
Here, we’re going to calculate the median of a 2-dimensional NumPy array.
First, we’ll need to create the array. To do this, we’re going to use the NumPy array function to create a NumPy array from a list of numbers. After that, we’re going to use the reshape method to reshape the data from 1-dimensional array to a 2-dimensional array that has 2 rows and 3 columns.
np_array_2d = np.array([0,20,40,60,80,100]).reshape((2,3))
And we can examine the array by using the print() function.
print(np_array_2d)
[[  0  20  40]
 [ 60  80 100]]
As you can see, this dataset has six values arranged in a 2 by 3 NumPy array.
Now, we’ll compute the median of these values.
np.median(np_array_2d)
Which produces the following output:
50.0
This example is very similar to the previous example. The only difference is that in this example, the values are arranged into a 2-dimensional array instead of a 1-dimensional array.
Ultimately though, the result is the same.
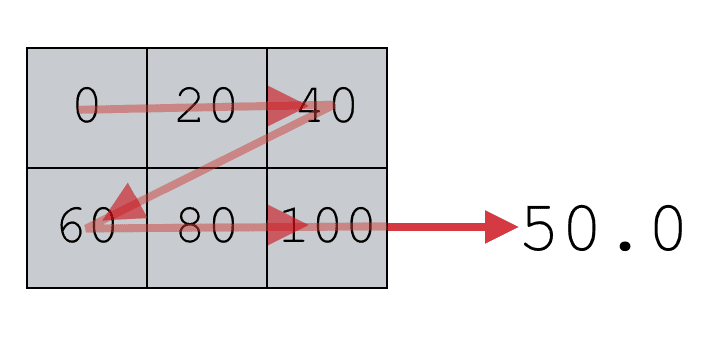
If we use the np.median function on a 2-dimensional NumPy array, by default, it will just compute the median of all of the values in the array. Here in this example, we only have six values in the array, but we could also have a larger number of values … the function would work the same.
Moreover, the NumPy median function would also work this way for higher dimensional arrays. For example, if we had a 3-dimensional NumPy array, we could use the median() function to compute the median of all of the values.
However, with 2-d arrays (and multi-dimensional arrays) we can use the axis parameter to compute the median along rows, columns, or other axes.
Let’s take a look.
Compute the median value of the columns of a 2-d array
First, I’m going to show you how to compute the median of the columns of a 2-dimensional NumPy array.
To do this, we need to use the axis parameter. Remember from earlier in the tutorial that NumPy axes are like directions along the rows and columns of a NumPy array.
Remember: axis 0 is the direction that points down against the rows, and axis 1 is the direction that points horizontally across the columns (in a 2-d array).
The axis parameter specifies which axis you want to summarize
So how exactly does the axis parameter control the behavior of np.median?
This is important: when you use the axis parameter, the axis parameter controls which axis gets summarized.
Said differently, it controls which axis gets collapsed.
So if you set axis = 0 inside of np.median, you’re effectively telling NumPy to compute the medians downward. The medians will be computed down along axis 0. Essentially, it will collapse axis 0 and compute the medians down that axis.
In other words, it will compute the column medians.
This confuses many people, because they think that by setting axis = 0, it will compute the row medians. That’s not how it works.
Again, it helps to think of NumPy axes as directions. The axis parameter specifies the direction along which the medians will be computed.
Compute a median with axis = 0
Let me show you.
Here, we’re going to compute the column medians by setting axis = 0.
Again, we’ll start by creating a dataset.
np_array_2d = np.array([0,20,40,60,80,100]).reshape((2,3))
And we can examine this array by using the print() function.
print(np_array_2d)
[[  0  20  40]
 [ 60  80 100]]
Next, let’s compute the median while setting axis = 0.
# CALCULATE COLUMN AXES
np.median(np_array_2d, axis = 0)
And here’s the output:
array([ 30., 50., 70.])
What happened here?
NumPy calculated the medians along axis 0. This effectively computes the column medians:
Again, this might seem counter intuitive, so remember what I said previously. The axis parameter controls which axis gets summarized. By setting axis = 0, we told NumPy median to summarize axis 0.
Compute the row medians with axis = 1
Now, let’s compute the row medians.
This example is almost identical to the previous example, except here we will set axis = 1.
Once again, we’ll create a dataset. (This is the same as the previous example, so if you’ve already run it, you don’t need to re-run it.)
np_array_2d = np.array([0,20,40,60,80,100]).reshape((2,3))
And here are the contents of np_array_2d:
[[ 0  20  40]
 [ 60 80 100]]
It’s just a simple 2-d NumPy array.
Now, we’re going to calculate the median and set axis = 1. This will effectively calculate the row medians.
np.median(np_array_2d, axis = 1)
Here’s the output:
array([ 20., 80.])
If you’ve read this tutorial carefully so far, you should understand this. Still, I’ll explain.
The input array, np_array_2d, is a 2-d NumPy array. There are 2 rows and 3 columns.
When we use the np.median function on this array with axis = 1, we are telling the function to compute the medians along the direction of axis 1. Remember, in a 2-d array, axis 1 is the direction that runs horizontally across the columns.
When we use NumPy median with axis = 1, we’re basically telling NumPy to summarise axis 1.
This amounts to computing the row medians.
This is fairly easy to understand, but you really need to understand how NumPy axes work. So if you’re still confused, make sure to read read our NumPy axis tutorial, and then come back and read this example and the prior example.
How to use the keepdims parameter with np.median
Finally, let’s talk about how to use the keepdims parameter.
Remember, using the np.median function has the effect of summarizing or collapsing your data. As I showed you earlier, if you have an array of 6 values, and you use np.median on that array, it will summarize those values by computing a single value (the median).
Similarly, if you compute the median and use the axis parameter, the median function will also reduce the number of dimensions. Like we saw in one of the previous examples, if we use np.median on a 2-dimensional array with axis = 0 or axis = 1, the np.median function will compute the column medians or row medians respectively. In either case, the input had 2 dimensions, but the output (e.g., the row median) had only 1 dimension.
This reduction in dimensions is okay in many instances, but sometimes you want the output tho have the same number of dimensions as the input.
To force that behavior, we can use the keepdims parameter.
Set keepdims equal to true (and keep the same dimensions)
By default, the keepdims parameter is set to keepdims = False. As explained above, this means that the dimensions of the output does not need to be the same as the dimensions of the input.
To change this, we must set keepdims = True.
Here’s an example. We’re going to create a 2-d NumPy array and then calculate the column medians:
np_array_2d = np.array([0,20,40,60,80,100]).reshape((2,3))
Quickly, let’s examine the number of dimensions of this array by examining the ndim attribute.
np_array_2d.ndim
Which shows us the number of dimensions:
2
The array has 2 dimensions.
Now, let’s compute the median with axis = 0, and examine the number of dimensions by also using the ndim attribute.
np.median(np_array_2d, axis = 0).ndim
When we run this code, the result is 1. The output of np.median(np_array_2d, axis = 0) has 1 dimension. The explanation for this is just as I explained above: np.median summarizes data, which reduces the number of dimensions.
However, we can keep the same number of dimensions by setting keepdims = True.
Let’s run the operation and look at the number of dimensions of the output:
np.median(np_array_2d, axis = 0, keepdims = True).ndim
Which produces the following output
2
What happened here?
The keepdims parameter forces the median function to keep the dimensions of the output the same as the dimensions of the input. The input array (np_array_2d) has 2 dimensions, so if we set keepdims = True, the output of np.median will also have 2 dimensions.
If you want to learn data science in Python, learn NumPy
NumPy’s median function is one of several important functions in the NumPy module. Basically, if you’re new to NumPy, there’s a lot more to learn than what we covered here.
And NumPy is really important if you want to learn data science in Python. NumPy is critical for data manipulation in Python. If you want to learn data science in Python, you really need to study NumPy.
For more Python data science tutorials, sign up for our email list
With that in mind, I suggest that you sign up for our email list.
Here at Sharp Sight, we regularly publish free tutorials about data science topics.
For example, we regularly publish tutorials about NumPy. If you want to learn NumPy, sign up now.
When you sign up, all of our tutorials will be sent to you. It’s like having a Python data science tutor right in your inbox.
When you sign up, you’ll get free tutorials on:
- NumPy
- Pandas
- Base Python
- Scikit learn
- Machine learning
- Deep learning
- … and more.
Want to learn data science in Python? Sign up now.