This tutorial will show you how to use the NumPy max function, which you’ll see in Python code as np.max.
At a high level, I want to explain the function and show you how it works. That being the case, there are two primary sections in this tutorial: the syntax of NumPy max, and examples of how to use NumPy max.
If you’re still getting started with NumPy, I recommend that you read the whole tutorial, start to finish. Having said that, if you just want to get a quick answer to a question, you can skip ahead to the appropriate section with one of the following links:
Ok. With all of that in mind, let’s get started.
First, let’s talk about NumPy and the NumPy max function.
A quick introduction to the NumPy max function
It’s probably clear to you that the NumPy max function is a function in the NumPy module.
But if you’re a true beginner, you might not really know what NumPy is. So before we talk about the np.max function specifically, let’s quickly talk about NumPy.
What exactly is NumPy?
Numpy is a data manipulation module for Python
To put it very simply, NumPy is a data manipulation package for the Python programming language.
If you’re interested in data science in Python, NumPy is very important. This is because a lot of data science work is simply data manipulation. Whether you’re doing deep learning or data analysis, a huge amount of work in data science is just cleaning data, prepping data, and exploring it to make sure that it’s okay to use.
Again, because of the importance of data manipulation, NumPy is very important for data science in Python.
Numpy is a toolkit for working with numeric data
Specifically though, NumPy provides a set of tools for working with numeric data.
Python has other toolkits for working with non-numeric data and data of mixed type (like the Pandas module). But if you have any sort of numeric data that you need to clean, modify, reshape, or analyze, NumPy is probably the toolkit that you need.
Although NumPy functions can operate on a variety of data structures, they are built to operate on a structure called a NumPy array. NumPy arrays are just a special kind of Python object that contain numerical data. There are a variety of ways to create numpy arrays, including the np.array function, the np.ones function, the np.zeros function and the np.arange function, along with many other functions covered in past tutorials here at Sharp Sight.
Importantly, NumPy arrays are optimized for numerical computations. So there are a set of tools in NumPy for performing numerical computations on NumPy arrays, like calculating the mean of a NumPy array, calculating the median of a NumPy array, and so on.
Essentially, NumPy gives you a toolkit for creating arrays of numeric data, and performing calculations on that numeric data.
One of the computations you can perform is calculating the maximum value of a NumPy array. That’s where the np.max function comes in.
NumPy max computes the maxiumum of the values in a NumPy array
The numpy.max() function computes the maximum value of the numeric values contained in a NumPy array. It can also compute the maximum value of the rows, columns, or other axes. We’ll talk about that in the examples section.
Syntactically, you’ll often see the NumPy max function in code as np.max. You’ll see it written like this when the programmer has imported the NumPy module with the alias np.
Additionally, just to clarify, you should know that the np.max function is the same thing as the NumPy amax function, AKA np.amax. Essentially np.max is an alias of np.amax. Aside from the name, they are the same.
A high level example of how np.max works
Later in this tutorial, I’ll show you concrete examples of how to use the np.max function, but right here I want to give you a rough idea of what it does.
For example, assume that you have a 1-dimensional NumPy array with five values:
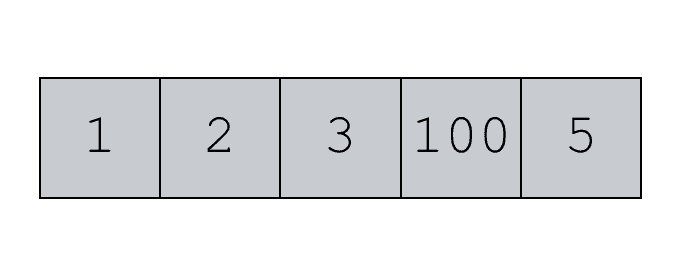
We can use the NumPy max function to compute the maximum value:
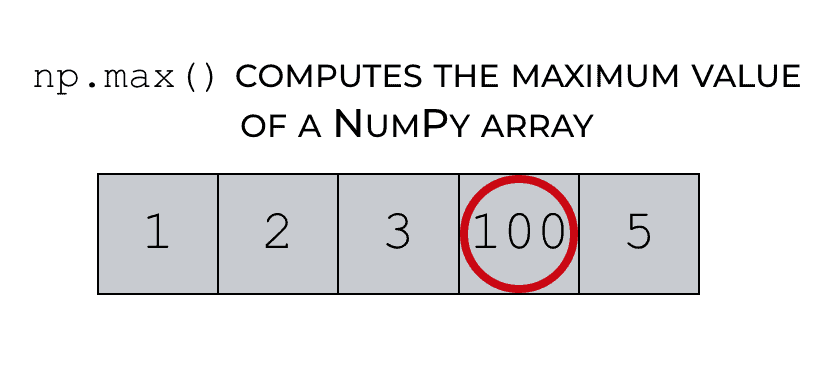
Although this example shows you how the np.max() function operates on a 1-dimensional NumPy array, it operates in a similar way on 2-dimensional arrays and multi-dimensional arrays. Again, I’ll show you full examples of these in the examples section of this tutorial.
Before we look at the code examples though, let’s take a quick look at the syntax and parameters of np.max.
The syntax of numpy max
The syntax of the np.max function is fairly straight forward, although a few of the parameters of the function can be a little confusing.
Here, we’ll talk about the syntactical structure of the function, and I’ll also explain the important parameters.
A quick note
One quick note before we start reviewing the syntax.
Syntactically, the proper name of the function is numpy.max().
Having said that, you’ll often see the function in code as np.max().
Why?
Commonly, at the start of a program that uses the NumPy module, programmers will import the NumPy function as np. You will literally see a line of code in the program that reads import numpy as np. Effectively, this imports the NumPy module with the alias np. This enables the programmer to refer to NumPy as np in the code, which enables them to refer to the numpy.max function as np.max.
Having said that, let’s take a closer look at the syntax.
An explanation of the syntax
At a high level, the syntax of np.max is pretty straight forward.
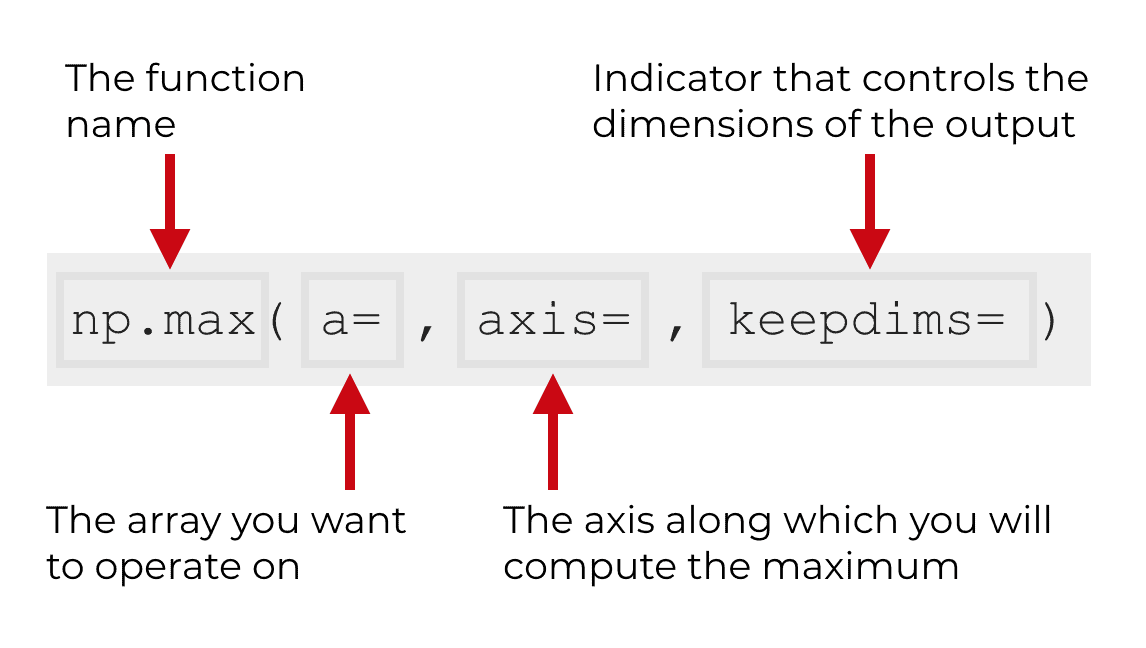
There’s the name of the function – np.max() – and inside of the function, there are several parameters that enable us to control the exact behavior of the function.
Let’s take a closer look at the parameters of np.max, because the parameters are what really give you fine-grained control of the function.
The parameters of np.max
The numpy.max function has four primary parameters:
aaxisoutkeepdims
Let’s talk about each of these parameters individually.
a (required)
The a parameter enables you to specify the data that the np.max function will operate on. Essentially, it specifies the input array to the function.
In many cases, this input array will be a proper NumPy array. Having said that, numpy.max (and most of the other NumPy functions) will operate on any “array like sequence” of data. That means that the argument to the a parameter can be a Python list, a Python tuple, or one of several other Python sequences.
Keep in mind that you need to provide something to this argument. It is required.
axis (optional)
The axis parameter enables you to specify the axis on which you will calculate the maximum values.
Said more simply, the axis parameter enables you to calculate the row maxima and column maxima.
I’ll explain how to do that with more detail in the examples section below, but let me quickly explain how the axis parameter works.
A quick review of array axes
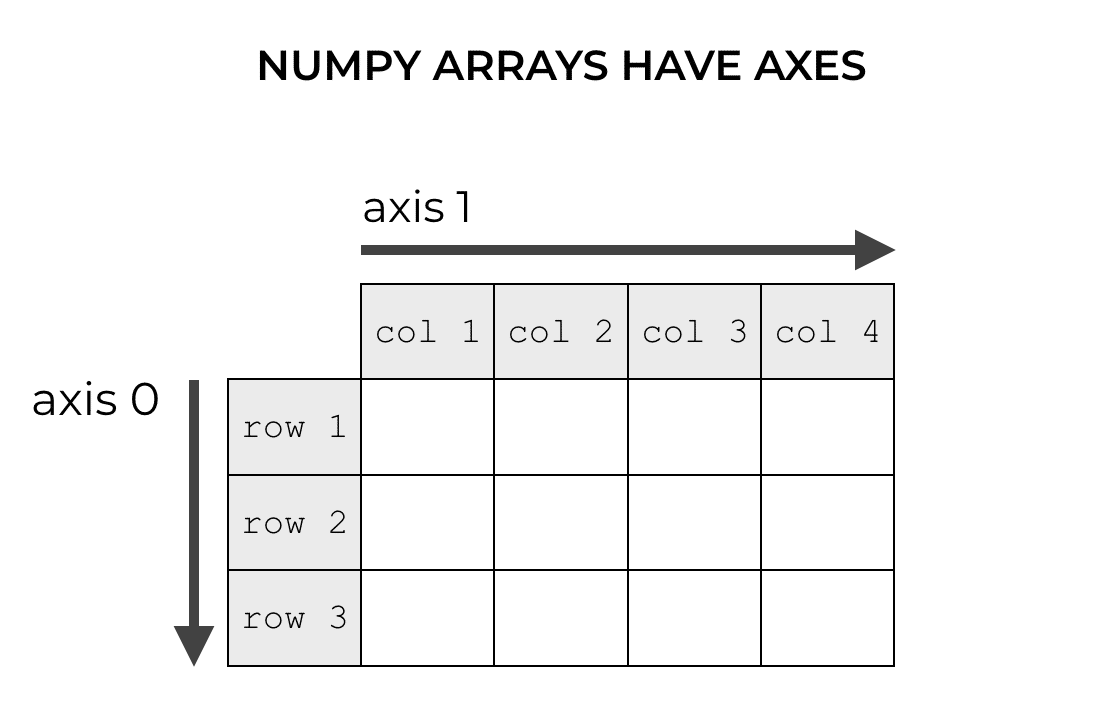
At a high level, you need to understand that NumPy arrays have axes.
Axes are like directions along the NumPy array. In a 2-dimensional array, axis 0 is the axis that points down the rows and axis 1 is the axis that points horizontally across the columns.
The array parameter specifies the axis to compute the maxima
So how does this relate to the axis parameter?
When we use the axis parameter in the numpy.max function, we’re specifying the axis along which to find the maxima.
This effectively lets us compute the column maxima and row maxima.
Let me show you what I mean.
Remember that axis 0 is the axis that points downwards, down the rows.
When we use the code np.max(axis = 0) on an array, we’re effectively telling NumPy to compute the maximum values in that direction … the axis 0 direction.
Effectively, when we set axis = 0, we’re specifying that we want to compute the column maxima.
Similarly, remember that in a 2-dimensional array, axis 1 points horizontally. Therefore, when we use NumPy max with axis = 1, we’re telling NumPy to compute the maxima horizontally, in the axis 1 direction.
This effectively computes the row maxima.
I’ll show you concrete code examples of how to do this, later in the examples section.
Keep in mind that the axis parameter is optional. If you don’t specify an axis, NumPy max will find the maximum value in the whole NumPy array.
out (optional)
The out parameter allows you to specify a special output array where you can store the output of np.max.
It’s not common to use this parameter (especially if you’re a beginner) so we aren’t going to discuss this in the tutorial.
out is an optional parameter.
keepdims (optional)
The keepdims parameter is a little confusing, so it will take a little effort to understand.
Ultimately, the keepdims parameter keeps the dimensions of the output the same as the dimensions of the input.
To understand why this might be necessary, let’s take a look at how the numpy.max function typically works.
When you use np.max on a typical NumPy array, the function reduces the number of dimensions. It summarizes the data.
For example, let’s say that you have a 1-dimensional NumPy array. You use NumPy max on the array.
When you use np.max on a 1-d array, the output will be a single number. A scalar value … not a 1-d array.
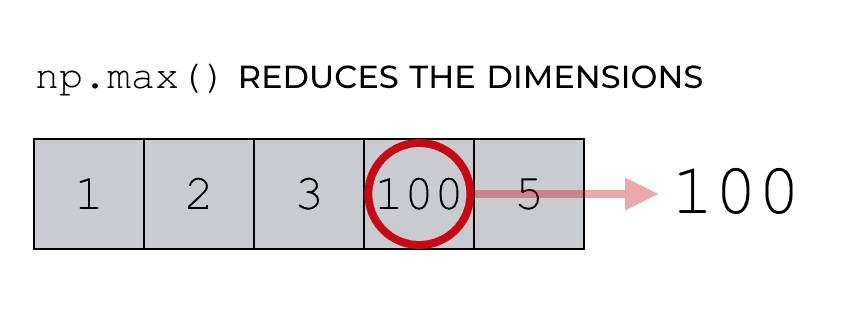
Essentially, the functions like NumPy max (as well as numpy.median, numpy.mean, etc) summarise the data, and in summarizing the data, these functions produce outputs that have a reduced number of dimensions.
Sometimes though, you want the output to have the same number of dimensions. There are times when if the input is a 1-d array, you want the output to be a 1-d array (even if the output array has a single value in it).
You can do this the keepdims parameter.
By default, keepdims is set to False. So by default (as discussed above), the dimensions of the output will not be the same as the dimensions of the input. By default, the dimensions of the output will be smaller (because np.max summarizes the data).
But if you set keepdims = True, the output will have the same dimensions as the input.
This is a little abstract without a concrete example, so I’ll show you an example of this behavior later in the examples section.
And actually, now that we’ve reviewed the parameters, this is a good spot to start looking at the examples of NumPy max.
Examples: how to use the numpy max function
In this section, I’m going to show you concrete examples of how to use the NumPy max function.
I’ll show you several variations of how to find the maximum value of an array. I’ll show you how to find the maximum value of a 1-d array, how to find the max value of a 2-d array, and how to work with several of the important parameters of numpy.max.
Run this code first
Before we get started, there are some preliminary things you need to do to get set up properly.
First, you need to have NumPy installed properly on you computer.
Import numpy
Second, you need to have NumPy imported into your working environment.
You can import NumPy with the following code:
import numpy as np
Notice that we’ve imported NumPy as np. That means that we will refer to NumPy in our code with the alias np.
Ok, now that that’s finished, let’s look at some examples.
Compute the max of a 1-dimensional array
We’ll start simple.
Here, we’re going to compute the maximum value of a 1-d NumPy array.
To do this, we’ll first just create a 1-dimensional array that contains some random integers. To create this array, we’ll use the numpy.random.randint() function. Keep in mind that you need to use the np.random.seed() function so your NumPy array contains the same integers as the integers in this example.
np.random.seed(22)
np_array_1d = np.random.randint(size = 5, low = 0, high = 99)
This syntax will create a 1-d array called np_array_1d.
We can print out np_array_1d using the print() function.
print(np_array_1d)
And here’s the output:
[ 4, 44, 64, 84, 8]
Visually, we can identify the maximum value, which is 84.
But let’s do that with some code.
Here, we’ll calculate the maximum value of our NumPy array by using the np.max() function.
np.max(np_array_1d)
Which produces the following output:
84
This is an extremely simple example, but it illustrates the technique. Obviously, when the array is only 5 items long, you can visually inspect the array and find the max value. But this technique will work if you have an array with thousands of values (or more!).
Compute the maximum of a 2-d array
Next, let’s compute the maximum of a 2-d array.
To do this, obviously we need a 2-d array to work with, so we’ll first create a 2-dimensional NumPy array.
To create our 2-d array, we’re going to use the np.random.choice() function. Essentially, this function is going to draw a random sample from the integers between 0 and 8, without replacement. After np.random.choice() is executed, we’re using the reshape() method to reshape the integers into a 2-dimensional array with 3 rows and 3 columns.
np.random.seed(1)
np_array_2d = np.random.choice(9, 9, replace = False).reshape((3,3))
Let’s take a look by printing out the array, np_array_2d.
print(np_array_2d)
[[8 2 6]
 [7 1 0]
 [4 3 5]]
As you can see, this is a 2-d array with 3 rows and 3 columns. It contains the integers from 0 to 8, arranged randomly in the array.
Now, let’s compute the max value of the array:
np.max(np_array_2d)
Which produces the following output:
8
Again, this is a very simple example, but you can use this with a much larger 2-d array and it will operate in the same way. Once you learn how to use this technique, try it with larger arrays!
Next, let’s do something more complicated.
… in the next examples, we’ll compute the column maxima and the row maxima.
Compute the maximum value of the columns of a 2-d array
First up: we’ll compute the maximum values of the columns of an array.
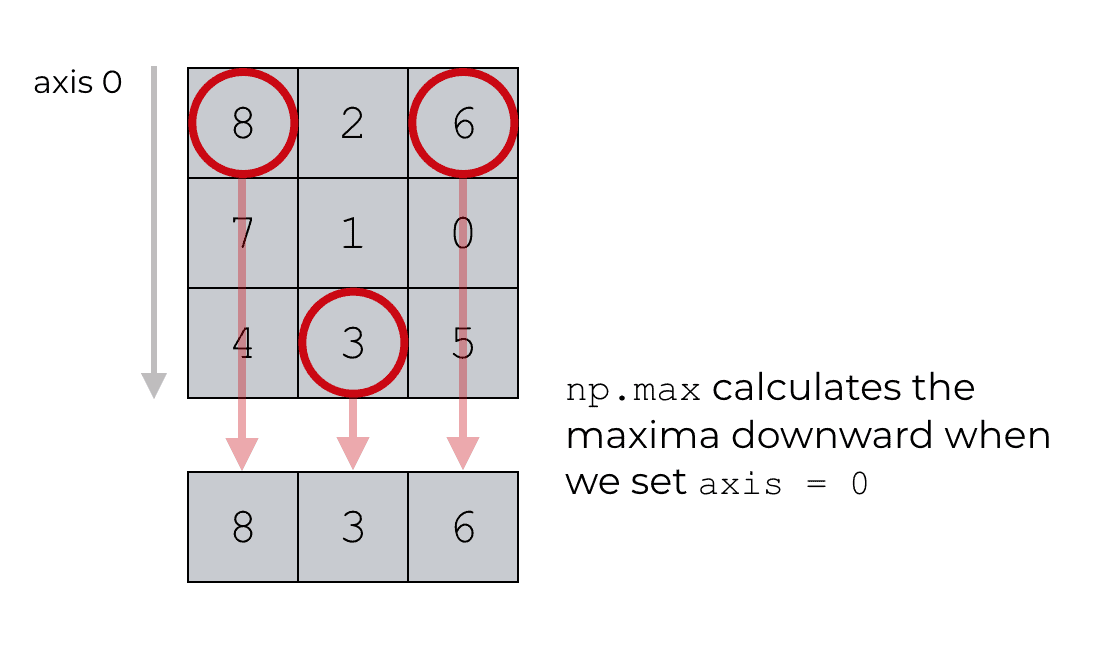
To do this, we need to use the axis parameter. Specifically, we need to set axis = 0 inside of the numpy.max function.
Let’s quickly review why.
The axis parameter specifies which axis you want to summarize
Remember that NumPy arrays have axes, and that the axes are like directions along the array. In a 2-d array, axis 0 is the axis that points downwards, and axis 1 is the axis that points horizontally.
We can use these axes to define the direction along which to use np.max.
So let’s say that we want to compute the maximum values of the columns. This is equivalent to computing the means downward.
Essentially, to compute the column maxima, we need to compute the maxima in the axis-0 direction.
Compute max with axis = 0
Let me show you how.
Here, we’re going to re-create our 2-d NumPy array. This is the same as the 2-d NumPy array that we created in a previous example, so if you already ran that code, you don’t need to run it again.
np.random.seed(1)
np_array_2d = np.random.choice(9, 9, replace = False).reshape((3,3))
And we can print it out:
print(np_array_2d)
[[8 2 6]
 [7 1 0]
 [4 3 5]]
Once again, this is a 2-d array with 3 rows and 3 columns. It contains the integers from 0 to 8, arranged randomly in the array.
Now, let’s compute the column maxima by using numpy.max with axis = 0.
# CALCULATE COLUMN MAXIMA
np.max(np_array_2d, axis = 0)
Which produces the following output array:
array([8, 3, 6])
Let’s evaluate what happened here.
By setting axis = 0, we specified that we want the NumPy max function to calculate the maximum values downward along axis 0.
It’s pretty straightforward as long as you understand NumPy axes and how they work in the NumPy functions.
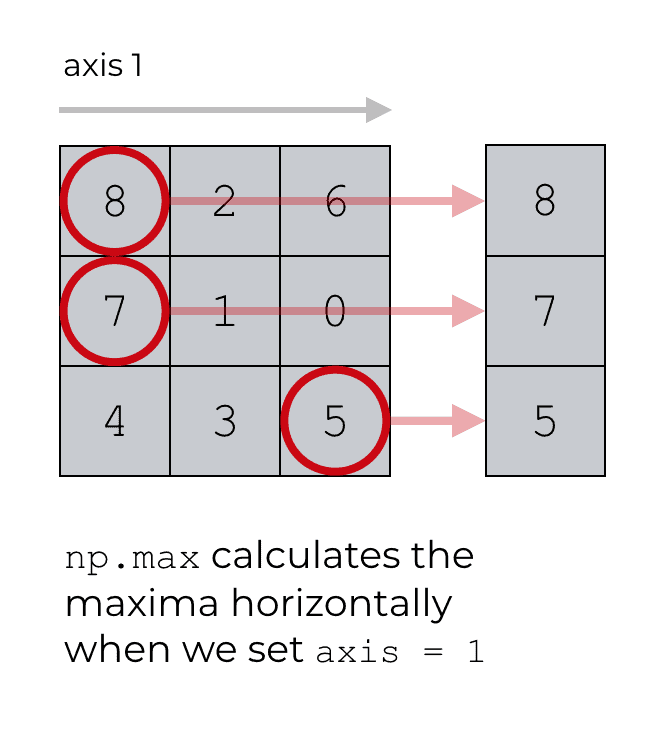
Compute the row max with axis = 1
Similarly, we can compute the row maxima by setting the axis parameter to axis = 1.
Here’s the code to create the 2-d dataset again:
np.random.seed(1)
np_array_2d = np.random.choice(9, 9, replace = False).reshape((3,3))
print(np_array_2d)
[[8 2 6]
 [7 1 0]
 [4 3 5]]
And now let’s calculate the row maxima:
np.max(np_array_2d, axis = 1)
With the following output:
array([8, 7, 5])
This should make sense if you’ve already read and understood the previous examples.
When we set axis = 1, we’re telling numpy.max to calculate the maximum values in the axis-1 direction. Since axis 1 is the axis that runs horizontally along the array, this effectively calculates the maximum values along the rows of a 2-d array:
Again, this is pretty straightforward, as long as you really understand NumPy array axes. If you’re still having trouble understanding axes, I recommend that you review our tutorial about NumPy array axes.
How to use the keepdims parameter with np.max
Finally, let’s take a look at the keepdims parameter.
Before we do this, let me explain why we need it.
As I noted earlier, the NumPy max function summarizes data when you use it. In fact, many of the NumPy functions that calculate summary statistics (like np.mean, np.median, np.min, etc) summarize data by their very nature. When you calculate a summary statistic, you are by definition summarizing the data.
This has important consequences related to the dimensions of the data.
When you summarize your data with a function like numpy.max, the output of the function will have a reduced number of dimensions.
For example, let’s say you’re calculating the maximum value of a 2-dimensional array. If you use numpy.max on this 2-d array (without the axis parameter), then the output will be a single number, a scalar. Scalars have zero dimensions. Two dimensions in, zero dimension out.
The NumPy max function effectively reduces the dimensions between the input and the output.
Sometimes though, you don’t want a reduced number of dimensions. There may be situations where you need the output to technically have the same dimensions as the input (even if the output is a single number).
You can force that behavior by using the keepdims parameter.
Set keepdims equal to true (and keep the same dimensions)
By default, the keepdims parameter is set to False. As I just explained, this means that the output does not need to have the same dimensions as the input, by default.
But if you set keepdims = True, this will force the output to have the same number of dimensions as the input.
This might confuse you, so let’s take a look at a solid example.
First, let’s just create a 2-d array.
This is the same array that we created earlier, so if you already ran this code, you don’t need to re-run it. Essentially, this code creates a 2-d array with the numbers from 0 to 8, arranged randomly in a 3-by-3 array.
np.random.seed(1)
np_array_2d = np.random.choice(9, 9, replace = False).reshape((3,3))
Just for the sake of clarity, let’s take a look by printing it out:
print(np_array_2d)
And here’s the array:
[[8 2 6]
 [7 1 0]
 [4 3 5]]
Again, this array just contains the integers from 0 to 8, arranged randomly in a 3-by-3 NumPy array.
And how many dimensions does it have?
It’s probably obvious to you, but we can directly retrieve the number of dimensions by extracting the ndim attribute from the array.
np_array_2d.ndim
And this tells us the number of dimensions:
2
So, np_array_2d is a 2-dimensional array.
Now, let’s use np.max to compute the maximum value of the array.
np.max(np_array_2d)
The max value is 8.
And how many dimensions does the output have? We can check by referencing the ndim attribute at the end of the np.max() function:
np.max(np_array_2d).ndim
How many dimensions does the output have?
0.
The output of np.max is the maximum value (8), which is a scalar. This scalar has zero dimensions.
Re-run np.max with keepdims = True
Now, let’s re-run the code with keepdims = True.
np.max(np_array_2d, keepdims = True)
Which produces the following output:
array([[8]])
And let’s check the dimensions:
np.max(np_array_2d, keepdims = True).ndim
2
Here, when we run np.max on np_array_2d with keepdims = True, the output has 2 dimensions.
Keep in mind that the maximum value is the same: 8. It’s just that the dimensions of the output is different. By setting keepdims = True, we change the structure of the output … instead of being a scalar, the output is actually a 2-d NumPy array with a single value (8).
If you want to learn data science in Python, learn NumPy
If you’ve read other tutorials here at the Sharp Sight data science blog, you know just how important data manipulation is.
If you’re serious about learning data science, you really need to master the basics of data manipulation. A huge part of the data science workflow is just cleaning and manipulating input data.
If you’re working in Python, one of the essential skills you need to know then is NumPy. Numpy is critical for cleaning, manipulating, and exploring your data.
If you want to learn data science in Python, learn NumPy and learn it well.
For more Python data science tutorials, sign up for our email list
Having said that, if you want to learn NumPy and data science in Python, then sign up for our email list.
Here at the Sharp Sight blog, we regularly publish data science tutorials.
When you sign up, you’ll get free tutorials on:
- NumPy
- Pandas
- Base Python
- Scikit learn
- Machine learning
- Deep learning
- … and more.
When we publish tutorials, we’ll send them directly to your inbox.
Want to learn data science in Python? Sign up now.
This was really helpful. Thank you
You’re welcome.