This tutorial will show you how to use the NumPy mean function, which you’ll often see in code as numpy.mean or np.mean.
It will teach you how the NumPy mean function works at a high level and it will also show you some of the details.
So, you’ll learn about the syntax of np.mean, including how the parameters work.
This post will also show you clear and simple examples of how to use the NumPy mean function. Those examples will explain everything and walk you through the code.
Let’s get started by first talking about what the NumPy mean function does.
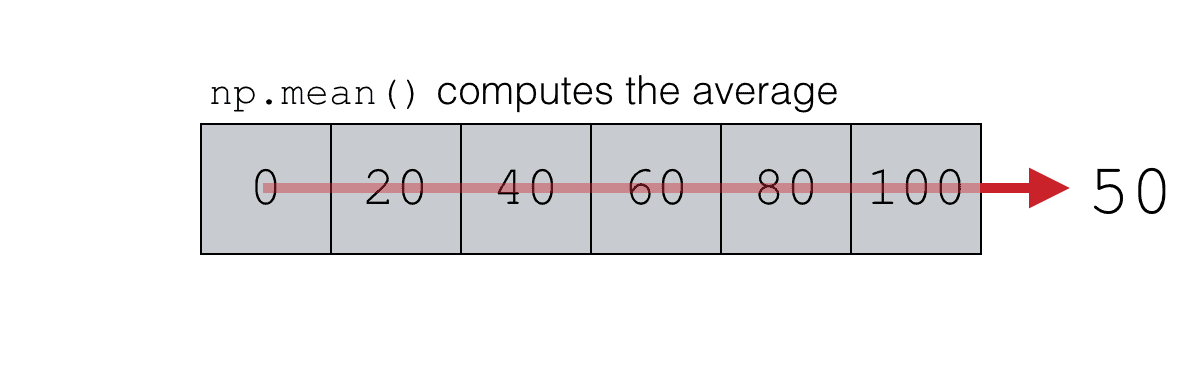
NumPy mean computes the average of the values in a NumPy array
NumPy mean calculates the mean of the values within a NumPy array (or an array-like object).
Let’s take a look at a visual representation of this.
Imagine we have a NumPy array with six values:
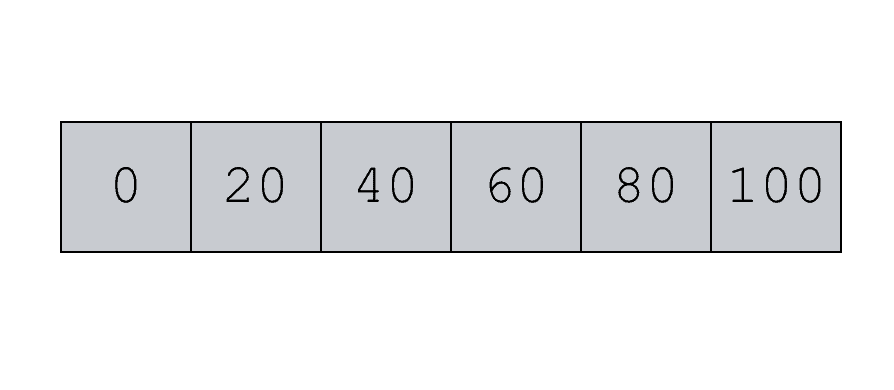
We can use the NumPy mean function to compute the mean value:
It’s actually somewhat similar to some other NumPy functions like NumPy sum (which computes the sum on a NumPy array), NumPy median, and a few others. These are similar in that they compute summary statistics on NumPy arrays.
Further down in this tutorial, I’ll show you exactly how the numpy.mean function works by walking you through concrete examples with real code.
But before I do that, let’s take a look at the syntax of the NumPy mean function so you know how it works in general.
The syntax of numpy mean
Syntactically, the numpy.mean function is fairly simple.
There’s the name of the function – np.mean() – and then several parameters inside of the function that enable you to control it.
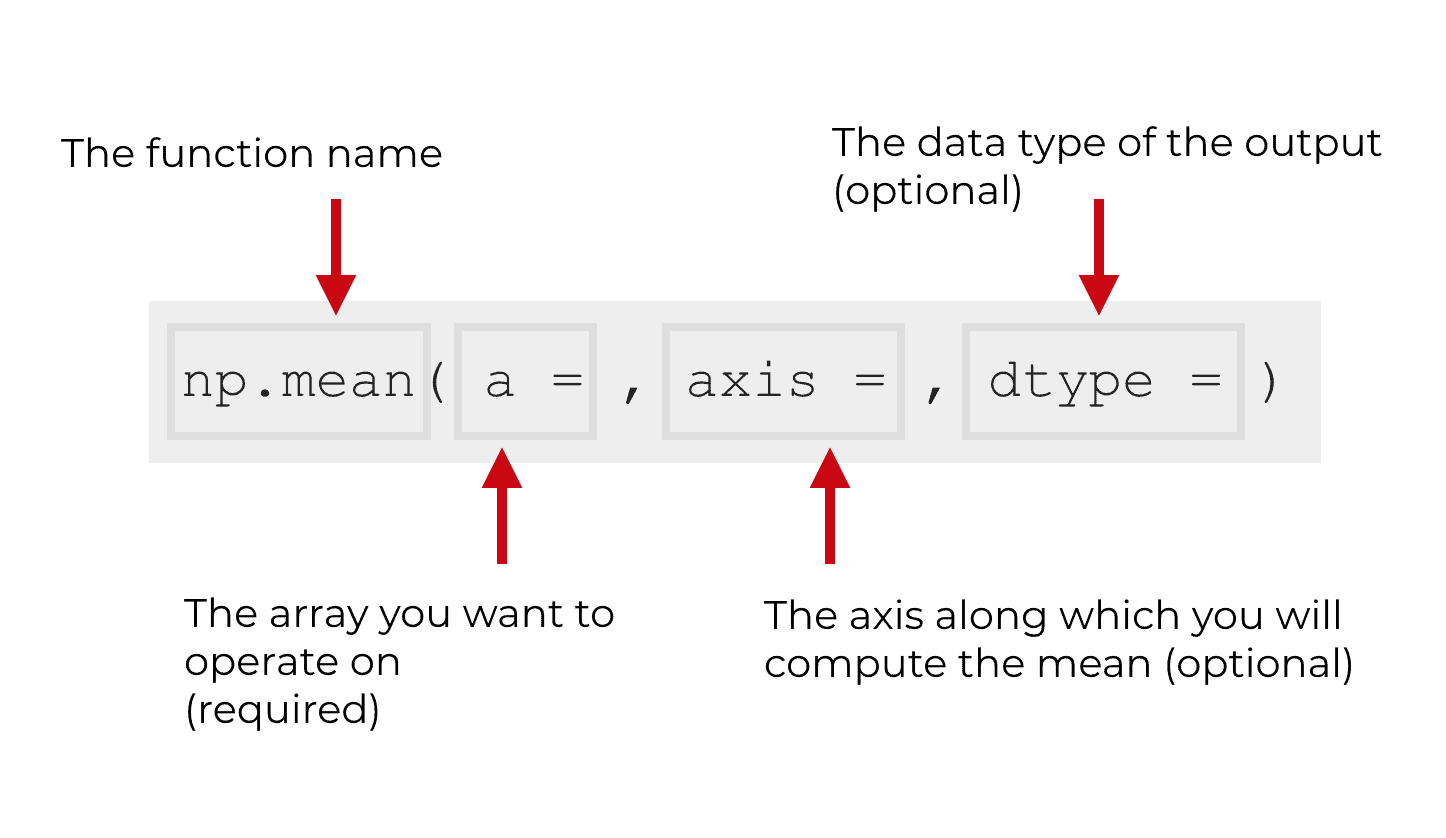
In the image above, I’ve only shown 3 parameters – a, axis, and dtype.
There are actually a few other parameters that you can use to control the np.mean function.
Let’s look at all of the parameters now to better understand how they work and what they do.
The parameters of numpy mean
The np.mean function has five parameters:
aaxisdtypeoutkeepdims
Let’s quickly discuss each parameter and what it does.
a (required)
The a = parameter enables you to specify the exact NumPy array that you want numpy.mean to operate on.
This parameter is required. You need to give the NumPy mean something to operate on.
Having said that, it’s actually a bit flexible. You can give it any array like object. That means that you can pass the np.mean() function a proper NumPy array. But you can also give it things that are structurally similar to arrays like Python lists, tuples, and other objects.
axis (optional)
Technically, the axis is the dimension on which you perform the calculation.
On the other hand, saying it that way confuses many beginners. So another way to think of this is that the axis parameter enables you to calculate the mean of the rows or columns.
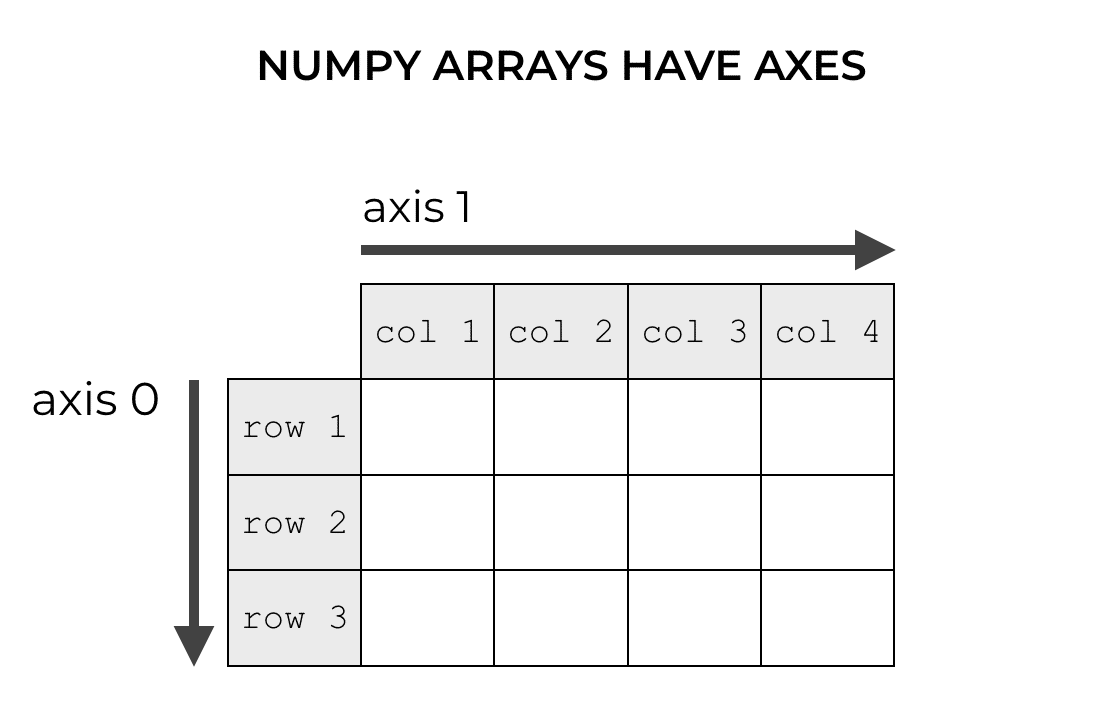
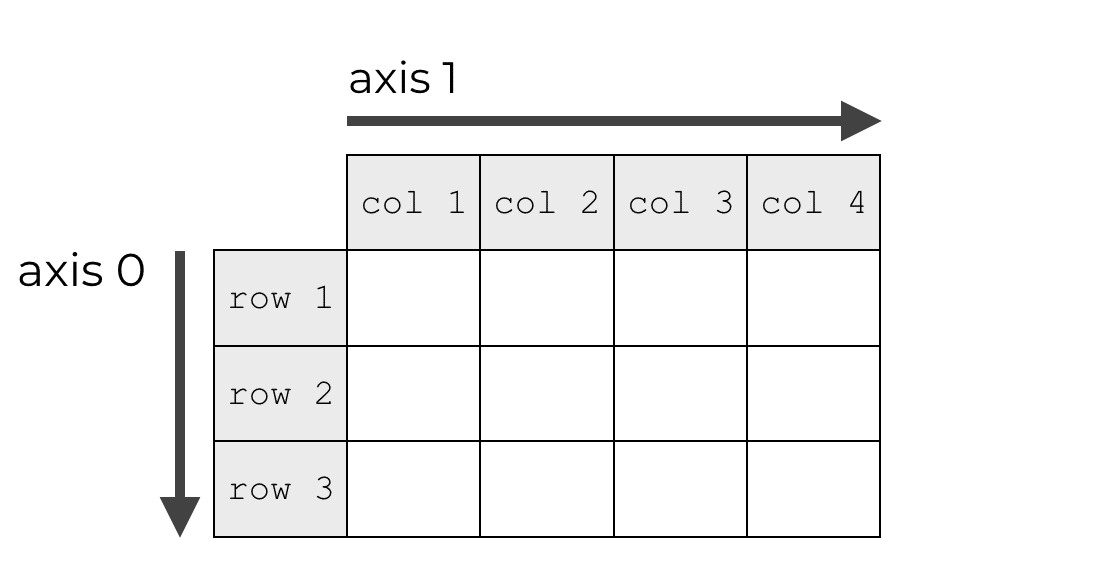
The reason for this is that NumPy arrays have axes. What is an axis? An “axis” is like a dimension along a NumPy array.
Think of axes like the directions in a Cartesian coordinate system. In Cartesian coordinates, you can move in different directions. We typically call those directions “x” and “y.”
Similarly, you can move along a NumPy array in different directions. You can move down the rows and across the columns. In NumPy, we call these “directions” axes.
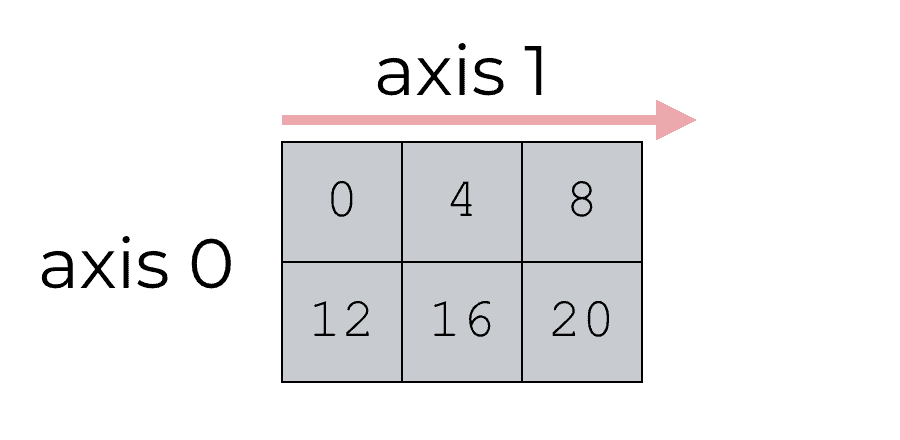
Specifically, in a 2-dimensional array, “axis 0” is the direction that points vertically down the rows and “axis 1” is the direction that points horizontally across the columns.
So how does this relate to NumPy mean?
When you have a multi dimensional NumPy array object, it’s possible to compute the mean of a set of values down along the rows or across the columns. In these cases, NumPy produces a new array object that holds the computed means for the rows or the columns respectively.
This probably sounds a little abstract and confusing, so I’ll show you solid examples of how to do this later in this blog post.
Additionally, if you’re still a little confused about them, you should read our tutorial that explains how to think about NumPy axes.
dtype (optional)
The dtype parameter enables you to specify the exact data type that will be used when computing the mean.
By default, if the values in the input array are integers, NumPy will actually treat them as floating point numbers (float64 to be exact). And if the numbers in the input are floats, it will keep them as the same kind of float; so if the inputs are float32, the output of np.mean will be float32. If the inputs are float64, the output will be float64.
Keep in mind that the data type can really matter when you’re calculating the mean; for floating point numbers, the output will have the same precision as the input. If the input is a data type with relatively lower precision (like float16 or float32) the output may be inaccurate due to the lower precision. To fix this, you can use the dtype parameter to specify that the output should be a higher precision float. (See the examples below.)
out (optional)
The out parameter enables you to specify a NumPy array that will accept the output of np.mean().
If you use this parameter, the output array that you specify needs to have the same shape as the output that the mean function computes.
keepdims (optional)
The keepdims parameter enables you keep the dimensions of the output the same as the dimensions of the input.
This confuses many people, so let me explain.
The NumPy mean function summarizes data. It takes a large number of values and summarizes them. So if you want to compute the mean of 5 numbers, the NumPy mean function will summarize those 5 values into a single value, the mean.
When it does this, it is effectively reducing the dimensions. If we summarize a 1-dimensional array down to a single scalar value, the dimensions of the output (a scalar) are lower than the dimensions of the input (a 1-dimensional array). The same thing happens if we use the np.mean function on a 2-d array to calculate the mean of the rows or the mean of the columns. When we compute those means, the output will have a reduced number of dimensions.
Sometimes, we don’t want that. There will be times where we want the output to have the exact same number of dimensions as the input. For example, a 2-d array goes in, and a 2-d array comes out.
To make this happen, we need to use the keepdims parameter.
By setting keepdims = True, we will cause the NumPy mean function to produce an output that keeps the dimensions of the output the same as the dimensions of the input.
This confuses many people, so there will be a concrete example below that will show you how this works.
Note that by default, keepdims is set to keepdims = False. So the natural behavior of the function is to reduce the number of dimensions when computing means on a NumPy array.
Examples: how to use the numpy mean function
Now that we’ve taken a look at the syntax and the parameters of the NumPy mean function, let’s look at some examples of how to use the NumPy mean function to calculate averages.
Before I show you these examples, I want to make note of an important learning principle. When you’re trying to learn and master data science code, you should study and practice simple examples. Simple examples are examples that can help you intuitively understand how the syntax works. Simple examples are also things that you can practice and memorize. Mastering syntax (like mastering any skill) requires study, practice, and repetition.
And by the way, before you run these examples, you need to make sure that you’ve imported NumPy properly into your Python environment. To do that, you’ll need to run the following code:
import numpy as np
Ok, now let’s move on to the code.
Compute the mean of the elements of a 1-d array with np.mean
Here, we’ll start with something very simple. We’re going to calculate the mean of the values in a single 1-dimensional array.
To do this, we’ll first create an array of six values by using the np.array function.
np_array_1d = np.array([0,20,40,60,80,100])
Let’s quickly examine the contents of the array by using the print() function.
print(np_array_1d)
Which produces the following output:
[0 20 40 60 80 100]
As you can see, the new array, np_array_1d, contains six values between 0 and 100.
Now, let’s calculate the mean of the data. Here, we’re just going to call the np.mean function. The only argument to the function will be the name of the array, np_array_1d.
np.mean(np_array_1d)
This code will produce the mean of the values:
50
Visually though, we can think of this as follows.
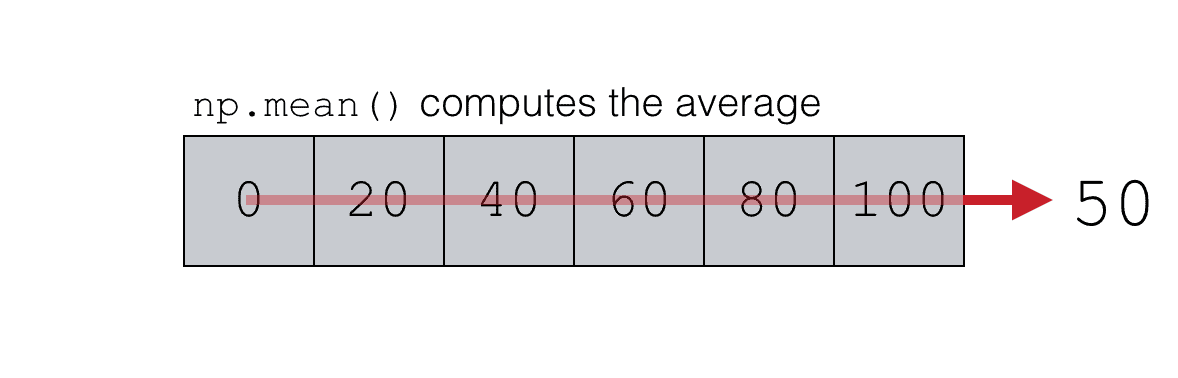
The NumPy mean function is taking the values in the NumPy array and computing the average.
Keep in mind that the array itself is a 1-dimensional structure, but the result is a single scalar value. In a sense, the mean() function has reduced the number of dimensions. The output has a lower number of dimensions than the input. This will be important to understand when we start using the keepdims parameter later in this tutorial.
Compute the mean of the elements of a 2-d array with np.mean
Next, let’s compute the mean of the values in a 2-dimensional NumPy array.
To do this, we first need to create a 2-d array. We can do that by using the np.arange function. We’ll also use the reshape method to reshape the array into a 2-dimensional array object.
np_array_2x3 = np.arange(start = 0, stop = 21, step = 4).reshape((2,3))
Let’s quickly look at the contents of the array by using the code print(np_array_2x3):
[[ 0  4  8]
 [12 16 20]]
As you can see, this is a 2-dimensional object with six values: 0, 4, 8, 12, 16, 20. By using the reshape() function, these values have been re-arranged into an array with 2 rows and 3 columns.
Now, let’s compute the mean of these values.
To do this, we’ll use the NumPy mean function just like we did in the prior example. We’ll call the function and the argument to the function will simply be the name of this 2-d array.
np.mean(np_array_2x3)
Which produces the following result:
10.0
Here, we’re working with a 2-dimensional array, but the mean() function has still produced a single value.
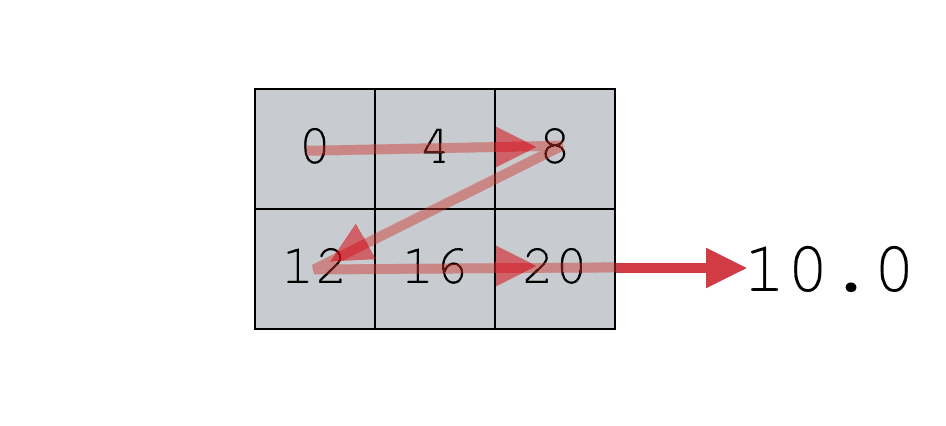
When you use the NumPy mean function on a 2-d array (or an array of higher dimensions) the default behavior is to compute the mean of all of the values.
Having said that, you can also use the NumPy mean function to compute the mean value in every row or the mean value in every column of a NumPy array.
Let’s take a look at how to do that.
Compute the column means of a 2-d array
Here, we’ll look at how to calculate the column mean.
To understand how to do this, you need to know how axes work in NumPy.
Recall earlier in this tutorial, I explained that NumPy arrays have what we call axes. Again, axes are like directions along the array.
Axis 0 refers to the row direction. Axis 1 refers to the column direction.
You really need to know this in order to use the axis parameter of NumPy mean. There’s not really a great way to learn this, so I recommend that you just memorize it … the row-direction is axis 0 and the column direction is axis 1.
Having explained axes again, let’s take a look at how we can use this information in conjunction with the axis parameter.
The axis parameter specifies which axis you want to summarize
Using the axis parameter is confusing to many people, because the way that it is used is a little counter intuitive. With that in mind, let me explain this in a way that might improve your intuition.
When we use the axis parameter, we are specifying which axis we want to summarize. Said differently, we are specifying which axis we want to collapse.
So when we specify axis = 0, that means that we want to collapse axis 0. Remember, axis 0 is the row axis, so this means that we want to collapse or summarize the rows, but keep the columns intact.
Let me show you an example to help this make sense.
Compute a mean with axis = 0
Let’s first create a 2-dimensional NumPy array. (Note: we used this code earlier in the tutorial, so if you’ve already run it, you don’t need to run it again.)
np_array_2x3 = np.arange(start = 0, stop = 21, step = 4).reshape((2,3))
Ok. Let’s quickly examine the contents by using the code print(np_array_2x3):
[[ 0  4  8]
 [12 16 20]]
As you can see, this is a 2-dimensional array with 2 rows and 3 columns.
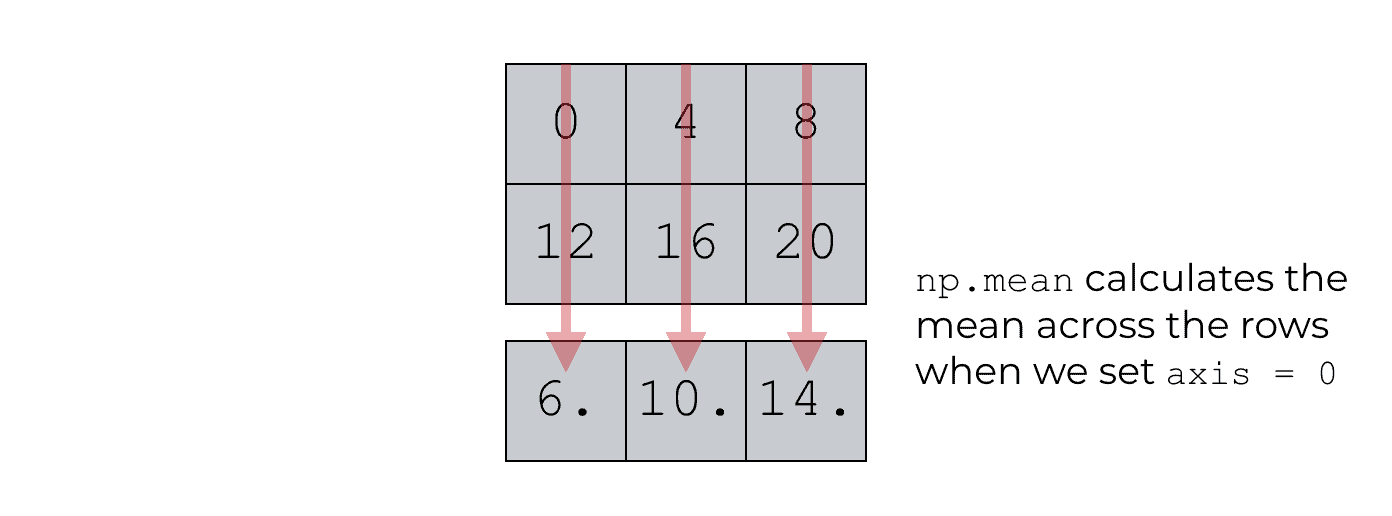
Now that we have our NumPy array, let’s calculate the mean and set axis = 0.
np.mean(np_array_2x3, axis = 0)
Which produces the following output:
array([ 6., 10., 14.])
What happened here?
Essentially, the np.mean function has produced a new array. But notice what happened here. Instead of calculating the mean of all of the values, it created a summary (the mean) along the “axis-0 direction.” Said differently, it collapsed the data along the axis-0 direction, computing the mean of the values along that direction.
Why?
Remember, axis 0 is the row axis. So when we set axis = 0 inside of the np.mean function, we’re basically indicating that we want NumPy to calculate the mean down axis 0; calculate the mean down the row-direction; calculate row-wise.
This is a little confusing to beginners, so I think it’s important to think of this in terms of directions. Along which direction should the mean function operate? When we set axis = 0, we’re indicating that the mean function should move along the 0th axis … the direction of axis 0.
If that doesn’t make sense, look again at the picture immediately above and pay attention to the direction along which the mean is being calculated.
Compute the row means of a 2-d array
Similarly, we can compute row means of a NumPy array.
In this example, we’re going to use the NumPy array that we created earlier with the following code:
np_array_2x3 = np.arange(start = 0, stop = 21, step = 4).reshape((2,3))
This code creates the following array:
[[ 0  4  8]
 [12 16 20]]
It is a 2-dimensional array. As you can see, it has 3 columns and 2 rows.
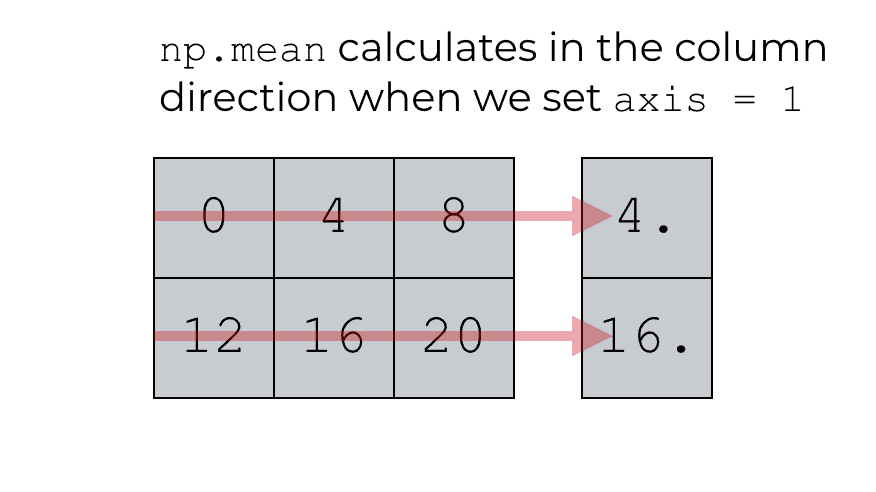
Now, we’re going to calculate the mean while setting axis = 1.
np.mean(np_array_2x3, axis = 1)
Which gives us the output:
array([ 4., 16.])
So let’s talk about what happened here.
First remember that axis 1 is the column direction; the direction that sweeps across the columns.
When we set axis = 1 inside of the NumPy mean function, we’re telling np.mean that we want to calculate the mean such that we summarize the data in that direction.
Again, said differently, we are collapsing the axis-1 direction and computing our summary statistic in that direction (i.e., the mean).
Do you see now?
Axis 1 is the column direction; the direction that sweeps across the columns.
When we set axis = 1, we are indicating that we want NumPy to operate along this direction. It will therefore compute the mean of the values along that direction (axis 1), and produce an array that contains those mean values: [4., 16.].
How to use the keepdims parameter with np.mean
Ok. Now that you’ve learned about how to use the axis parameter, let’s talk about how to use the keepdims parameter.
The keepdims parameter of NumPy mean enables you to control the dimensions of the output. Specifically, it enables you to make the dimensions of the output exactly the same as the dimensions of the input array.
To understand this, let’s first take a look at a few of our prior examples.
Earlier in this blog post, we calculated the mean of a 1-dimensional array with the code np.mean(np_array_1d), which produced the mean value, 50.
There’s something subtle here though that you might have missed. The dimensions of the output are not the same as the input.
To see this, let’s take a look first at the dimensions of the input array. We can do this by examining the ndim attribute, which tells us the number of dimensions:
np_array_1d.ndim
When you run this code, it will produce the following output: 1. The array np_array_1d is a 1-dimensional array.
Now let’s take a look at the number of dimensions of the output of np.mean() when we use it on np_array_1d.
Again, we can do this by using the ndim parameter:
np.mean(np_array_1d).ndim
Which produces the following output: 0.
So the input (np_array_1d) has 1 dimension, but the output of np.sum has 0 dimensions … the output is a scalar. In some sense, the output of np.sum has a reduced number of dimensions as the input.
This is relevant to the keepdims parameter, so bear with me as we take a look at another example.
Let’s look at the dimensions of the 2-d array that we used earlier in this blog post:
np_array_2x3.ndim
When you run this code, the output will tell you that np_array_2x3 is a 2-dimensional array.
What about the output of np.sum?
If we don’t specify an axis, the output of np.sum() on this array will have 0 dimensions. You can check it with this code:
np.mean(np_array_2x3).dim
Which produces the following output: 0. When we use np.mean on a 2-d array, it calculates the mean. The mean value is a scalar, which has 0 dimensions. In this case, the output of np.mean has a different number of dimensions than the input.
What if we set an axis? Remember, if we use np.mean and set axis = 0, it will produce an array of means. Run this code:
np.mean(np_array_2x3, axis = 0)
Which produces the output array([ 6., 10., 14.]).
And how many dimensions does this output have? We can check by using the ndim attribute:
np.mean(np_array_2x3, axis = 0).ndim
Which tells us that the output of np.mean in this case, when we set axis set to 0, is a 1-dimensional object.
The input had 2 dimensions and the output has 1 dimension.
Again, the output has a different number of dimensions than the input.
Ok, now that we’ve looked at some examples showing number of dimensions of inputs vs. outputs, we’re ready to talk about the keepdims parameter.
The keepdims parameter keeps the dimensions of the output the same as the dimensions of the input
The keepdims parameter enables you to set the dimensions of the output to be the same as the dimensions of the input.
keepdims takes a logical argument … meaning that you can set it to True or False.
By default, the parameter is set as keepdims = False. This means that the mean() function will not keep the dimensions the same. By default, the dimensions of the output will not be the same as the dimensions of the input. And that’s exactly what we just saw in the last few examples in this section!
On the other hand, if we set keepdims = True, this will cause the number of dimensions of the output to be exactly the same as the dimensions of the input.
Set keepdims equal to true (and keep the same dimensions)
Let’s take a look.
Once again, we’re going to operate on our NumPy array np_array_2x3. Remember, this is a 2-dimensional object, which we saw by examining the ndim attribute.
Now, let’s once again examine the dimensions of the np.mean function when we calculate with axis = 0.
np.mean(np_array_2x3, axis = 0).ndim
This code indicates that the output of np.mean in this case has 1-dimension. Why? Because we didn’t specify anything for keepdims so it defaulted to keepdims = False. This code does not deep the dimensions of the output the same as the dimensions of the input.
Now, let’s explicitly use the keepdims parameter and set keepdims = True.
np.mean(np_array_2x3, axis = 0, keepdims = True).ndim
Which produces the following output:
2
When we use np.mean on a 2-d array and set keepdims = True, the output will also be a 2-d array.
When we set keepdims = True, the dimensions of the output will be the same as the dimensions of the input.
I’m not going to explain when and why you might need to do this ….
Just understand that when you need to dimensions of the output to be the same, you can force this behavior by setting keepdims = True.
How to use the dtype parameter
Ok, one last example.
Let’s look at how to specify the output datatype by using the dtype parameter.
As I mentioned earlier, if the values in your input array are integers the output will be of the float64 data type. If the values in the input array are floats, then the output will be the same type of float. So if the inputs are float32, the outputs will be float32, etc.
But what if you want to specify another data type for the output?
You can do this with the dtype parameter.
Let’s take a look at a simple example.
Here, we’ll create a simple 1-dimensional NumPy array of integers by using the NumPy numpy arange function.
np_array_1d_int = np.array([1,3,4,7,11])
And we can check the data type of the values in this array by using the dtype attribute:
np_array_1d_int.dtype
When you run that code, you’ll find that the values are being stored as integers; int64 to be precise.
Now let’s use numpy mean to calculate the mean of the numbers:
mean_output = np.mean(np_array_1d_int)
Now, we can check the data type of the output, mean_output.
mean_output.dtype
Which tells us that the datatype is float64.
This is exactly the behavior we should expect. As I mentioned earlier, by default, NumPy produces output with the float64 data type.
Setting the data type with the dtype parameter
So now that we’ve looked at the default behavior, let’s change it by explicitly setting the dtype parameter.
mean_output_alternate = np.mean(np_array_1d_int, dtype = 'float32')
The object mean_output_alternate contains the calculated mean, which is 5.1999998.
Now, let’s check the datatype of mean_output_alternate.
mean_output_alternate.dtype
When you run this, you can see that mean_output_alternate contains values of the float32 data type. This is exactly what we’d expect, because we set dtype = 'float32'.
Be careful when you use the dtype parameter
As I mentioned earlier, you need to be careful when you use the dtype parameter.
If you need the output of np.mean to have high precision, you need to be sure to select a data type with high precision. For example, if you need the result to have high precision, you might select float64.
If you select a data type with low precision (like int), the result may be inaccurate or imprecise.
If you want to learn data science in Python, learn NumPy
You’ve probably heard that 80% of data science work is just data manipulation. That’s mostly true.
If you want to be great at data science in Python, you need to know how to manipulate data in Python.
And one of the primary toolkits for manipulating data in Python is the NumPy module.
In this post, I’ve shown you how to use the NumPy mean function, but we also have several other tuturials about other NumPy topics, like how to create a numpy array, how to reshape a numpy array, how to create an array with all zeros, and many more.
If you’re interested in learning NumPy, definitely check those out.
For more Python data science tutorials, sign up for our email list
More broadly though, if you’re interested in learning (and mastering) data science in Python, or data science generally, you should sign up for our email list right now.
Here at the Sharp Sight blog, we regularly post tutorials about a variety of data science topics … in particular, about NumPy.
If you want to learn NumPy and data science in Python, sign up for our email list.
If you sign up for our email list, you’ll receive Python data science tutorials delivered to your inbox.
You’ll get free tutorials on:
- NumPy
- Pandas
- Base Python
- Scikit learn
- Machine learning
- Deep learning
- … and more.
Want to learn data science in Python? Sign up now.
np.mean(np_array_3x2) ..there is a little typo (3×2) ,it should be (2×3)
Thank you for pointing that out ….
Fixed.