This tutorial will explain how to use the Pandas iloc method to select data from a Pandas DataFrame.
Working with data in Pandas is not terribly hard, but it can be a little confusing to beginners. The syntax is a little foreign, and ultimately you need to practice a lot to really make it stick.
To make it easier, this tutorial will explain the syntax of the iloc method to help make it crystal clear.
Additionally, this tutorial will show you some simple examples that you can run on your own.
This is critical. When you’re learning new syntax, it’s best to learn and master the tool with simple examples first. Learning is much easier when the examples are simple and clear.
Having said that, I recommend that you read the whole tutorial. It will provide a refresher on some of the preliminary things you need to know (like the basics of Pandas DataFrames). Everything will be more cohesive if you read the entire tutorial.
But, if you found this from a Google search, and/or you’re in a hurry, you can click on one of the following links and it will take you directly to the appropriate section:
- A quick refresher on Pandas
- Pandas DataFrame basics
- The syntax of Pandas iloc
- Examples: how to use iloc
A quick refresher on Pandas
Before I explain the Pandas iloc method, it will probably help to give you a quick refresher on Pandas and the larger Python data science ecosystem.
There are a few core toolkits for doing data science in Python: NumPy, Pandas, matplotlib, and scikit learn. Those are the big ones right now.
Each of those toolkits focuses on a different part of data science or a different part of the data workflow.
For example, NumPy focuses on numeric data organized into array-like structures. It’s a data manipulation toolkit specifically for numeric data.
Matplotlib focuses on data visualization. Commonly, when you’re doing data science or analytics, you need to visualize your data. This is true even if you’re working on an advanced project. You need to perform data visualization to explore your data and understand your data. Matplotlib provides a data visualization toolkit so you can visualize your data. You can use matplotlib for simple tasks like creating scatterplots in Python, histograms of single variables, line charts that plot two variables, etc.
And then there’s Pandas.
Pandas is a data manipulation toolkit in Python
Pandas also focuses on a specific part of the data science workflow in Python.
… it focuses on data manipulation with DataFrames.
Again, in this tutorial, I’ll show you how to use a specific tool, the iloc method, to retrieve data from a Pandas DataFrame.
Before I show you that though, let’s quickly review the basics of Pandas dataframes.
Pandas DataFrames basics
To understand the iloc method in Pandas, you need to understand Pandas DataFrames.
DataFrames are a type of data structure. Specifically, they are 2-dimensional structures with a row and column form.
So Pandas DataFrames are strictly 2-dimensional.
Also, the columns can contain different data types (although all of the data within a column must have the same data type).
Essentially, these features make Pandas DataFrames sort of like Excel spreadsheets.
Pandas dataframes have indexes for the rows and columns
Importantly, each row and each column in a Pandas DataFrame has a number. An index.
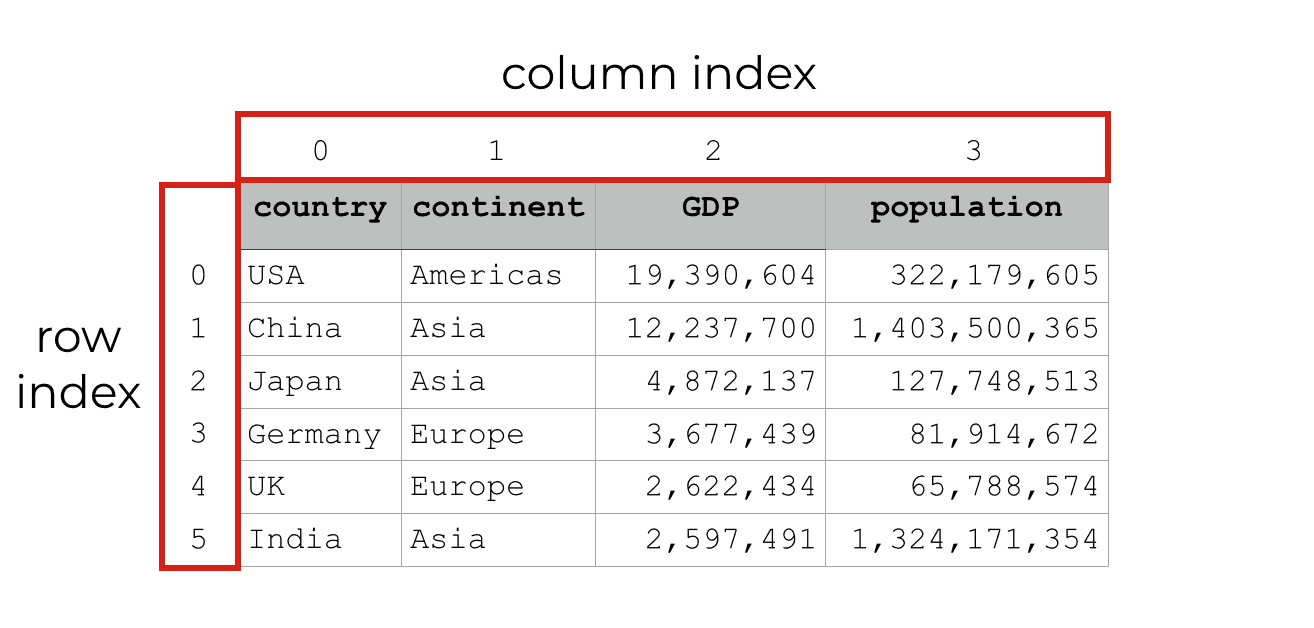
This structure, a row-and-column structure with numeric indexes, means that you can work with data by the row number and the column number.
That’s exactly what we can do with the Pandas iloc method.
The iloc method: how to select data from a dataframe
The iloc method enables you to “locate” a row or column by its “integer index.”
We use the numeric, integer index values to locate rows, columns, and observations.
integer locate.
iloc.
Get it?
The syntax of the Pandas iloc isn’t that hard to understand, especially once you use it a few times. Let’s take a look at the syntax.
The syntax of the Pandas iloc method
The syntax of iloc is straightforward.
You call the method by using “dot notation.” You should be familiar with this if you’re using Python, but I’ll quickly explain.
To use the iloc in Pandas, you need to have a Pandas DataFrame. To access iloc, you’ll type in the name of the dataframe and then a “dot.” Then type in “iloc“.
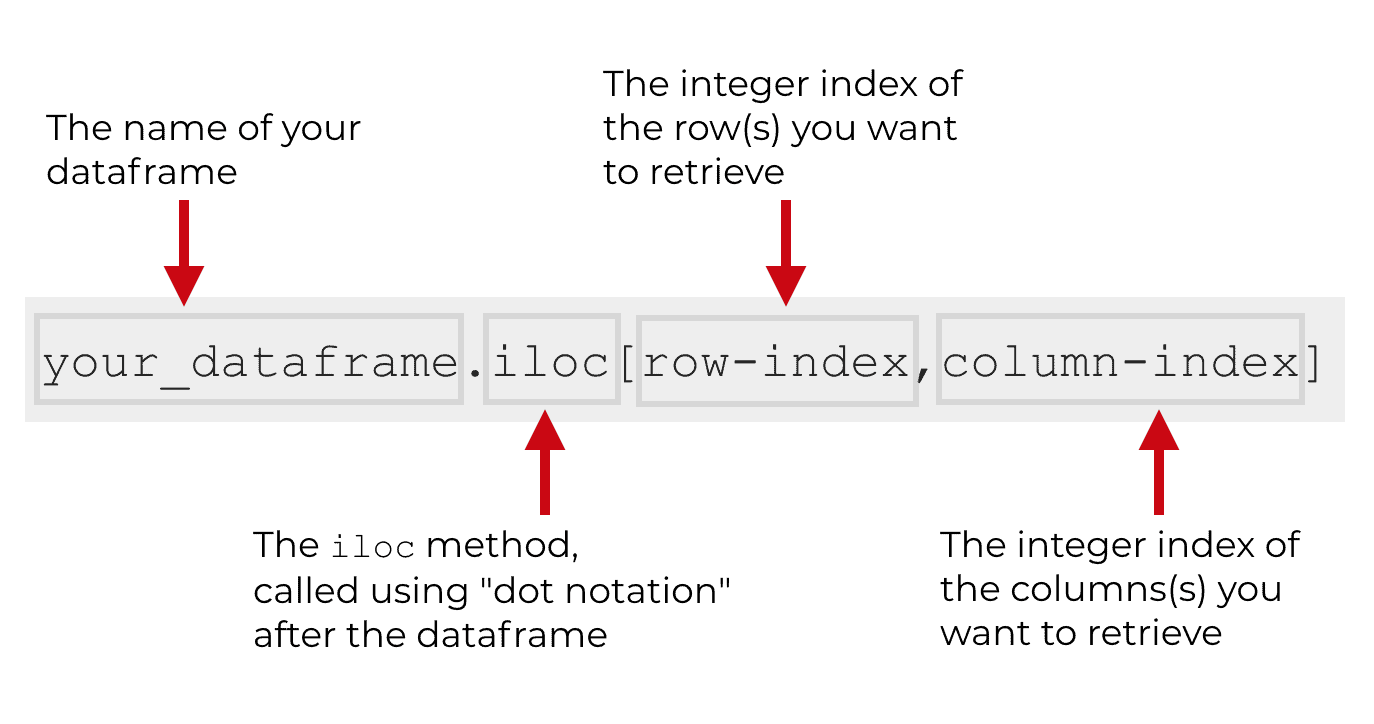
Immediately after the iloc method, you’ll type a set of brackets.
Inside of the brackets, you’ll use integer index values to specify the rows and columns that you want to retrieve. The order of the indexes inside the brackets obviously matters. The first index number will be the row or rows that you want to retrieve. Then the second index is the column or columns that you want to retrieve. Importantly, the column index is optional.
If you don’t provide a column index, iloc will retrieve all columns by default.
The syntax is simple, but it takes practice
As I mentioned, the syntax of iloc isn’t that complicated.
It’s fairly simple, but it still takes practice.
Even though it’s simple, it’s actually easy to forget some of the details or confuse some of the details.
For example, it’s actually easy to forget which index value comes first inside of the brackets. Does the row index come first, or the column index? It’s easy to forget this.
It’s also easy to confuse the iloc[] method with the loc[] method. This other data retrieval method, loc[], is extremely similar to iloc[], and the similarity can confuse people. The loc[], method works differently though (we explain the loc method in a separate tutorial).
Although the iloc method can be a little challenging to learn in the beginning, it’s possible to learn and master this technique fast. Here at Sharp Sight, our premium data science courses will teach you to memorize syntax, so you can permanently remember all of those important little details.
This tutorial won’t give you all of the specifics about how to memorize the syntax of iloc. But, I can tell you that it just takes practice and repetition to remember the little details. You need to work with simple examples, and practice those examples over time until you can remember how everything works.
Examples of Pandas iloc
Speaking of examples, let’s start working with some real data.
Like I said, you need to learn these techniques and practice with simple examples.
Here, in the following examples, we’ll cover the following topics:
- rows selection with iloc
- column selection with iloc
- retrieve specific cells with iloc
- retrieve ranges of rows and columns (i.e., slicing)
- get specific subsets of cells
Before we work on those examples though, you’ll need to create some data.
Import modules
First, we’ll import the Pandas module. Obviously, we’ll need this to call Pandas functions.
#===============
# IMPORT MODULES
#===============
import pandas as pd
Create DataFrame
Next, you’ll need to create a Pandas DataFrame that will hold the data we’re going to work with.
There are two steps to this. First, we need to create a dictionary of lists that contain the data. Essentially, in this structure, the “key” will be the name of the column, and the associated list will contain the values of that column. You’ll see how this works in a minute.
#==========================
# CREATE DICTIONARY OF DATA
#==========================
country_data_dict = {
    'country':['USA', 'China', 'Japan', 'Germany', 'UK', 'India']
    ,'continent':['Americas','Asia','Asia','Europe','Europe','Asia']
    ,'GDP':[19390604, 12237700, 4872137, 3677439, 2622434, 2597491]
    ,'population':[322179605, 1403500365, 127748513, 81914672, 65788574, 1324171354]
}
Now that we have our dictionary, country_data_dict, we’re going to create a DataFrame from this data. To do this, we’ll apply the pd.DataFrame() function to the country_data_dict dictionary. Notice that we’re also using the columns parameter to specify the order of the columns.
#=================================
# CREATE DATAFRAME FROM DICTIONARY
#=================================

country_data_df = pd.DataFrame(country_data_dict, columns = ['country', 'continent', 'GDP', 'population'])
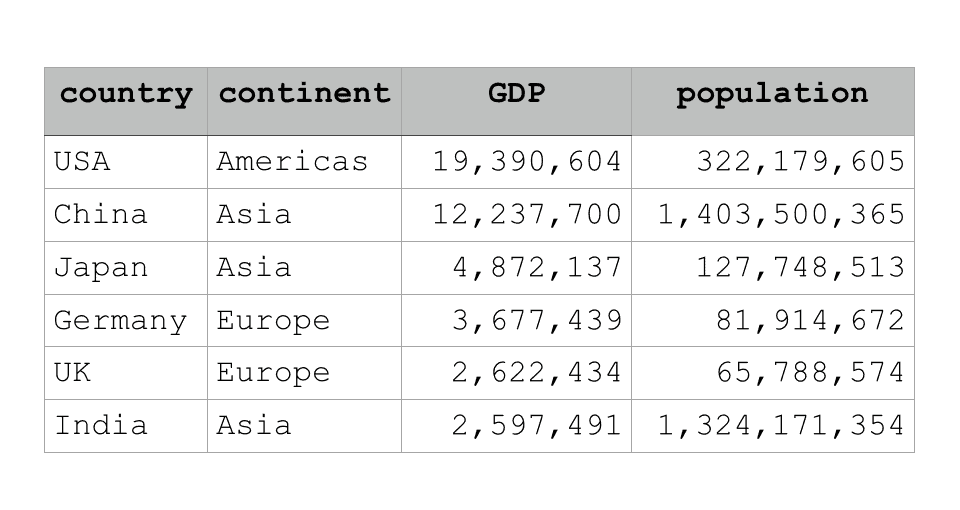
Now we have a DataFrame of data, country_data_df, which contains country level economic and population data.
Select a single row iloc
First, I’ll show you how to select single rows with iloc.
For example, let’s just select the first row of data. To do this, we’ll call the iloc method using dot notation, and then we’ll use the integer index value inside of the bracets.
country_data_df.iloc[0]
Which produces the following output:
country             USA
continent      Americas
GDP            19390604
population    322179605
Name: 0, dtype: object
Essentially, the code pulls back the first row of data, and all of the columns.
Notice that the “first” row has the numeric index of 0. If you’ve used Python for a little while, this should make sense. When we use indexes with Python objects – including lists, arrays, NumPy arrays, and other sequences – the numeric indexes start with 0. The first value of the index is 0. This is very consistent in Python.
Here’s another example.
We can pull back the sixth row of data by using index value 5. Remember, because the index values start at 0, the numeric index value will be one less than the row of data you want to retrieve.
Let’s pull back the row of data at index value 5:
country_data_df.iloc[5]
Which produces the following output:
country            India
continent           Asia
GDP              2597491
population    1324171354
Name: 5, dtype: object
Again, this is essentially the data for row index 5, which contains the data for India. Here, you can see the data for all of the columns.
Select a single row (alternate syntax)
There’s actually a different way to select a single row using iloc.
This is important, actually, because the syntax is more consistent with the syntax that we’re going to use to select columns, and to retrieve “slices” of data.
Here, we’re still going to select a single row. But, we’re going to use some syntax that explicitly tells Pandas that we want to retrieve all columns.
country_data_df.iloc[0, :]
Which produces the following:
country             USA
continent      Americas
GDP            19390604
population    322179605
Name: 0, dtype: object
Notice that this is the same output that’s produced by the code country_data_df.iloc[0, :].
What’s going on here?
Notice that in this new syntax, we still have an integer index for the rows. That’s in the first position just inside of the brackets.
But now we also have a ‘:‘ symbol in the second position inside of the brackets.
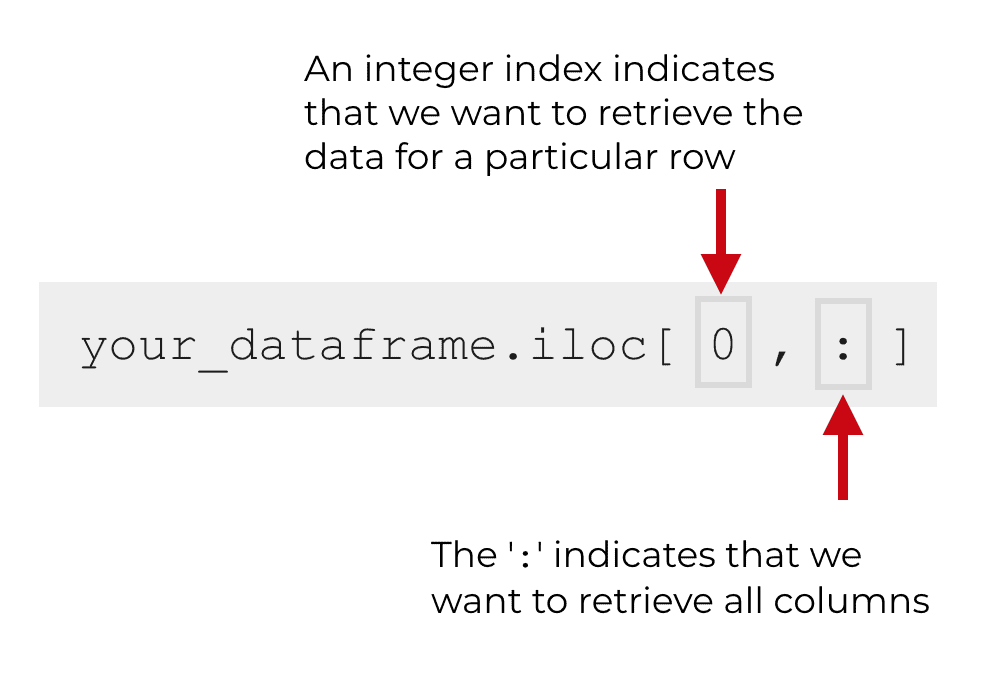
The colon character (‘:‘) essentially tells Pandas that we want to retrieve all columns.
Remember from the syntax explanation above that we can use two integer index values inside of iloc[]. The first is the row index and the second is the column index.
When we want to retrieve all columns, we can use the ‘:‘ character.
You’ll understand this more later. It’s relevant for when we retrieve ‘slices’ of data.
Select columns with iloc
Similarly, you can select a single column of data using a special syntax that uses the ‘:‘ character.
Let’s say that we want to retrieve the first column of data, which is the column at index position 0.
To do this, we will use an integer index value in the second position inside of the brackets when we use iloc[]. Remember that the integer index in the second position specifies the column that we want to retrieve.
What about the rows?
When we want to retrieve a single column and all rows we need to use a special syntax using the ‘:‘ character.

You’ll use the ‘:‘ character in the first position inside of the brackets when we use iloc[]. This indicates that we want to retrieve all of the rows. Remember, the first index position inside of iloc[] specifies the rows, and when we use the ‘:‘ character, we’re telling Pandas to retrieve all of the rows.
Let me show you an example of this in action.
Code to retrieve the data for a single column
In this example, we’re going to retrieve a single column.
The code is simple. We have our DataFrame that we created above: country_data_df.
We’re going to use dot notation after the DataFrame to call the iloc[] method.
Inside of the brackets, we’ll have the ‘:‘ character, which indicates that we want to get all rows. We also have 0 in the second position inside the brackets, which indicates that we want to retrieve the column with index 0 (the first column in the DataFrame).
Let me show you the code:
country_data_df.iloc[:,0]
And here is the output.
0        USA
1      China
2      Japan
3    Germany
4         UK
5      India
Name: country, dtype: object
Notice that the code retrieved a single column of data – the ‘country‘ column – which is the first column in our DataFrame, country_data_df.
It’s pretty straightforward. Using the syntax explained above, iloc retrieved a single column of data from the DataFrame.
Select a specific cell using iloc
Now, let’s move on to something a little more complicated.
Here, we’re going to select the data in a specific cell in the DataFrame.
You’ll just use iloc[] and specify an integer index value for the data in the row and column you want to retrieve.
So if we want to select the data in row 2 and column 0 (i.e., row index 2 and column index 0) we’ll use the following code:
country_data_df.iloc[2,0]
Which produces the following output:
'Japan'
Again. This is pretty straightforward.
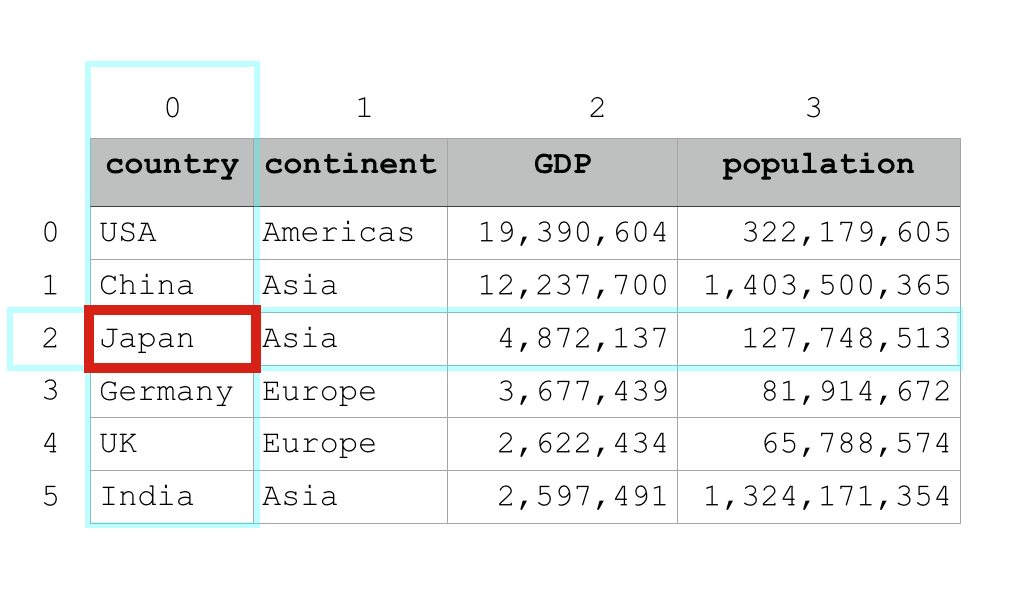
Using the first index position, we specified that we want the data from row 2, and we used the second index position to specify that we want to retrieve the information in column 0.
The data that fits both criteria is Japan, in cell (2, 0).
Notice that the Pandas DataFrame essentially works like an Excel spreadsheet. You can just specify the row and column of the data that you want to pull back.
Retrieve “slices” of data
Now that I’ve explained how to select specific rows and columns using iloc[], let’s talk about slices.
When we “slice” our data, we take multiple rows or multiple columns.
There’s a special syntax to do this, which is related to some of the examples above.
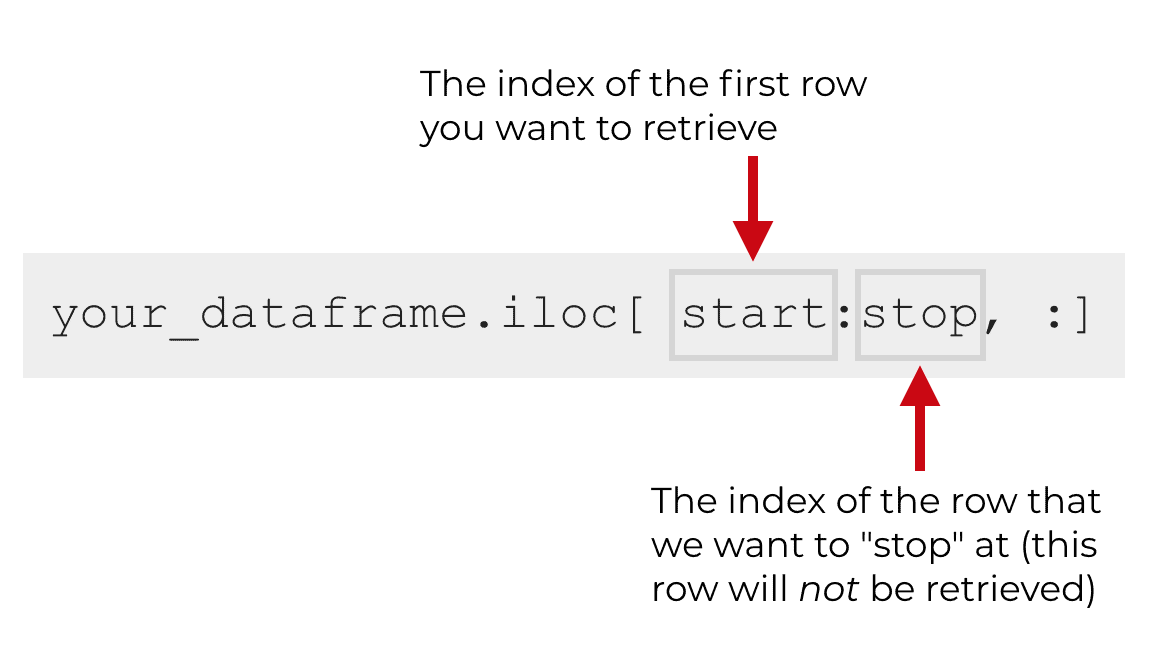
Essentially, we can use the colon (‘:‘) character inside of iloc[] to specify a start row and a stop row.
Keep in mind that the row number specified by the stop index value is not included.
It’s always best to illustrate an abstract concept with a concrete example, so let’s take a look at an example of how to use iloc to retrieve a slice of rows.
Example: retrieve a slice of rows using iloc
Here, we’re going to retrieve a subset of rows.
This is pretty straightforward.
We’re going to specify our DataFrame, country_data_df, and then call the iloc[] method using dot notation.
Then, inside of the iloc method, we’ll specify the start row and stop row indexes, separated by a colon.
Here’s the exact code:
country_data_df.iloc[0:3]
And here are the rows that it retrieves:
  country continent       GDP  population
0     USA  Americas  19390604   322179605
1   China      Asia  12237700  1403500365
2   Japan      Asia   4872137   127748513
Notice what data we have here.
The code has retrieved rows 0, 1, and 2.
It also retrieved all of the columns.
This is pretty straightforward … we’re retrieving a subset of rows by using the colon (‘:‘) character inside of iloc[].
Example: retrieve a slice of columns using iloc
Now, we’re going to retrieve a subset of columns using iloc.
This is very similar to the previous example where we retrieved a subset of rows. The only difference is how exactly we use the row and column indexes inside of iloc[].
Here, we’re going to specify that we’re going to use data from country_data_df. Then we’ll use dot notation to call the iloc[] method following the name of the DataFrame.
Inside of the iloc[] method, we’re using the “:” character for the row index. This means that we want to retrieve all rows.
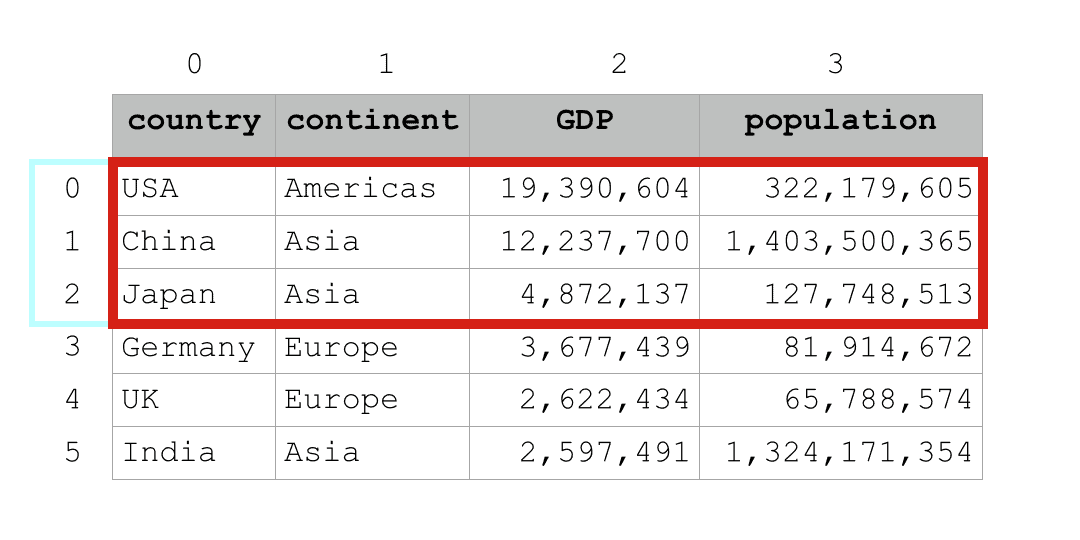
For the column index, we’re using the range 0:2. This means that we want to retrieve the columns starting from column 0 up to and excluding column 2.
Here’s the exact code:
country_data_df.iloc[:,0:2]
Which produces the following result:
   country continent
0      USA  Americas
1    China      Asia
2    Japan      Asia
3  Germany    Europe
4       UK    Europe
5    India      Asia
If you understand column indexes and how to get slices of data with iloc, this is pretty easy to understand.
The code country_data_df.iloc[:,0:2] gets columns 0 and 1, and gets all rows.
Visually, this is what is being retrieved:
To be clear, Pandas slices can get more complicated than this.
I recommend that you first learn, practice, and master these simple examples before you move on to anything more complicated.
Retrieving subsets of cells
Finally, let’s retrieve a subset of cells from our data.
Doing this is really just a combination of getting a slice of columns and a slice of rows with iloc, at the same time.
Let me show you.
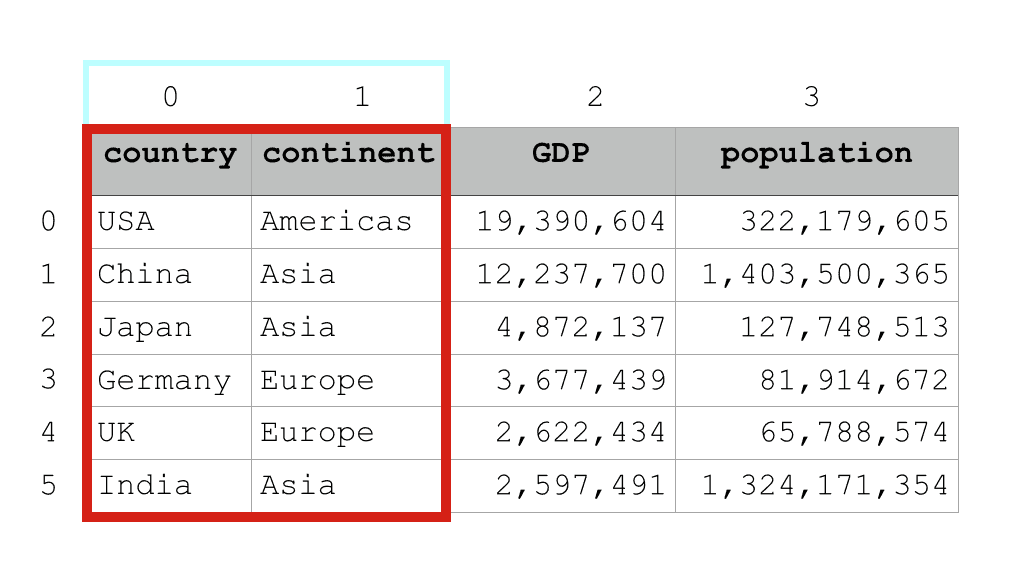
country_data_df.iloc[1:5,0:3]
Which produces the following output:
   country continent       GDP
1    China      Asia  12237700
2    Japan      Asia   4872137
3  Germany    Europe   3677439
4       UK    Europe   2622434
So what did we do here?
We called the iloc[] using dot notation after the name of the Pandas DataFrame.
Inside of the iloc[] method, you see that we’re retrieving rows ‘1:5‘ and columns ‘0:3.’
This means that we want to retrieve rows 1 to 4 (remember, the “stop” index is excluded, so it will exclude 5). It is also saying that we want to retrieve the contents of columns from 0 through 2.
This has the effect of selecting the data in rows 1 through 4 and columns 0 through 2. The cells that get retrieved must meed both criteria.
Visually, we can represent the results like this:
![This image shows how to get a slice of cells with iloc using the code country_data_df.iloc[1:5,0:3].](https://www.sharpsightlabs.com/wp-content/uploads/2019/02/pandas-iloc-cell-slice.png)
Again, this is relatively easy to understand if you understand the basics of iloc and the basics of slices.
That being said, you have questions, leave your question in the comment section below.
Data manipulation is important, so master Pandas
I’m sure that you’ve heard it before: data manipulation is really important for data science.
I’ve said it before, and so have many other professional data scientists.
In fact, you’ll often here the quote that “80 percent of your work as a data scientist will be data manipulation.”
That’s probably pretty close to true. Data manipulation is really important.
If you want to learn data science in Python, that means that you should really know the Pandas module and how to retrieve data using methods like iloc.
Sign up for our email list to learn more about Pandas
Having said that, if you’re interested in learning more about Pandas and more about data science in Python, then sign up for our email list.
Here at Sharp Sight, we teach data science.
Every week, we post new tutorials about Python data science topics like:
- Pandas
- Matplotlib
- Sci-kit learn
- NumPy
- Seaborn
- Keras
We also publish data science tutorials for the R programming language.
When you sign up for our email list, you’ll get these tutorials delivered directly to your inbox every week.
If you want FREE data science tutorials every week, then sign up now.
When creating the dataframe from the dictionary, you did not to include the continent column. Thanks.
Fixed.
Thanks for details on Pandas. what is difference between .loc and .iloc in pandas. when should we use theses methods ? Thanks for reply
Shan
pandas.ilocsubsets based on the numeric index, whereaspandas.locsubsets based on the name of the column.For more info about
pandas.loc, check out this tutorial:https://www.sharpsightlabs.com/blog/pandas-loc/
Is there a way to do locate and extract the values of a cell but looking for the name of the column? I have datasets with the same information and label but in different columns. Thanks.
I solve it! I checked your tutorial about .loc …Thank you!
It looks like you already found the other tutorial, but for other readers, you can learn about subsetting based on column name here:
https://www.sharpsightlabs.com/blog/pandas-loc/
Subsetting dataframes by column name or row name is a little different, and it requires you to use the
pandas.loc[]technique instead ofpandas.iloc[]Thank you very much for good explanations of iloc in Pandas.
You’re welcome.