In this tutorial, I’ll show you how to use the Sklearn train_test_split function to split machine learning data into a training set and test set.
I’ll review what the function does, I’ll explain the syntax, and I’ll show an example of how to use it.
If you need something specific, just click on the appropriate link below. The link will take you to the specific section of the tutorial.
Table of Contents:
A Quick Introduction to Sklearn Train-Test Split
The Sklearn train_test_split function splits a dataset into training data and test data.
Let’s quickly review the machine learning process, so you understand why we do this.
Machine Learning Often Requires Training Data and Test Data
Machine learning algorithms are algorithms that improve their performance as we expose them to data.
So when we build a machine learning model, we commonly need to feed a dataset into a machine learning algorithm.

This dataset that we initially feed into a machine learning algorithm to “train” the algorithm, is typically called the training dataset. The training dataset is used exclusively as an input to help the algorithm “learn.”
But typically, we also have a so-called “test” dataset. We use the test dataset as an input to the model after the model has been built to “test” that the model works as needed.
So when we build a machine learning model, we usually need a training dataset and a test dataset.
Sklearn train_test_split splits a dataset
When we build machine learning models in Python, the Scikit Learn package gives us tools to perform common machine learning operations.
One such tool is the train_test_split function.
The Sklearn train_test_split function helps us create our training data and test data.
This is because typically, the training data and test data come from the same original dataset.
To get the data to build a model, we start with a single dataset, and then we split it into two datasets: train and test.
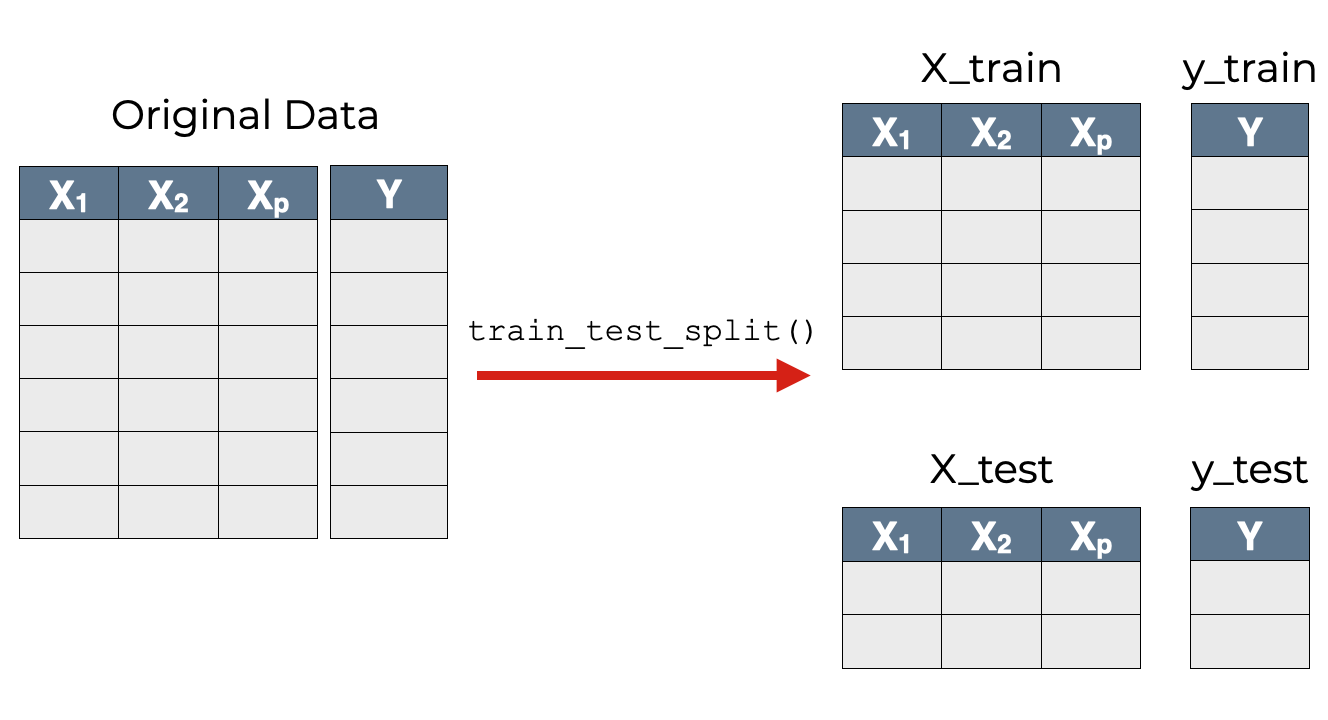
So the scikit learn train test split function enables us to split a dataset into training data and test data.
Having said that, how the function works depends on what data you give it as an input, and how use the optional parameters in the syntax.
That being the case, let’s look at the syntax.
The Syntax of the Sklearn train_test_split
Here, I’ll explain the syntax of the Scikit Learn train test split function.
Before we move on, remember that to use this function, you need to import it first. You can do that with the following code:
from sklearn.model_selection import train_test_split
train_test_split syntax
If we’ve imported the function as shown above, we call the function as train_test_split().
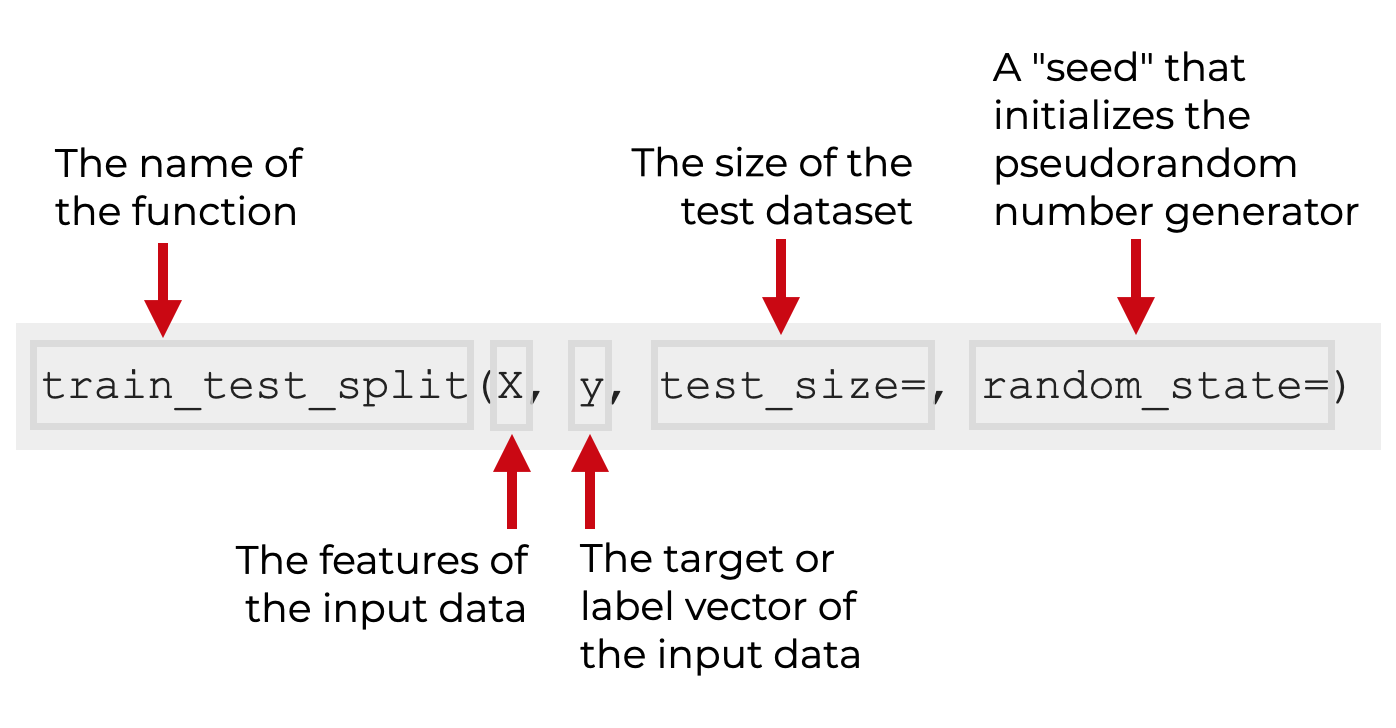
Inside the parenthesis, we’ll provide the name of the “X” input data as the first argument. This data should contain the feature data. Optionally, we can also provide the name of the “y” dataset that contains the label or target dataset (this is common when we use supervised learning).
Additionally, there are several and optional parameters that we can use to control exactly how the function.
Let’s look more closely at the arguments and parameters.
The parameters of train test split
The train/test split function has a few important inputs and parameters
Xytest_sizerandom_stateshufflestratify
Let’s look at each of these.
X (required)
The X argument is an input array that contains the feature data (i.e., the variables/columns you want to use to build your model.
This is typically a Numpy array, but the function will allow other structures like Python lists.
This object should be 2-dimensional, so if it’s a 1-dimensional Numpy array, you may need to reshape your data. This is commonly done with the code .reshape(-1,1).
y
The y argument typically contains the vector of target values (i.e., the target or label of your data).
This is typically a 1-dimensional Numpy array, although the function will allow 2D arrays and lists.
If it’s a 1-dimensional object, it should have the same length as the number of rows in X. Or if it’s 2D, it should have the same number of rows as X.
additional arrays
Although we commonly use train_test_split on one or two input arrays (X and y), technically, the function will operate on multiple arrays.
If you need to split many arrays, you can provide them in addition to X and y.
test_size
The test_size parameter enables you to specify the size of the output test set.
As an argument to this parameter, you can provide either an integer, or a float.
If the argument is an integer, the size of the test set will be equal to that number.
If the argument is a float, it must be between 0 and 1, and the number will represent the proportion of observations that will be in the test set. (Note: this is probably the most common way to use the parameter.)
random_state
The random_state parameter controls how the pseudo-random number generator randomly selects observations to go into the training set or test set.
If you provide an integer as the argument to this parameter, then train_test_split will shuffle the data in the same order prior to the split, every time you use the function with that same integer.
Effectively, if you provide an integer to this parameter, it will make your code exactly reproducible across every call of the function.
shuffle
The shuffle parameter controls whether the input dataset is randomly shuffled before being split into train and test data.
By default, this is set to shuffle = True. What that means, is that by default, the data are shuffled into random order before splitting, so the observations will be allocated to the training and test data randomly.
If you set shuffle = False, random sorting will be turned off, and the data will be split in the order the data are already in.
If you set shuffle = False, then you must set stratify = None.
stratify
The shuffle parameter controls if the data are split in a stratified fashion.
By default, this is set to stratify = None.
For more information on the stratify parameter, you can read this guide.
The format of the output
The output will be training and test datasets, where the observations of the input data have been allocated to the the training set and test set.
The output objects are Numpy arrays.
The number of outputs will be equal to 2 times the number of inputs. So if you only provide an X input to the function, there will be two outputs (X_train and X_test). If you provide an X and y input to the function, there will be four outputs (X_train, X_test, y_train, and y_test).
The format of the input data
One last note before we move on.
For most of the tools in Scikit learn, we need to have 2-dimensional feature data.
For example, when we use the Sklearn fit method or the Sklearn predict method, the X data needs to have a 2D structure.
That being the case, it’s often useful to have your X data structured in a 2D format before you put it in train_test_split. If you do this, then both your X_train and X_test will have the correct 2D structure, and the’ll be ready for other Sklearn tools.
Example: How to Use Sklearn train_test_split
Now that we’ve looked at the syntax of train_test_split, let’s look at some examples.
Examples:
- Simple data split (with default arguments)
- Create a split with a specific test size
- Use random_state to make a repeatable split
Run Setup Code
Before we use the train/test split function, we’ll need to run some setup code.
Specifically, we need to:
- import scikit-learn and other packages
- create a dataset
Let’s quickly do those.
Import Scikit Learn and other packages
First, we need to import Numpy, Seaborn, as well as train_test_split (from Scikit Learn).
from sklearn.model_selection import train_test_split
import numpy as np
import seaborn as sns
We obviously need the train_test_split function to split our data.
But we’ll also use Numpy and Seaborn. We’ll use Numpy to create a mock dataset, and we’ll use Seaborn to briefly plot the data.
Create Training Data
Next, let’s create a mock dataset that we can use.
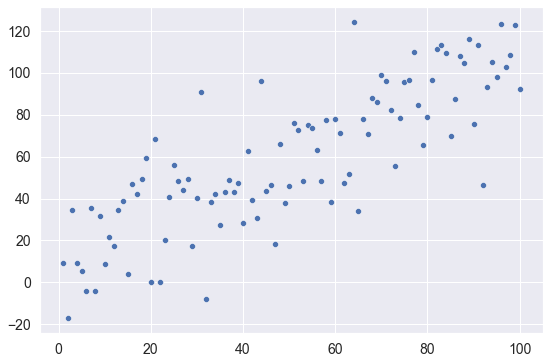
Here, we’re going to create a dataset with two variables. The variables will be linearly related, with a little random noise thrown in.
We’ll use Numpy linspace to create our x-axis variable. This variable will have 100 evenly distributed values from 1 to 99.
The y-axis variable will equal the x-axis variable, with a little random normal noise thrown in, generated with Numpy random normal.
Note that we’ll also use np.random.seed to set the seed for the random number generator.
observation_count = 100
x_var = np.linspace(start = 1, stop = 100, num = observation_count)

np.random.seed(22)
y_var = x_var + np.random.normal(size = observation_count, loc = 10, scale = 20)
Once you run the code, you’ll have two variables:
- x_var
- y_var
Let’s plot them with Seaborn:
sns.scatterplot(x = x_var, y = y_var)
OUT:
Reshape x variable
One last thing before we do the examples.
Typically, when we use Scikit Learn, the “X” data (i.e., the features) needs to be structured as a 2-dimensional array.
The x-variable that we just created, x_var, is 1-dimensional. This 1D format will work with train_test_split, but it will be a problem if you try to use it with other tools like sklearn fit and sklearn predict.
So here, we’ll reshape x_var to a 2D format.
x_var_2d = x_var.reshape(-1,1)
Now we have some data that we can split and use with Scikit Learn.
EXAMPLE 1: Simple data split, with default arguments
We’ll start with the simplest case.
Here, we’ll split our data with train_test_split(), with the default arguments.
The only inputs to the function will be x_var_2d and y_var.
(X_train, X_test, y_train, y_test) = train_test_split(x_var_2d, y_var)
Explanation
Notice that this code creates 4 output datasets:
X_trainX_testy_trainy_test
The original data had 100 observations, but these new datasets contain subsets of x_var_2d and y_var.
Specifically, X_test and y_test contain 25% of the original rows of x and y data, respectively. That’s because by default, train_test_split splits the data into 75% training data and 25% test data.
But, we can change that with the test_size parameter.
EXAMPLE 2: Create a split with a specific test size
Here, we’re going to create a train/test split, with a specific percent of observations in the test data.
To do this, we’re going to use the test_size = .2, which will allocate 20% of the observations to the test sets.
(X_train, X_test, y_train, y_test) = train_test_split(x_var_2d, y_var, test_size = .2)
Explanation
Once again, the Sklearn train_test split function has created 4 datasets: X_train, X_test, y_train, and y_test.
Remember that the original input data had 100 observations.
If we check the y_test dataset, we’ll see that it has 20 observations:
y_test.size
OUT:
20
This makes sense. We set test_size = .2, so 20% of the data (20 observations, out of 100) were allocated to the test set.
EXAMPLE 3: Use random_state to make a repeatable split
Finally, let’s create a train/test split that’s “repeatable.”
If you run the code from one of the previous examples, and then re run that code again, you’ll notice that the exact observations in the output datasets change.
That’s because train_test_split allocates rows of data to the output randomly. Therefore, every time you run train_test_split with the default settings, the output data will contain observations that are randomly selected from the input data.
Sometimes, that’s okay.
But, sometimes, we want our code to be exactly repeatable. So for example, for training and testing purposes (i.e., sharing code with a student or new colleague) we want the output to be the same, which makes it easier to validate that the code is working properly.
If you want to do this in Scikit Learn, then you want to have the same train/test split in your data.
To create such a repeatable train/test split, you can use random state:
(X_train, X_test, y_train, y_test) = train_test_split(x_var_2d, y_var, random_state = 22)
Explanation
Here, I’ve set random_state = 22.
I recommend that after running the code, you print out the observations in one of the data sets:
print(y_test)
OUT:
[ 34.63583358  46.12242594 113.13776798  -7.80060786  42.98140927
  34.75504429 104.59206851  30.84326284  92.33713696  87.52333107
  96.71044417  20.07852775 110.1999608   75.90678294  77.69534726
  90.98353281  63.28392045  42.04873081  73.64578603   9.1610016
  78.56890633  18.53540289  96.4100534   44.26118189  82.23007252]
So here we have the y values that are in y_test.
But now, run train_test_split again, with the same random state:
(X_train, X_test, y_train, y_test) = train_test_split(x_var_2d, y_var, random_state = 22)
print(y_test)
OUT:
[ 34.63583358  46.12242594 113.13776798  -7.80060786  42.98140927
  34.75504429 104.59206851  30.84326284  92.33713696  87.52333107
  96.71044417  20.07852775 110.1999608   75.90678294  77.69534726
  90.98353281  63.28392045  42.04873081  73.64578603   9.1610016
  78.56890633  18.53540289  96.4100534   44.26118189  82.23007252]
You’ll notice that if we run train_test_split with the same random state, we get the exact same observations in the output.
That’s because train_test_split is pseudorandom. It’s random-ish … but if we use the same value for random_state, it will produce the exact same output.
If you’re still confused about this, I recommend that you read our tutorial about Numpy random seed, which explains pseudorandom number generators in more depth.
Leave your other questions in the comments below
Do you have other questions about the Sklearn train_test_split method?
Is there something that I’ve missed?
If so, leave your questions in the comments section near the bottom of the page.
For more machine learning tutorials, sign up for our email list
In this tutorial, I’ve shown you how to use the Sklearn train-test split function.
But if you want to master machine learning in Python, there’s a lot more to learn.
That said, if you want to master scikit learn and machine learning in Python, then sign up for our email list.
When you sign up, you’ll get free tutorials on:
- Scikit learn
- Machine learning
- Deep learning
- … as well as tutorials about Numpy, Pandas, Seaborn, and more
We publish tutorials for FREE every week, and when you sign up for our email list, they’ll be delivered directly to your inbox.
Amazing explaining skills!
Many thanks.
Why didn’t you set the value of shuffle? Is there any difference if we set the value and if we don’t?
Shuffle is set to
shuffle = Trueby default.If we don’t manually set it or change it to
False, it automatically defaults toTrue, which shuffles the data before splitting.Understood. Thank you.
Hi i still don’t understand clearly what the random state doing and what the mining for example if i put random_State=0 what happend
thanks
random_statejust sets the seed for the random number generator, which in this case, determines howtrain_test_split()shuffles the data.Using
random_statemakes the results of our code reproducible.Additionally, the argument value that we use is somewhat arbitrary. It doesn’t really matter if you set
random_state = 0orrandom_state = 322310, or any other value. It’s just a way to set a seed for the random number generator, such that the code shuffles the data the same way.In order to really understand this, you need to understand random number generators and random “seeds.”
Read this tutorial and it will help you understand: https://www.sharpsightlabs.com/blog/numpy-random-seed/