In this tutorial, I’ll show you how to use the Sklearn Linear Regression function to create linear regression models in Python.
I’ll quickly review what linear regression is, explain the syntax of Sklearn LinearRegression, and I’ll show you step-by-step examples of how to use the technique.
If you need something specific, just click on any of the following links. The link will take you to the appropriate section in the tutorial.
Table of Contents:
A Quick Introduction to Linear Regression
To understand what the Sklearn linear regression function does, it helps to know what linear regression is generally.
Here, I’ll quickly explain what linear regression is, and then explain Sklearn Linear Regression.
Linear Regression is a type of Machine Learning Technique
Many machine learning tasks fall broadly into two groups: regression and classification.

Roughly speaking, in regression, we’re trying to predict numeric values.
Linear Regression is a Specific Style of Regression
There are many types of machine learning techniques that can solve regression tasks, including decision trees, K-Nearest Neighbor regression, and regression with neural networks.
But arguably the most common regression technique is linear regression.
In linear regression, we make the assumption that the data we’re working with fits a linear pattern.
More precisely, we assume that the data fit the equation:
(1) 
… where  is some random noise.
So with linear regression, we’re assuming that the output  is a linear function of the input variable X, and we fit a straight line to the training data.
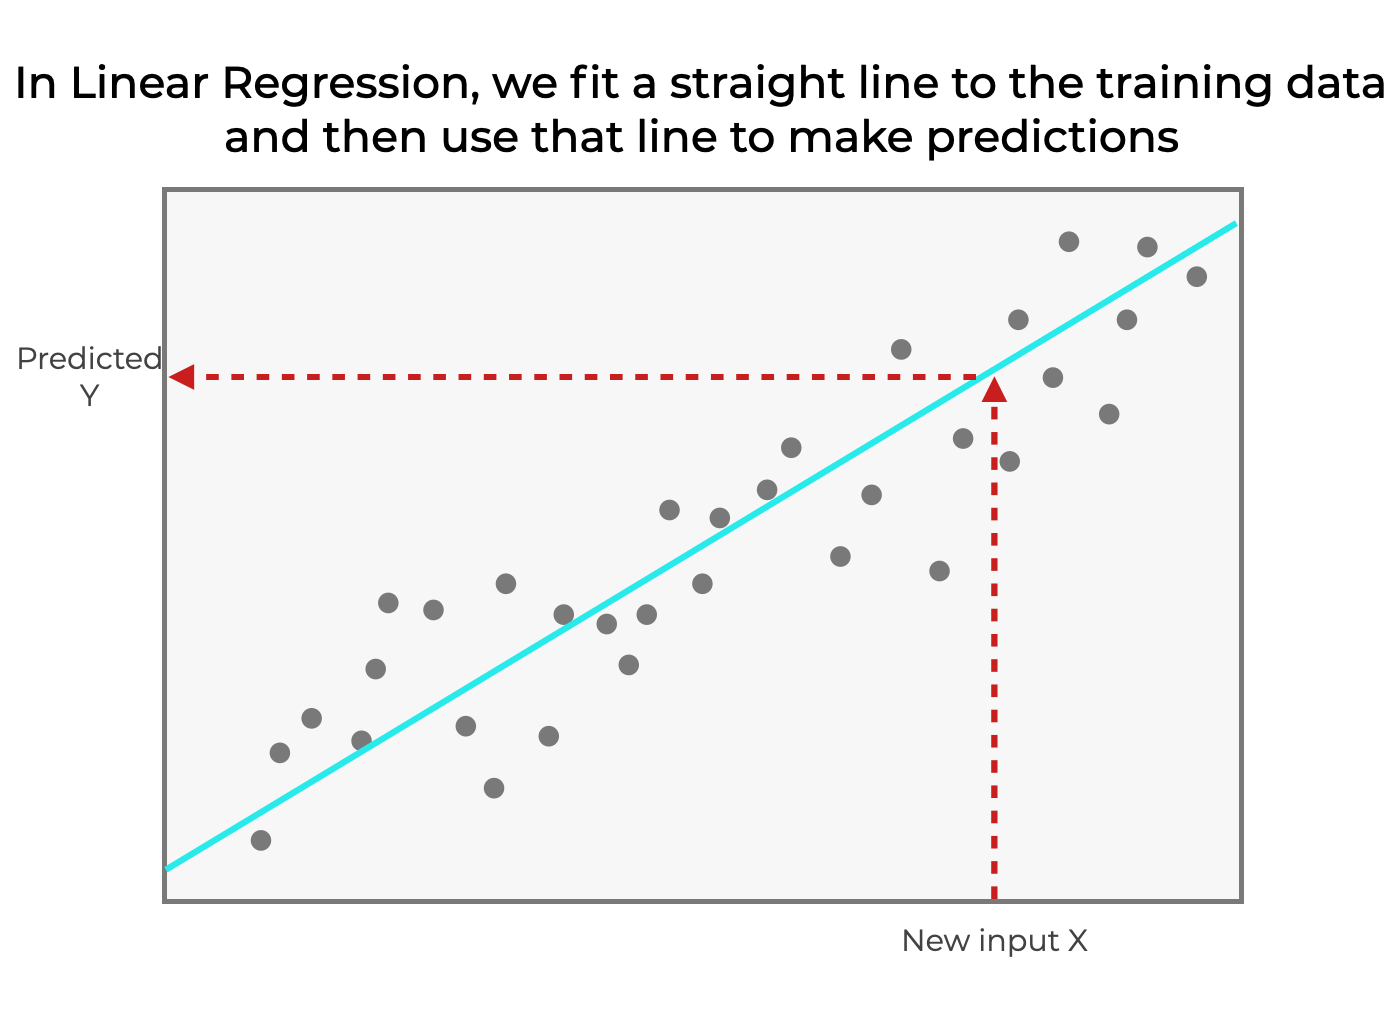
Then, we can use that straight line as a model to predict new values. If we plug in a new X value to the equation  , it produces an output y value,
(Note: this is the case of “simple” linear regression with one X variable. This generalizes to multiple X variables, in the case of multiple linear regression.)
Sklearn LinearRegression Builds Linear Regression Models in Python
Now, let’s bring this back to Scikit Learn.
The Sklearn LinearRegression function is a tool to build linear regression models in Python.
Using this function, we can train linear regression models, “score” the models, and make predictions with them.
The details, however, of how we use this function depend on the syntax.
Let’s take a look at the syntax.
The Syntax of the Sklearn Linear Regression Method
Now that we’ve reviewed what the Sklearn Liner Regression method does, let’s look at the syntax.
LinearRegression Steps
When we use the Scikit Learn LinearRegression function to create a linear regression model, there is typically multiple steps:
- initialize the model
- train the model with the training data
- make predictions
Now to be fair, this is sort of a simplified view of things. There are other things in the machine learning workflow that we might need to do, like scoring the model, using regularization, etc.
But at a high level, the steps above represent the workflow that you’ll use when you use Sklearn LinearRegression.
Initialize Sklearn LinearRegression
So the first step when using Sklearn LinearRegression is simply to initialize the model object.
To initialize the model, you first need to import it with the code:
from sklearn.linear_model import LinearRegression
Once the function has been imported, you can call the it as LinearRegression().
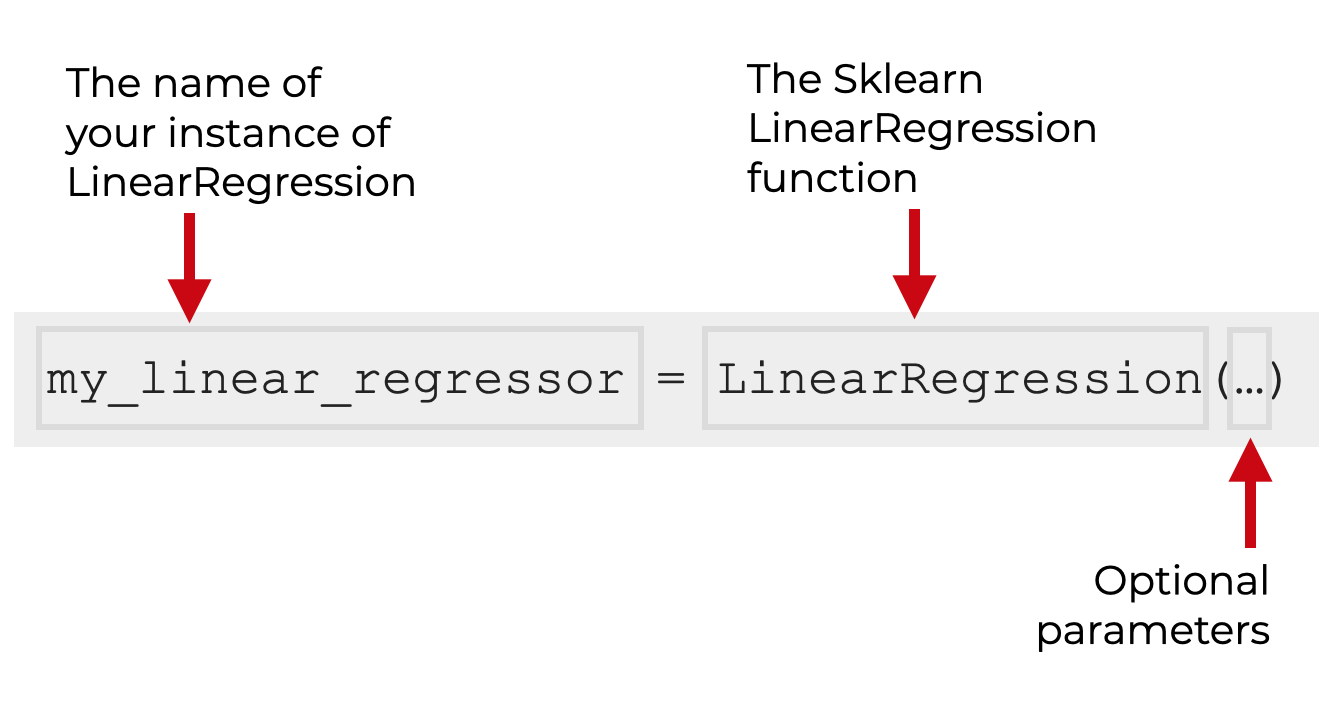
Inside the parenthesis, there are some optional parameters that you can use to modify how the function works. I’ll discuss these later.
When we call the function, we typically save the Sklearn model object with a name, just like we can save other Python objects with names, like integers or lists.
So in the above syntax, I’ve used the variable name my_linear_regressor to store the LinearRegression model object. But, you can use any name that you want, as long as it conforms to Python’s variable naming conventions.
Fit and Train Syntax
After we initialize the model, then we train the model with the training data, and then we can use it to make prediction:
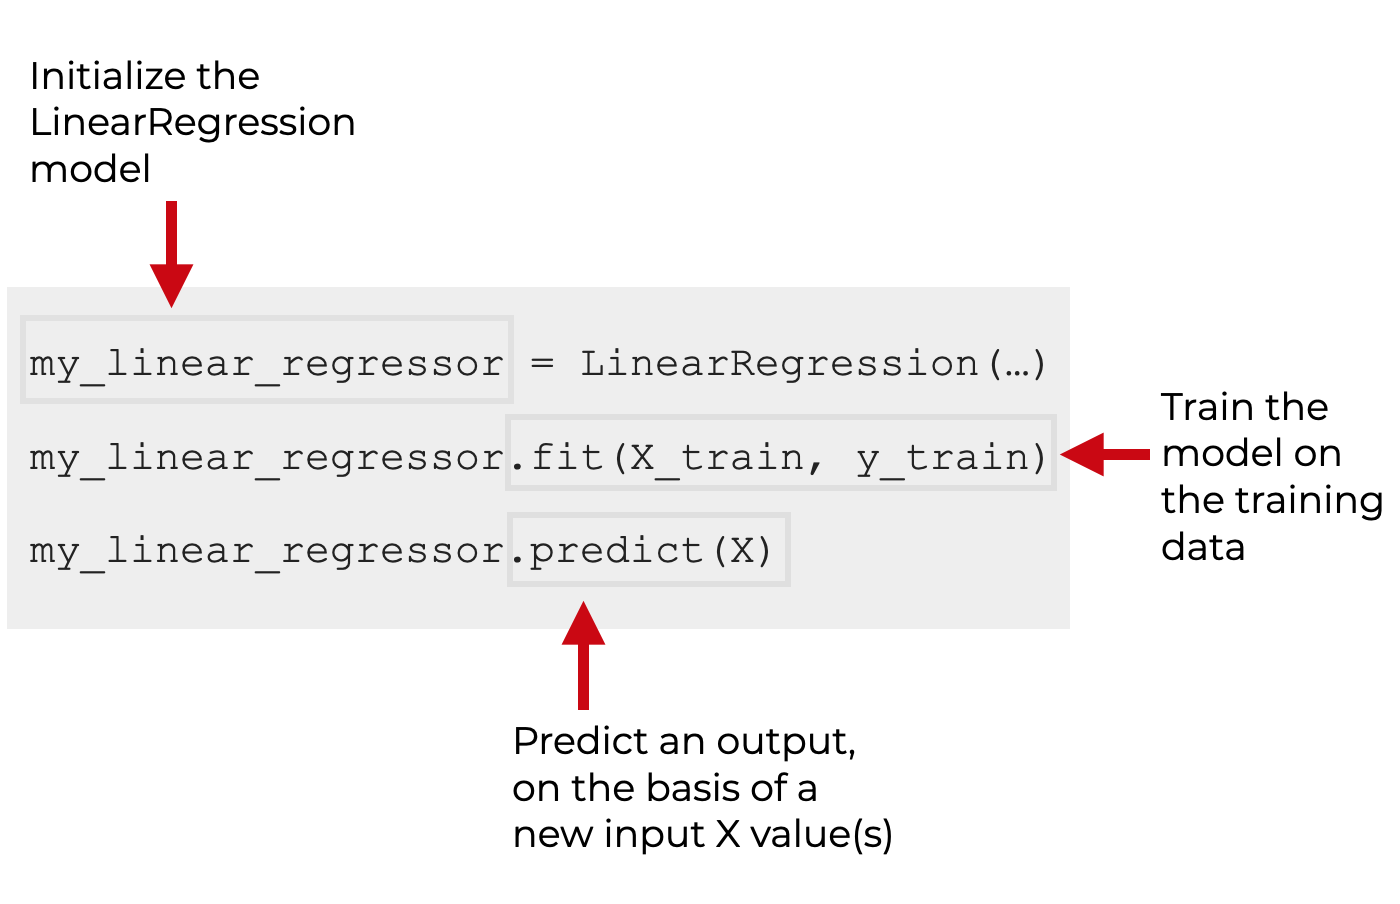
To learn more about training and predicting in machine learning, read our tutorials about the Sklearn Fit method and the Sklearn Predict method.
The parameters of Sklearn Linear Regression
Let’s quickly look at some of the optional parameters of the Sklearn Linear Regression function.
fit_interceptcopy_Xn_jobspositive
Let’s review each of these.
fit_intercept
The fit_intercept parameter specifies whether or not the model should fit a intercept for the model.
By default, this is set to fit_intercept = True.
If you set this parameter to fit_intercept = True, the data should be centered.
copy_X
The copy_X parameter specifies whether or not the X data should be copied as the model is built.
If you set copy_X = True, the X data will be copied. (This is the default.)
If you set copy_X = False, the X data may be overwritten.
n_jobs
The n_jobs parameter specifies the number of jobs to use for the computation, if you’re working with large datasets.
By default, this is set to n_jobs = None.
positive
The positive parameter specifies whether or not all of the fitted coefficients of the model must be positive.
By default, this is set to positive = False.
If you set positive = True, it will force all of the parameters to be positive.
(This parameter only works for dense arrays.)
Example: How to Use Sklearn Linear Regression to Build Linear a Regression Model in Python
Now that we’ve looked at the syntax of Sklearn Linear Regression, let’s look at an example of how to build a linear regression model with Scikit Learn.
I’ll try to show you a clear example, which will involve several steps.
Steps:
- Import necessary packages and functions
- Create dataset
- Initialize the model
- Fit the model
- Predict new values
Import Packages and Functions
Before you run the example code, you’ll need to import the functions and tools that we’ll use.
We’ll import Numpy, which will give us functions that we can use to create a numeric array for our training and test data.
We’ll import Seaborn, which will give us some data visualization tools to plot the data.
We’ll import the Scikit Learn LinearRegression function, which we’ll need to build the model itself.
And we’ll import train_test_split, we we’ll use to split our data into training data and test data.
import numpy as np
import seaborn as sns

from sklearn.linear_model import LinearRegression
from sklearn.model_selection import train_test_split
Create Data
Next, we’ll create a linear dataset that we can work with.
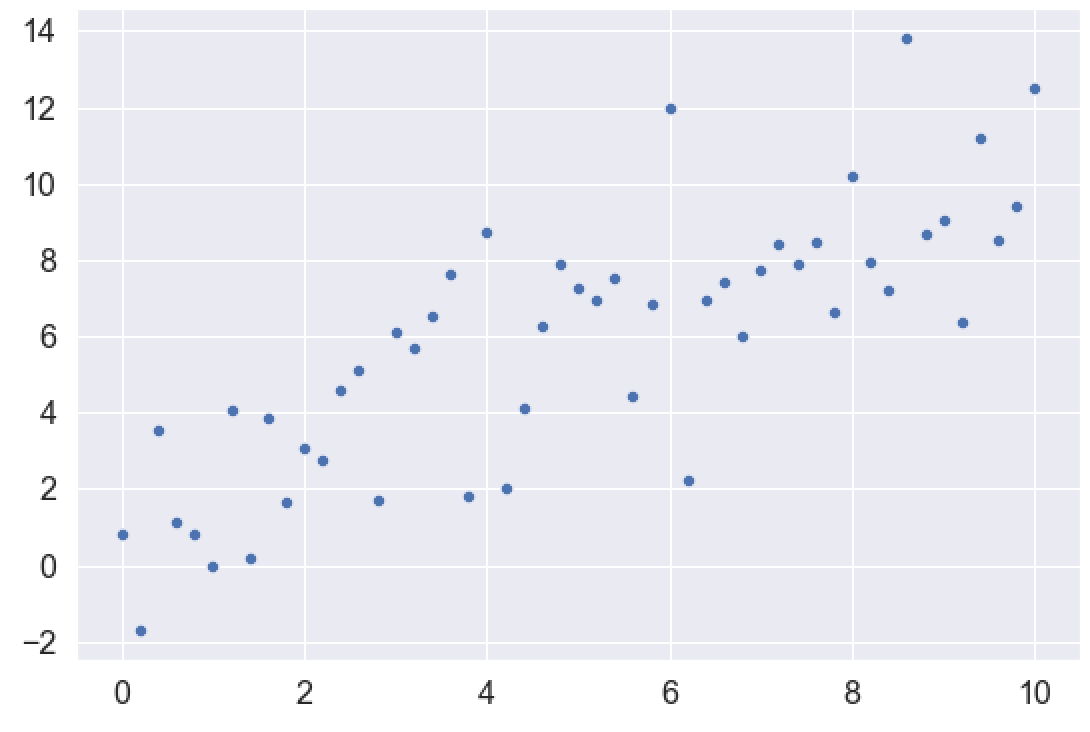
We’re going to create a dataset where the x and y variables are linearly related, with a little random noise built in.
Mathematically, we’ll create x and y such that:
(2) 
Where represents normally distributed noise.
To do this, we’ll use both Numpy linspace and Numpy random normal:
- With Numpy linspace, we’ll create an array of 51 evenly spaced numbers. This will be our “X” variable
- Then we’ll set
 , but add in some random normal noise with Numpy Random Normal.
We’ll call the two variables x_var and y_var.
observation_count = 51
x_var = np.linspace(start = 0, stop = 10, num = observation_count)

np.random.seed(22)
y_var = x_var + np.random.normal(size = observation_count, loc = 1, scale = 2)
Additionally, note that I’m using Numpy random seed to set the seed for the pseudo-random number generator, which is used by Numpy when we call np.random.normal.
Plot Data
Let’s plot the data with the sns.scatterplot function from Seaborn:
sns.scatterplot(x = x_var, y = y_var)
OUT:
Split data
Next, let’s split this data into training data and test data.
To split the data, we’ll use the Sklearn train-test split function.
from sklearn.model_selection import train_test_split
(X_train, X_test, y_train, y_test) = train_test_split(x_var.reshape(-1,1), y_var, test_size = .2)
Note that I’m also reshaping x_var to a 2-dimensional format using Numpy reshape, because the X data needs to be 2-dimensional when we use it in Scikit Learn fit and predict.
This data splitting operation gives us 4 datasets:
- training features (X_train)
- training target (y_train)
- test features (X_test)
- test target (y_test)
Initialize Model
Next, we’ll initialize the LinearRegression model.
from sklearn.linear_model import LinearRegression
linear_regressor = LinearRegression()
After you run this code, you will have initialized linear_regressor, which is an sklearn model object. From this object, we can call the fit method and other scikit learn methods.
Fit the Model
Let’s fit the model.
Here, we’ll fit the model on the training data, X_train and y_train.
linear_regressor.fit(X_train, y_train)
In this code, we’re using the Sklearn fit method to train the linear regression model on the training data.
Predict
Now that we have our linear regression model trained, we can use it to make some predictions.
We’ll use the model to predict new y values, on the basis of X values from the X_test set.
Let’s quickly do that:
linear_regressor.predict(X_test)
OUT:
array([ 4.08428825,  6.15948972, 10.49854733, 10.30989265,  5.02756165,
        2.57505083,  7.29141779,  2.00908679,  7.66872715,  3.32966954,
        3.89563358])
Here, the model is predicting output y values for each value of X_test.
Leave your other questions in the comments below
Do you have other questions about the Sklearn Linear Regression technique?
Is there something that I’ve missed?
If so, leave your questions in the comments section near the bottom of the page.
For more machine learning tutorials, sign up for our email list
In this tutorial, I’ve shown you how to use the sklearn LinearRegression method.
But if you want to master machine learning in Python, there’s a lot more to learn.
That said, if you want to master scikit learn and machine learning in Python, then sign up for our email list.
When you sign up, you’ll get free tutorials on:
- Scikit learn
- Machine learning
- Deep learning
- … as well as tutorials about Numpy, Pandas, Seaborn, and more
We publish tutorials for FREE every week, and when you sign up for our email list, they’ll be delivered directly to your inbox.
Thank you so much. It is really helpful guide to make an order in the ML procedures. Actually, you site is a best resourse for ML and DS learning.
Thank you for the complement.
Thank you for very simple step by step telling this story. I read alot info but your blog is awesome. I have to say, If you teach something, you are going to be number 1!
Let me say my problems: I understood every step until predict. I am expecting real comparison. Where is the real x (it must be new) and where is the prediction of the y, where is the line, where is the error values? And what does mean an error value?(Don’t say “y-yhat”, need comparison) May be you will tell answers in your course, but I expected in this page. Output array is meaningless for me without input. Thank you
I’m really not clear on what you’re asking.