In this tutorial, I’ll show you how to use the Sklearn Logistic Regression function to create logistic regression models in Python.
I’ll quickly review what logistic regression is, explain the syntax of Sklearn LogisticRegression, and I’ll show you a step-by-step example of how to use the technique.
If you need something specific, just click on any of the following links. The link will take you to the appropriate section in the tutorial.
Table of Contents:
A Quick Introduction to Logistic Regression
To understand what the Sklearn logistic regression function does, you should probably have a basic understanding of what logistic regression is, generally.
That being said, let’s quickly review what logistic regression is, and how it works.
Linear Regression is a type of Machine Learning Technique
Logistic regression is a type of machine learning technique.
Specifically, logistic regression is a type of classification algorithm.
Remember: classification is one of the primary “tasks” of machine learning.

In classification, we input a dataset and classify each row of data by adding a new “label”. So we can use classification to do things like:
- identify cars vs bikes (machine vision)
- identify spam vs not-spam
- predict pass vs fail
So in classification, the model produces a categorical prediction as an output. This is in contrast to regression, where the output is a real-valued number.
Logistic Regression is Type of Classification Technique
Logistic regression is a specific type of classification algorithm.
There are many algorithms and techniques that can solve classification tasks, like decision trees, support vector machines, and K-Nearest Neighbor classification. We can even use deep learning (i.e., neural networks) to perform classification.
But arguably, the simplest classification technique, and probably one of the most common, is logistic regression.
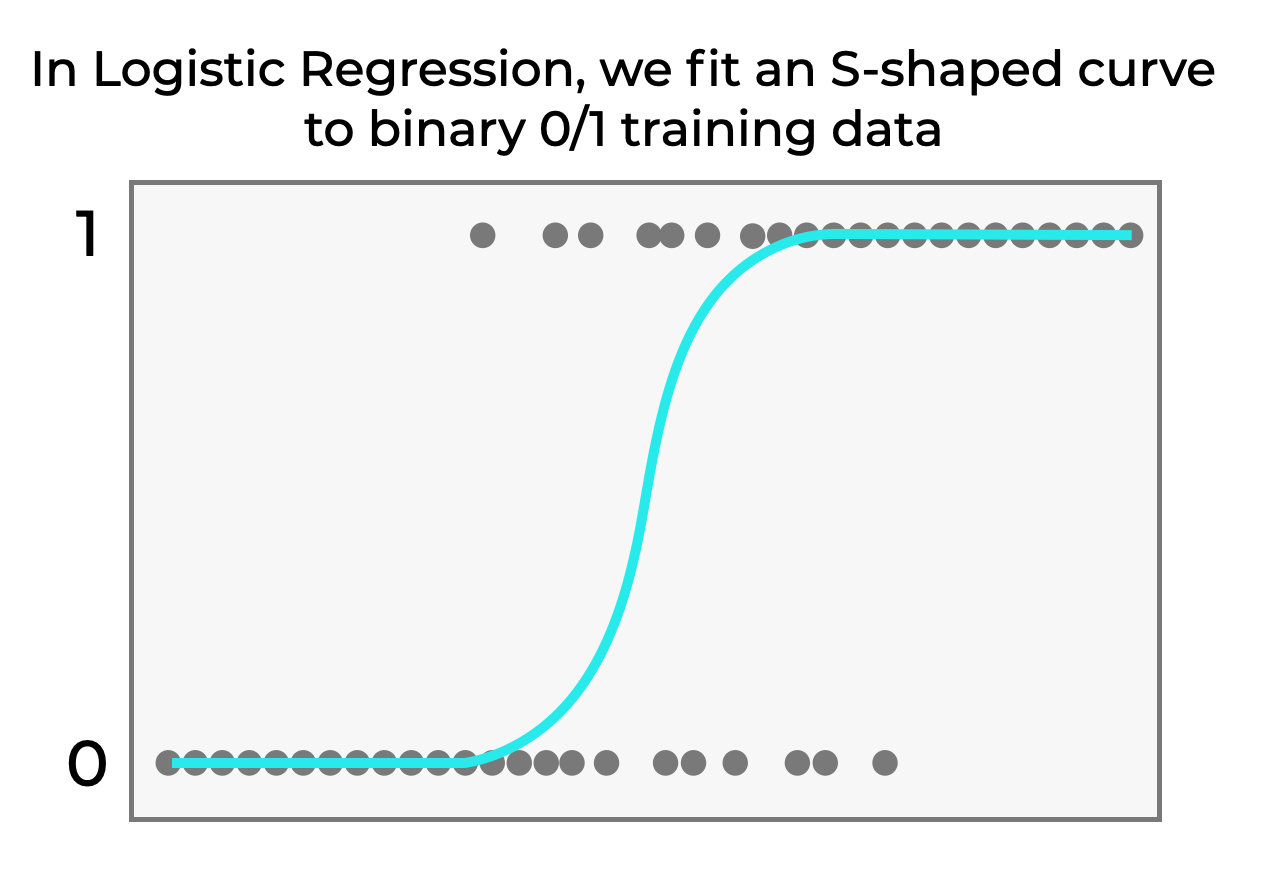
In Logistic Regression, We Fit an S-Shaped Curve to the Data
Logistic regression solves classification problems in a particular way.
Essentially, in logistic regression we fit an s-shaped curve to the training data.
Specifically, we fit a function to the training data of the form:
(1) 
The equation above is for a model with one X variable (feature), but it generalizes to multiple features.
So the function takes a real-valued input (X), but outputs a number between 0 and 1.
We can interpret the output of this function as a probability, and then produce an output prediction  as follows:
(2) 
So essentially, when we use logistic regression:
- we fit an s-shaped curve to the training data
- the s-shaped curve is a function of the input features
- the s-shaped curve outputs a “probability” between 0 and 1
- we classify the observation with a label/category, based on the computed probability
Sklearn LogisticRegression Builds Logistic Regression Models in Python
Now, let’s return to Scikit Learn.
The Sklearn LogisticRegression function builds logistic regression models in Python.
Using this function, we can train logistic regression models, “score” the accuracy of the model, and make “predictions”.
To do this though, you need to know the syntax.
The Syntax of the Sklearn Logistic Regression Method
Now that we’ve reviewed what the Sklearn Logistic Regression method does, let’s take a look at the syntax.
LogisticRegression Steps
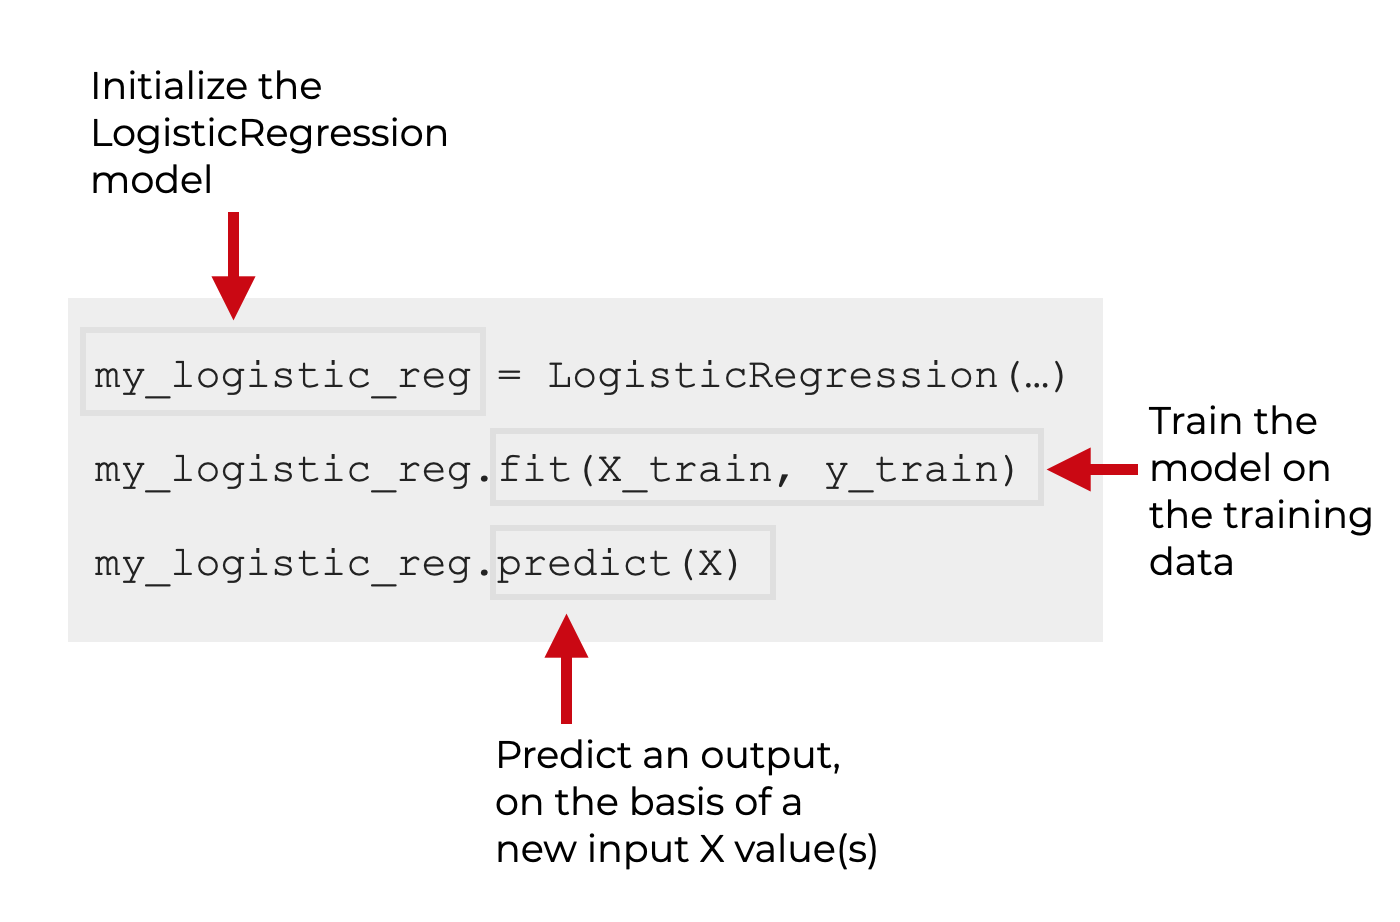
Using the Scikit Learn LogisticRegression function to create a logistic regression model typically involves several steps:
- initialize the model
- train the model with the training data
- make predictions
To be clear, I’m simplifying things slightly. The process for creating a machine learning model is often a little more complicated than this.
However, at a high level, the above steps are what you need to do when you build and use a logistic regression model. This is important, because the syntax that we use reflects those steps.
Initialize Sklearn LogisticRegression
When you build a logistic regression model in Python with Scikit Learn, the first step is to initialize the model.
Before we initialize the model, we first need to import the function from Scikit learn:
from sklearn.linear_model import LogisticRegression
After you import the function, you simply call it as LogisticRegression().
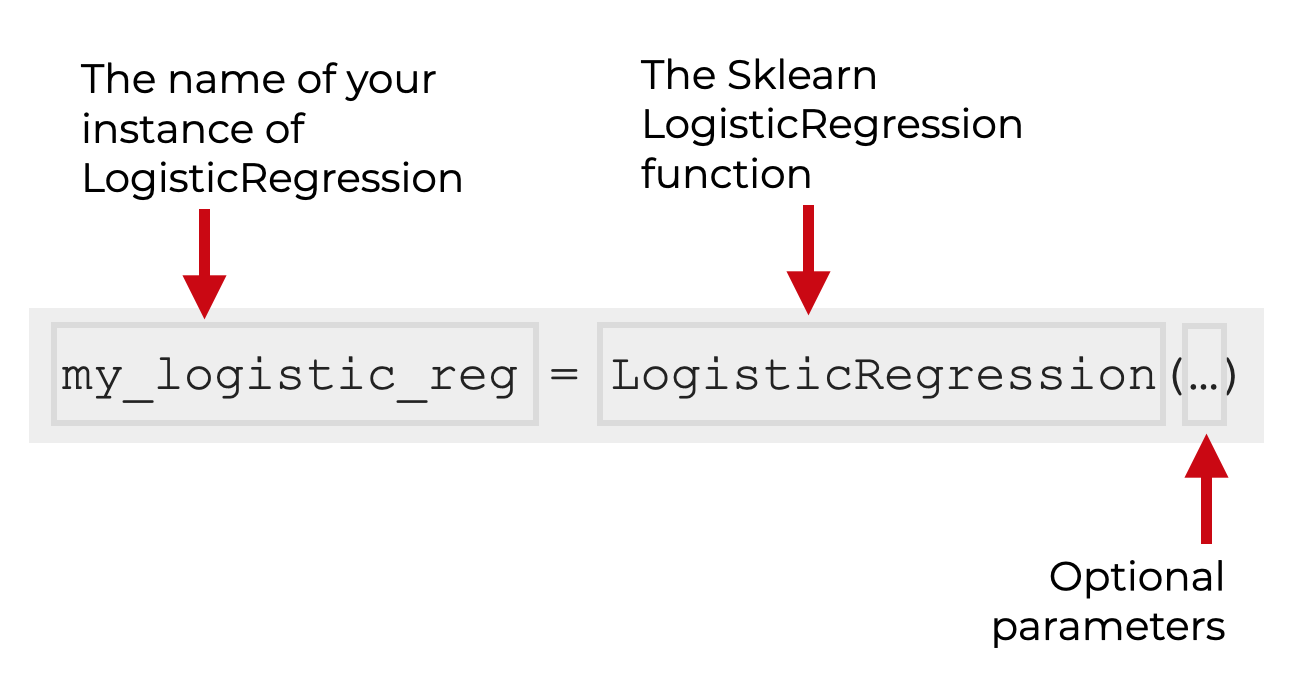
Inside the parenthesis, there are a few optional parameters that you can use to control how the function behaves. I’ll explain those in a section below.
When we call the LogisticRegression function, we commonly save the model object with a name. Just like when you create a list, or integer, or other Python object and store it with a variable name, you can also store a LogisticRegression object with a variable name.
In the above syntax example, I’ve stored the LogisticRegression object with the name my_logistic_reg. You can use any variable name to store the object, as long as it conforms to Pythons variable naming rules.
Fit and Train Syntax
Once we initialize the LogisticRegression object, we can train the model and also use the model to make predictions:
You can learn more about training models and predicting with them in our tutorials about Sklearn Fit and Sklearn Predict.
Sklearn LogisticRegression Parameters
The Sklearn Logistic regression function has several optional parameters:
penaltydualtolCfit_interceptintercept_scalingclass_weightrandom_statesolvermax_itermulti_classverbosewarm_startn_jobsl1_ratio
These are somewhat uncommonly used for beginners so we’re not going to discuss them here in detail.
(But, if you have a specific question about on of the Sklearn Logistic Regression parameters, leave your question in the comments section below. I may be able to answer your question.)
Example: How to Build a Logistic Regression Model in Python
Now that we’ve looked at the syntax for Sklearn LogisticRegression, let’s look at an example of how to build a logistic regression model in Python.
Here, I’ll show you a clear example which will involve several steps.
Steps:
- Import necessary packages and functions
- Create dataset
- Initialize the model
- Fit the model
- Predict new values
Import Packages and Functions
Before you run the example, you’ll need to import a couple of Python packages and you’ll need to import some tools from Scikit Learn.
Specifically, we’ll import Numpy and Seaborn. We’ll use Numpy to create and wrangle a numeric dataset that we can work with. And we’ll use Seaborn to plot the data.
We also need to import some tools from Scikit learn.
We need to import train_test_split to split our dataset into training data and test data.
import numpy as np
import seaborn as sns

from sklearn.linear_model import LogisticRegression
from sklearn.model_selection import train_test_split
Create Data
Now that we have our packages and functions loaded, let’s create a dataset that we can work with.
Here, we’re going to create a dataset with an x variable and a y variable.
The x variable will have values between -10 and 10.
The y variable will be a binary variable with values 0 or 1.
We’ll structure it so that values of x_var that are greater than 0 are likely to have a y value of 1. But, there will be a little noise in the data such that a few values where x_var is less than 0 will have a y value of 1 and visa versa.
observation_count = 201
x_var = np.linspace(start = -10
                    ,stop = 10
                    ,num = observation_count
                    )

np.random.seed(42)
noise_var = np.random.normal(size = observation_count
                             ,loc = 0
                             ,scale = 3
                             )

y_var = np.where(x_var + noise_var >= 0 , 1, 0)
Notice that we’re using Numpy linspace to create x_var.
We’re creating y_var using Numpy where, so that y_var equals 0 when x_var plus noise_var are greater than or equal to 0. The data in noise_var just just random normal “noise”, created with Numpy random normal and Numpy random seed.
Plot Data
Before we move on, let’s quickly plot the data using the Seaborn scatterplot function.
sns.scatterplot(x = x_var
                ,y = y_var
                ,hue = y_var
                )
OUT:
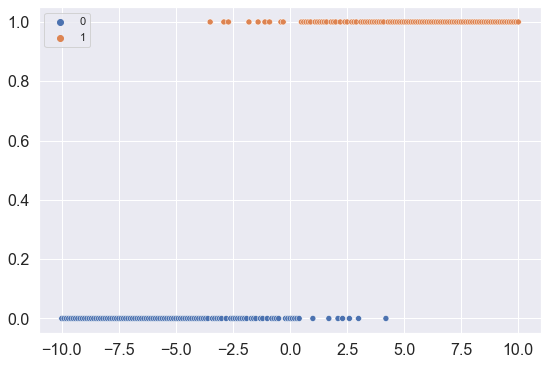
You’ll notice that:
- most of the values for x_var > 0 have a y_var value of 1
- most of the values for x_var < 0 have a y_var value of 0
So there’s a strong relationship between the binary response variable y_var, and the real-valued input, x_var.
We’ll be able to use Sklearn Logistic Regression to model that relationship.
Split data
Now, let’s split the data into training data and test data.
To split our data, we’ll use the train_test_split function from Scikit Learn.
from sklearn.model_selection import train_test_split
(X_train, X_test, y_train, y_test) = train_test_split(x_var.reshape(-1,1), y_var, test_size = .2)
Keep in mind that here, I’m reshaping x_var into a 2D shape before I split the data.
The reason for that, is because many Scikit learn tools (like Sklearn fit and Sklearn predict) require a 2-dimensional input for the “X” data.
After splitting, we have 4 datasets:
- training features (X_train)
- training target (y_train)
- test features (X_test)
- test target (y_test)
Initialize Model
Now, let’s initialize the LogisticRegression model:
from sklearn.linear_model import LogisticRegression
logistic_regressor = LogisticRegression()
Here, I’ve initialized a LogisticRegression object, and stored it with the name logistic_regressor. With this object, we’ll be able to train our model and make predictions.
Fit the Model
Now, we can train the model on the training data.
Here, we’ll use the “fit” method to train the model on the datasets X_train and y_train.
logistic_regressor.fit(X_train, y_train)
Predict
Now that the model is trained, we can make predictions with the model.
To do this, we’ll use the Sklearn predict method, and ask it to make new y predictions on the basis of new input values in X_test.
logistic_regressor.predict(X_test)
OUT:
array([0, 1, 0, 1, 1, 0, 1, 1, 0, 0, 0, 1, 1, 0, 1, 0, 0, 1, 0, 0, 0, 0,
       0, 1, 1, 0, 0, 1, 0, 1, 0, 1, 1, 0, 0, 0, 0, 0, 1, 0, 0])
Here, the 0/1 output values are predictions of y, based on any particular input value from X_test.
Leave your other questions in the comments below
Do you have other questions about the Sklearn Logistic Regression technique?
Is there something that I’ve missed?
If so, leave your questions in the comments section near the bottom of the page.
For more machine learning tutorials, sign up for our email list
In this tutorial, I’ve shown you how to use the Sklearn Logistic Regression method.
But if you want to master machine learning in Python, there’s a lot more to learn.
That said, if you want to master scikit learn and machine learning in Python, then sign up for our email list.
When you sign up, you’ll get free tutorials on:
- Scikit learn
- Machine learning
- Deep learning
- … as well as tutorials about Numpy, Pandas, Seaborn, and more
We publish tutorials for FREE every week, and when you sign up for our email list, they’ll be delivered directly to your inbox.
Hi Joshua,
Always love your content from day one when i had started taking your course on Python, Numpy, Pandas, Matplotlib and Seaborn.
is there any plan from your side to introduce the detail course on Machine Learning?
Hello Adil … yes, I’m currently working on a machine learning course that I’d like to launch by the end of 2023.